Configure Layer 2 Transport Protocol (L2TP) Server Settings on an RV34x Series Router
Available Languages
Objective
Layer 2 Tunneling Protocol (L2TP) establishes a Virtual Private Network (VPN) that allows remote hosts to connect to one another through a secure tunnel. It does not provide any encryption or confidentiality by itself but relies on an encryption protocol that it passes within the tunnel to provide privacy.
One of its biggest advantages of L2TP is that it encrypts the authentication process, which makes it more difficult for someone to "listen in" on your transmission to intercept and crack the data. L2TP does not only provide confidentiality but also data integrity. Data integrity is protection against modification of date between the time it left the sender and the time it reached the recipient.
This document aims to show you how to configure the L2TP Server settings on the RV34x Series Router.
Applicable Devices
- RV34x Series
Software Version
- 1.0.01.16
Configure L2TP
Step 1. Log in to the web-based utility of the router and choose VPN > L2TP Server.

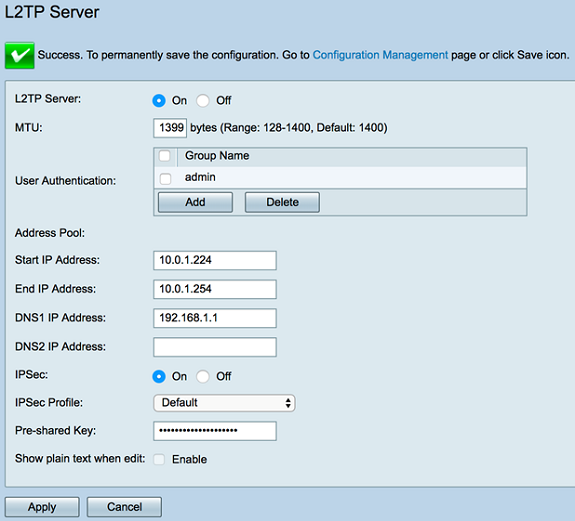
Step 2. Click the On L2TP Server radio button to enable the L2TP Server.

Step 3. Enter a number within the range of 128 to 1400 in the MTU field. The Maximum Transmission Unit (MTU) defines the largest size of packets that an interface can transmit without the need to fragment. The default is 1400.
Note: For this example, 1399 is used.

Step 4. In the User Authentication area, click Add for an additional set of choose a group profile where the users will be authenticated. The options depend on whether or not a group profile has been configured previously. The default options are:
- admin — Special set of privileges to read/write over settings
- guest — Read-only privileges
Note: For this example, admin is chosen.

Step 5. In the Start IP Address field, enter the starting IP address of the IP address range to be assigned to users. These are reserved IP addresses for L2TP users. A maximum of 25 sessions is supported.
Note: For this example, 10.0.1.224 is used.

Step 6. In the End IP Address field, enter the ending IP address of the IP address range.
Note: For this example, 10.0.1.254 is used.

Step 7. In the DNS1 IP Address field, enter the IP address of the DNS server.
Note: For this example, 192.168.1.1 is used.

Step 8. (Optional) In the DNS2 IP Address field, enter the IP address of the second DNS server. The default is blank.

Step 9. (Optional) Click the On IPSec radio button to enable the IPSec feature for L2TP. Internet Protocol Security (IPSec) provides security for transmission of sensitive information over unprotected networks.
Note: If you chose off, skip to Step 13.

Step 10. Choose a profile from the IPSec Profile drop-down menu. The options are:
- Amazon_Web_Services — A cloud service by Amazon provided by Amazon.
- Default — Default profile
- Microsoft_Azure — A cloud service provided by Microsoft.
Note: For this example, Microsoft_Azure is chosen.

Step 11. In the Pre-Shared Key field, enter a key used to authenticate to a remote Internet Key Exchange (IKE) peer. You can enter up 30 hexadecimal characters.
Note: Both ends of the VPN tunnel must use the same pre-shared key. It is recommended to update the key periodically to maximize VPN security.

Step 12. (Optional) Check the Enable Show plain text when edit check box to display the Pre-Shared Key in plain text.
Note: For this example, Show plain text when edit is enabled.

Step 13. Click Apply to save the settings.

Step 14. (Optional) To save the configuration to the startup configuration file, go to the Copy/Save Configuration page or click the  icon at the upper portion of the page.

You should now have successfully configured the L2TP server settings on the RV34x Series Router.
 Feedback