Configure Site-to-Site IPsec Virtual Private Network (VPN) on an RV132W or RV134W Router
Available Languages
Objective
Site-to-site Virtual Private Networks (VPNs) are implemented based on the IPsec policies that are assigned to the VPN topologies. An IPsec policy is a set of parameters that define the characteristics of the site-to-site VPN, such as the security protocols and algorithms that will be used to secure traffic in an IPsec tunnel.
The RV132W and the RV134W routers support site-to-site IPsec VPN for a single gateway-to-gateway VPN tunnel. After configuring the basic VPN settings, you can connect securely to another VPN-enabled router. For example, you can configure your device at a branch site to connect to a router that connects site-to-site VPN tunnels at the corporate site, so that the branch site has secure access to the corporate network.
This article aims to show you how to configure basic VPN settings for a site-to-site IPsec connection on your RV132W or RV134W router.
Applicable Devices
- RV132W
- RV134W
Software Version
- 1.0.0.17 — RV132W
- 1.0.0.21 — RV134W
Configure Site-to-Site IPSec VPN on a Router
Step 1. Log in to the web-based utility and choose VPN > Site-to-Site IPSec VPN > Basic VPN Setup.

Step 2. In the New Connection Name field, enter a name for the VPN tunnel. The name can contain letters, numbers and hyphens only.
Note: In this example, the name is Branch1.
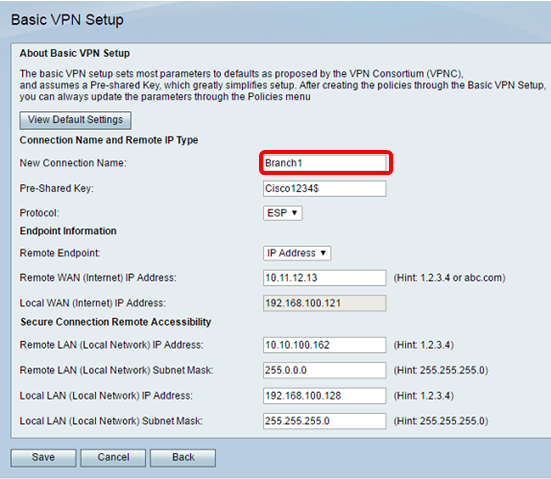
Step 3. In the Pre-Shared Key field, enter the pre-shared key or password, which will be exchanged between the two routers. The password must be between 8 and 49 characters.
Note: In this example, the pre-shared key is Cisco1234$.

Step 4. In the Protocol drop-down list, choose the protocol name. The options are:
- ESP — Encapsulating Security Payload (ESP) protocol provides origin authenticity, integrity, and confidentiality protection of packets.
- AH — Authentication Header (AH) protocol authenticates the origin of datagrams and guarantees the integrity of the data.
Note: In this example, ESP is chosen.

Step 5. Choose the Remote Endpoint from the drop-down menu. The options are:
- IP Address — This option will identify the router which your device will connect to with its IP address.
- FQDN —Fully Qualified Domain Name (FQDN) will identify the router which your device will connect to with its domain name.
Note: In this example, IP Address is chosen.
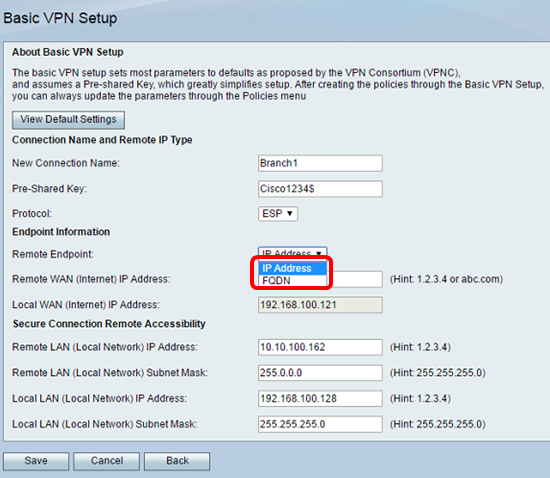
Step 6. Enter the remote WAN (Internet) IP address or FQDN in the Remote WAN (Internet) IP Address field.
Note: In this example, the Remote WAN (Internet) IP Address is 10.11.12.13.

Step 7. Verify that the source IP address in the Local WAN (Internet) IP Address field is correct. This is generated automatically.
Note: In this example, the Local WAN (Internet) IP Address is 192.168.100.121.
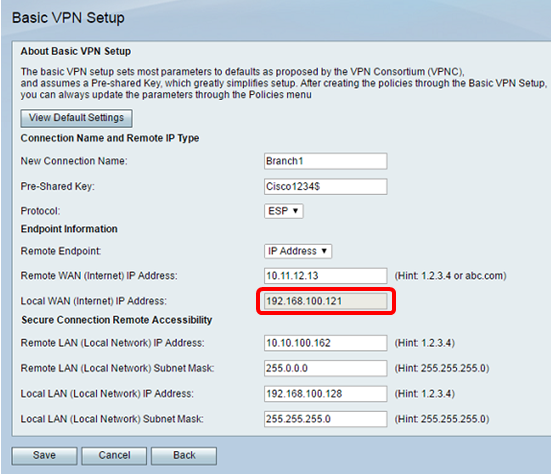
Step 8. Enter the private network (LAN) IP address of the remote endpoint in the Remote LAN (Local Network)IP Address field. This is the IP address of the internal network at the remote site.
Note: In this example, the Remote LAN (Local Network) IP Address is 10.10.100.162.

Step 9. Verify the private network (LAN) subnet mask of the remote endpoint in the Remote LAN (Internet) Subnet Mask field. This is generated automatically.
Note: In this example, the Remote LAN (Local Network) Subnet Mask is 255.0.0.0.
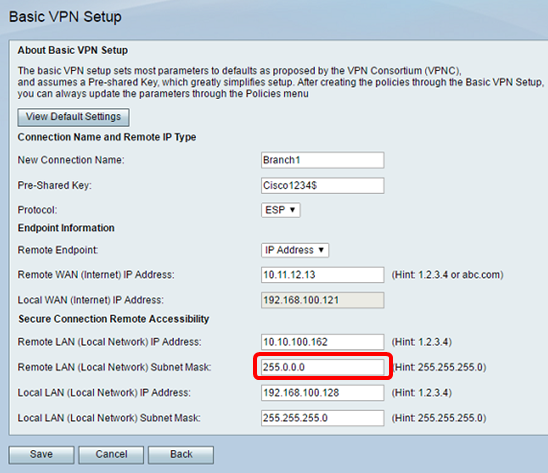
Step 10. Enter the private network (LAN) IP address of the local network in the Local LAN (Local Network)IP Address field. This is the IP address of the internal network on the device.
Note: In this example, the Local LAN (Local Network) IP Address is 192.168.100.128.
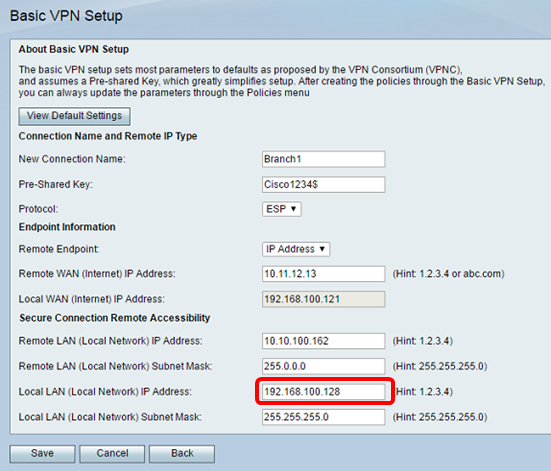
Step 11. Verify the private network (LAN) subnet mask of the local endpoint in the Local LAN (Local Network) Subnet Mask field. This is generated automatically.
Note: In this example, the Local LAN (Local Network) Subnet Mask is 255.255.255.0.

Note: The remote WAN and remote LAN IP addresses cannot be on the same subnet. For example, a remote LAN IP address of 192.168.1.100 and a local LAN IP address of 192.168.1.115 causes a conflict when traffic is routed over the VPN. The third octet must be different so that the IP addresses are on different subnets. For example, a remote LAN IP address of 192.168.1.199 and a local LAN IP address of 192.168.2.100 is acceptable.
Step 12. Click Save.
You should now have successfully configured site-to-site IPsec VPN on your RV132W or RV134W router.
 Feedback