Configure Power over Ethernet (PoE) Settings on the RV345P Router
Available Languages
Objective
Power over Ethernet (PoE) is a feature available on PoE-based devices, such as the RV345P, which delivers the electrical power to connected powered devices (PD) over the copper cables without the interference of the network traffic. The PoE Settings page in the web-based utility enables the selection of either the Port Limit or Class Limit PoE mode and specifies the PoE traps to be generated. When the PD actually connects and if it consumes power, it might consume much less than the maximum power allowed. Output power is disabled when power-on reboot, initialization, or system configuration occurs to ensure that the powered devices are not damaged.
The objective of this document is to provide the steps on how to configure the PoE settings on the RV345P Router.
Applicable Devices
- RV345P
Software Version
-
1.0.00.33
Configure Power over Ethernet
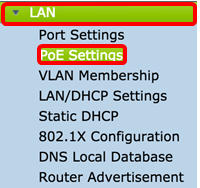
Step 1. Log in to the web-based utility and choose LAN > PoE Settings.
Step 2. Choose a Power Mode radio button. The options are:
- Port Limit — Choose this if you want to configure the port to operate at a specific wattage.
- Class Limit — The maximum power limit per port is determined by the class of the device, which results from the Classification stage. In this stage, the PD specifies its class, which is the amount of the maximum power that the PD consumes. To configure Class Limit, skip to Step 12.
Note: For this example, Port Limit was chosen.
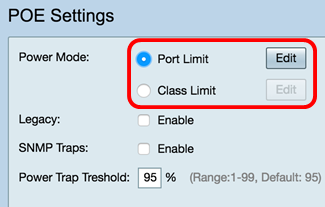
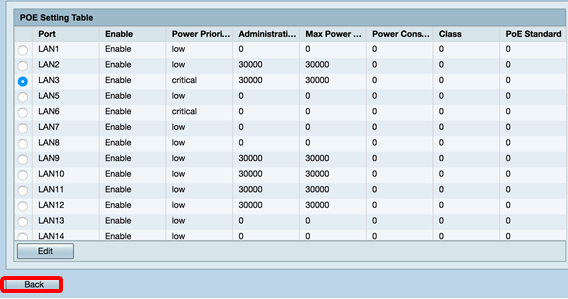
Step 3. Click Edit. You will be taken to the POE Setting Table.

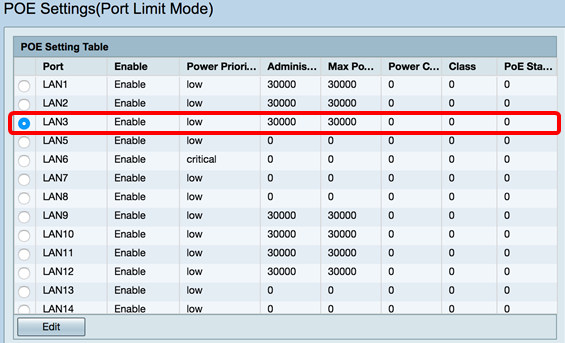
Step 4. Click the corresponding radio button of the LAN port you want to configure.
Note: For this example, LAN3 is chosen.
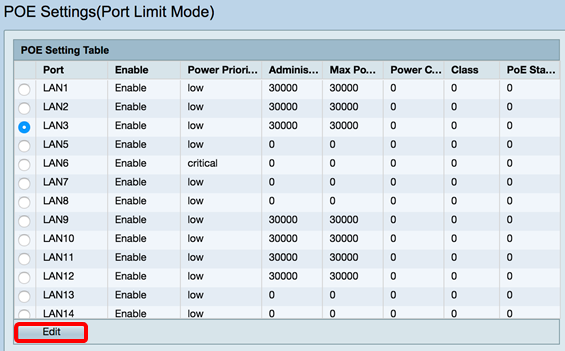
Step 5. Click Edit. The PoE Settings-Port Limit page opens.
Step 6. Check the PoE Enable check box to activate PoE. This is enabled by default.

Step 7. Click the radio button for the Power Priority Level. A port with a lower priority level may be denied power over a port with a higher priority level if power is limited. The options are Critical, High, and Low. The default is Low.
Note: For this example, Critical is used.
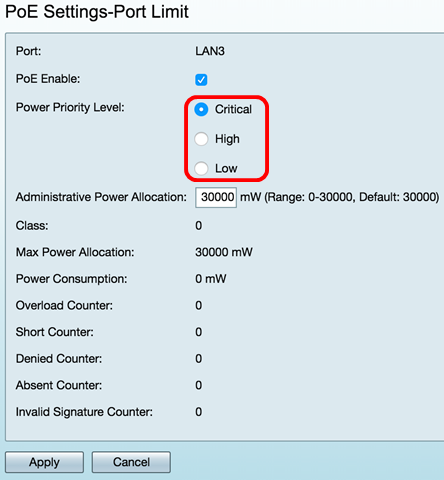
Step 8. In the AdministrativePower Allocation field, enter a value between 0 to 30000. This value indicates the power in milliwatts (mW) that is allocated to the port. The default is 30000.
Note: For this example, the default mW value of 30000 is used.

Note: The following areas in the page are counters.
- Class — Determines the power level that the end device can receive.
— Class 0 — 15.4 Watts of maximum power is delivered to the port. This is the default.
— Class 1 — 4.0 Watts of maximum power is delivered to the port.
— Class 2 — 7.0 Watts of maximum power is delivered to the port.
— Class 3 — 15.4 Watts of maximum power is delivered to the port.
— Class 4 — 30 Watts of maximum power is delivered to the port.
- Max Power Allocation — The maximum power allotted for the device.
- Power Consumption — The amount of power in milliwatts assigned to the powered device that is connected to the specified port.
- Overload Counter — The total number of power overload occurrences.
- Short Counter — The total number of power shortage occurrences.
- Denied Counter — The number of times the connected device was denied power.
- Absent Counter — The number of times the power was stopped to the connected device because the device was no longer detected.
- Invalid Signature Counter — The number of times an invalid signature was received from the connected device.

Step 9. Click Apply. You will be taken back to the POE Settings (Port Limit Mode) page.

Step 10. (Optional) To configure more ports under Port Limit, repeat Steps 4-9.

Step 11. Click on Back to return to the main POE Settings page. Then skip to Step 20.
Step 12. If you have chosen Class Limit in Step 2, click Edit and you will be taken to the POE Settings (Class Limit Mode) page.

Step 13. Click on the corresponding radio button of the LAN port you want to configure.
Note: For this example, LAN3 is chosen.

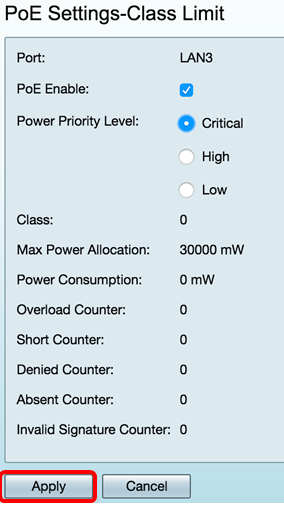
Step 14. Click Edit.

Step 15. Check the PoE Enable check box to activate PoE. This is enabled by default.

Step 16. Click the radio button for the Power Priority Level. A port with a lower priority level may be denied power over a port with a higher priority level if power is limited. The options are Critical, High, and Low. The default is Low.
Note: For this example, Critical is chosen.

Note: The following fields in the page are counters.
- Class — Determines the power level that the end device can receive.
— Class 0 — 15.4 Watts of maximum power is delivered by the port. This is the default.
— Class 1 — 4.0 Watts of maximum power is delivered by the port.
— Class 2 — 7.0 Watts of maximum power is delivered by the port.
— Class 3 — 15.4 Watts of maximum power is delivered by the port.
— Class 4 — 30 Watts of maximum power is delivered by the port.
- Max Power Allocation — Maximum amount of power that is allowed on the chosen port.
- Power Consumption — Amount of power in milliwatts that is assigned to the powered device connected to the port.
- Overload Counter — Number of times there has been a power overload.
- Short Counter — Number of times there has been a power shortage.
- Denied Counter — Number of times the powered device has been denied power.
- Absent Counter — Number of times power has stopped because the powered device was not detected.
- Invalid Signature Counter — Number of times an invalid signature was received.
Step 17. Click Apply. You will be taken back to the POE Settings (Class Limit Mode) page.
Step 18. (Optional) To configure more ports under Class Limit, repeat Steps 13-17.

Step 19. Click on Back to return to the main POE Settings page.

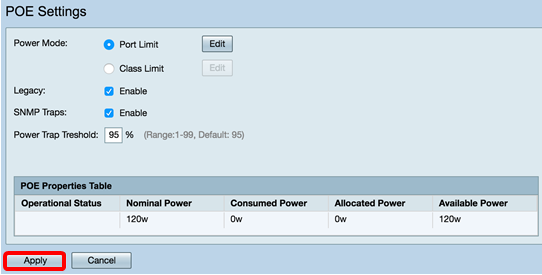
Step 20. Check the Enable Legacy check box to cater to old devices.

Step 21. Check the Enable SNMP Traps check box to allow Simple Network Transport Protocol to send trap notifications. If traps are enabled, you must also enable SNMP and configure at least one SNMP Notification Recipient.

Step 22. In the Power Trap Threshold field, enter the usage threshold that is a percentage of the power limit. An alarm is initiated if the power exceeds this value. The default value is 95.

Note: The PoE Properties Table displays the counters for each configured port.
- Operational Status — The operation status of the configured port.
- Nominal Power — The total amount of power the switch can supply to all the connected PDs.
- Consumed Power — Amount of power currently being consumed by the PoE ports.
- Allocated Power — Amount of power allocated for the port.
- Available Power — The nominal power (the amount of consumed power).

Step 23. Click Apply.
Step 24. (Optional) To save the configuration permanently, go to the Copy/Save Configuration page or click the  icon at the upper portion of the page.
You should now have successfully configured the PoE settings on your RV345P Router.
 Feedback