Configure IP Source Guard on the RV34x Series Router
Available Languages
Objective
When a router is not physically secured, the network is left in a vulnerable position. To prevent unauthorized access to the network by means of unplugging an Ethernet cable from a network device and plugging it back, it is important to register a list of allowed hosts to directly connect to the router with their respective IP and MAC addresses.
IP Source Guard allows an administrator to physically secure ports by binding IP addresses and MAC addresses.
The objective of this article is to show you how to configure the IP Source Guard on the RV34x Series Router.
Applicable Devices
- RV34x Series
Software Version
- 1.0.00.33
Configure IP Source Guard
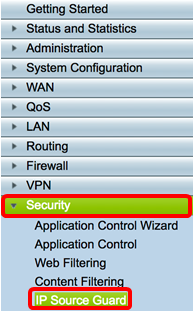
Step 1. Log in to the web-based utility and choose Security > IP Source Guard.

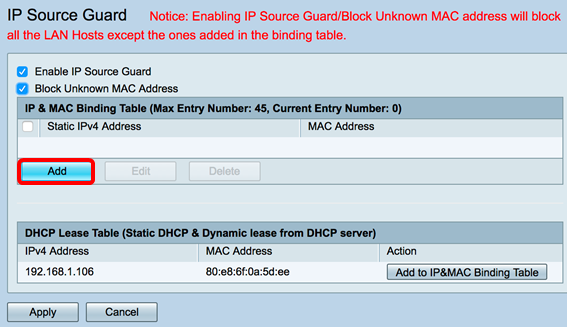
Step 2. Check the EnableIP Source Guard check box to enable the feature. This feature is disabled by default.
Note: A line of red text will appear in the IP Source Guard area panel to inform you that enabling IP Source Guard and Block Unknown MAC Address will block all the LAN hosts except the ones added in the binding table.

Step 3. (Optional) Check the Block Unknown MAC Address check box to block any hosts that attempt to connect to the network through a port. This feature is disabled by default.

Step 4. Click Apply.

Step 5. Under the IP & MAC Binding Table, click Add to create an entry to bind a statically assigned IP address and MAC address.
Note: A maximum of 45 entries can be created.

Step 6. In the Static IPv4 Address field, enter the statically assigned IP address of the host to be registered on the router.
Note: For this example, 192.168.1.122 is used.

Step 7. In the MAC Address field, enter the MAC address of the statically assigned host to bind.
Note: In this example, 80:e8:6f:0a:d5:aa is used.

Step 8. Click Apply.

Step 9. (Optional) To bind a host with a dynamically assigned IP address to its respective MAC address, click on the Add to IP&MAC Binding Table button in the DHCP Lease Table (Static DHCP & Dynamic lease from DHCP server).

Note: For this example, the dynamic host used has an IP of 192.168.1.106 with a MAC address of 80:e8:6f:0a:5d:ee. It will then appear in the IP & MAC Binding Table.

Step 10. Click Apply.

Step 11. (Optional) To save the configuration permanently, go to the Copy/Save Configuration page or click the  icon at the upper portion of the page.
You should now have successfully configured the IP Source Guard on the RV34x Series Router.
 Feedback