Configure System Log Settings on the RV34x Series Router
Available Languages
Objective
System events are activities that may require attention and necessary actions to be taken to run the system smoothly and prevent failures. These events are recorded as logs. System Logs enable the administrator to keep track of particular events that take place on the device.
Log settings define the logging rules and output destinations for messages, notifications, and other information as various events are recorded on the network. This feature notifies responsible personnel so that necessary action will be taken when an event occurs. Logs can also be sent to them via email alerts.
This article aims to show you how to configure the system log settings including the email server, and the remote server settings on the RV34x Series Router.
Applicable Devices
- RV34x Series
Software Version
- 1.0.01.14
Configure System Log Settings
Log Setting
Step 1. Log in to the web-based utility and choose System Configuration > Log.

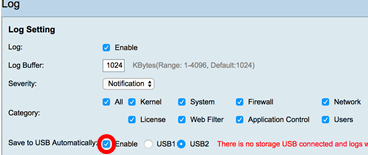
Step 2. In the Log Setting area, check the Enable check box for Log to receive updates about the network.

Step 3. In the Log Buffer field, enter the size in Kilobytes (KB) that the local buffer has for logs. The buffer size determines how many logs can be saved locally on the router. The range is from 1 to 4096. The default value is 1024.
Note: For this example, the value is left at the default.

Step 4. Choose an option from the Severity drop-down list. The severity chosen is inclusive of all the higher levels, so logs are kept for all severity levels from the top level down to the chosen level.
The options are:
- Emergency — Level 0; Message is logged if a device is down or unusable. The message is normally broadcasted to all processes.
- Alert — Level 1; Message is logged if there is a serious device malfunction, such as a case in which all device features stop working.
- Critical — Level 2; Message is logged if there is a critical device malfunction, such as two ports not functioning properly while the remaining ports work correctly.
- Error — Level 3; Message is logged if there is an error within a device such as a single port being offline.
- Warning — Level 4; Message is logged if a device is functioning properly but an operational problem occurs.
- Notification — Level 5; Message is logged if a device is functioning properly but a system notice occurs. This is the default.
- Information — Level 6; Message is logged if a condition that is not an error exists on the device but may require attention or special handling.
- Debugging — Level 7; Provides all detailed debugging information.
Note: For this example, the default is chosen.

Step 5. Check the applicable categories to receive updates and notifications. The options are:
- All — This option enables all options.
- Kernel — Logs involving the kernel code.
- System — Logs involving user-space applications such as Network Time Protocol (NTP), Session, and Dynamic Host Configuration Protocol (DHCP).
- Firewall — Logs triggered by firewall violations, rules, attacks, and content filtering.
- Network — Logs related to routing, DHCP, Wide Area Network (WAN), Local Area Network (LAN), and QoS.
- VPN — Virtual Private Network (VPN) related logs including instances like VPN tunnel establishment failure, VPN gateway failure, and so on.
- SSLVPN — Logs related to Secure Sockets Layer (SSL) VPN.
- License — Logs involving license violations.
- Web Filter — Logs related to events that triggered web filtering.
- Application Control — Logs related to Application Control.
- Users — Logs related to user activities.
- 3G/4G — Logs from the 3G/4G/USB dongles that are plugged into the router.
Note: In this example, All is chosen.

Step 6. (Optional) Check the Enable check box for Save to USB Automatically to save logs to a USB. This is disabled by default.
Note: If the router detects that a USB is not connected in order for this feature to be functional, a line of red text will appear beside the USB2 radio button stating that There is no storage USB connected and logs will be saved only after a valid storage device is connected.

Step 7. Choose a radio button of the USB port where the drive is connected.
Note: For this example, USB2 is chosen.

Email Server
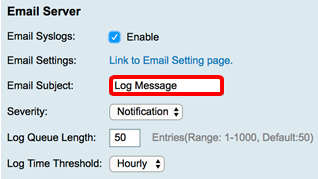
Step 8. Check the Enable check box for Email Syslogs to allow the router to send email alerts for specific network events or behavior that may impact performance, security, or for debugging purposes.

Step 9. To configure Email Settings, click Link to Email Setting page and click here for instructions on how to configure the email settings on the RV34x Series Router.

Step 10. In the Email Subject field, enter a subject for the email to be sent to the email address.
Note: For this example, Log Message is used.

Step 11. From the Severity drop-down list, choose a severity. The severity chosen is inclusive of all the higher levels, so logs are kept for all severity levels from the top level down to the chosen level. The options are Notification, Warning, Error, Critical, Alert, and Emergency.
Note: For this example, Notification is used.

Step 12. In the Log Queue Length field, enter the number of entries that must be made before the log is sent to the email recipient. The default is 50.
Note: For this example, the default is used.

Step 13. From the Log Time Threshold drop-down list, choose the interval at which the router sends the log to the email. The options are Hourly, Daily, and Weekly.
Note: For this example, Hourly is chosen.

Step 14. Check the check boxes of the events that will trigger a real time email alert. The options are as follows:
- All — Checks all the check boxes and enables the router to send real time alerts to the email.
- WAN Up — Alert sent to email about the WAN link is up.
- WAN Down — Alert sent to email about the WAN link going down.
- USB link Up — Alert sent to email about the USB link going up.
- USB link Down — Alert sent to email about the USB link going down.
- Failover/Recovery — Alert sent to email about the router going into recovery mode or the router has resorted to the 3G/4G USB dongle to connect to the Internet.
- System Startup — Alert sent to email about the router starting up.
- S2S VPN Down — Alert sent to email that the site-to-site VPN is up.
- S2S VPN Down — Alert sent to email that the site-to-site VPN is down.
- Unauthorized Login Attempt — Alert is sent to the email about an unauthorized login attempt on the router.
Note: For this example, All is checked.

Remote Syslog Servers
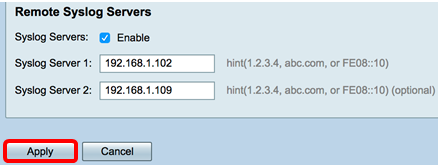
Step 15. Check the Enable check box for Syslog Servers.

Step 16. In the Syslog Server 1 field, enter the IP address of the remote syslog server where the logged events will be stored.
Note: For this example, 192.168.1.102 is used as the remote syslog server address.

Step 17. (Optional) In the Syslog Server 2 field, enter the backup IP address of the remote syslog server.
Note: In this example, 192.168.1.109 is used.

Step 18. Click Apply.

Step 19. (Optional) To save the configuration permanently, go to the Copy/Save Configuration page or click the  icon at the upper portion of the page.
You should now have successfully configured the system log settings on the RV34x Series Router.
 Feedback