Configuration of an IPv4 Access Rule on RV016, RV042, RV042G, and RV082 VPN Routers
Available Languages
Objective
An access rule helps the router to determine, based on the user requirement, what traffic is allowed to pass and which traffic is to be denied through the firewall. This helps add security to the router.
This document explains the procedure to add or delete an access rule on the RV016, RV042, RV042G, and RV082 VPN Routers.
Applicable Devices
• RV016
• RV042
• RV042G
• RV082
Software Version
• 4.2.1.02
Manage IPv4 Access Rules
Scheduling IPv4 Access Rules is an optional configuration.
Add or Delete IPv4 Access Rules
Step 1. Log in to the web configuration utility and choose Firewall > Access Rules. The IPv4 Access Rules page opens. Click Add.

Step 2. The Access Rules Service page opens. In the Action drop-down list, choose Allow to allow the traffic. Otherwise, choose Deny to deny the traffic.

Step 3. Choose the appropriate service from the Service drop-down list. If the appropriate service is not available, click Service Management.
Note: If the desired service is available, skip to Step 6.

Step 4. A new window appears. Enter a service name in the Service Name field.
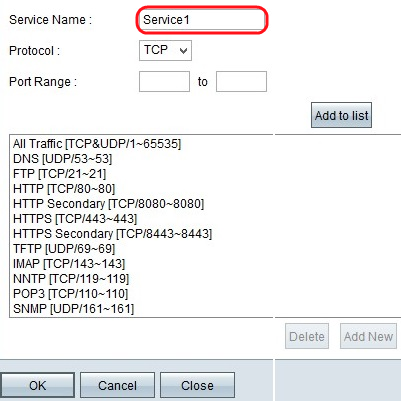
Step 5. Choose the appropriate protocol type from the Protocol drop-down list.
• TCP (Transmission Control Protocol) — A transport layer protocol used by applications that require guaranteed delivery.
• UDP (User Datagram Protocol) — Uses datagram sockets to establish host to host communications. It is faster than TCP but not as likely to deliver successfully.
• IPv6 (Internet Protocol version 6) — Directs Internet traffic between hosts in packets that are routed across networks specified by routing addresses.

Step 6. Enter the port range in the Port Range fields. This range depends on the protocol chosen.
Click Add to List. This adds the Service to the Service drop-down list.
Other options here include Delete, Update, or Add New.
Click OK. This closes the window and takes the user back to the Access Rule Service page.

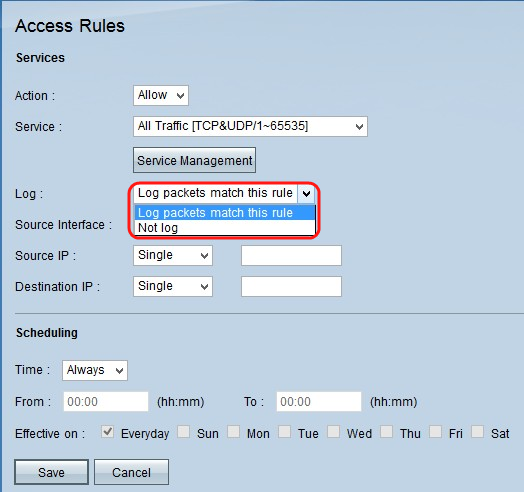
Step 7. In the Log drop-down list, choose Log packets match this rule to log the incoming packets that match the access rule. Otherwise, choose Not Log.
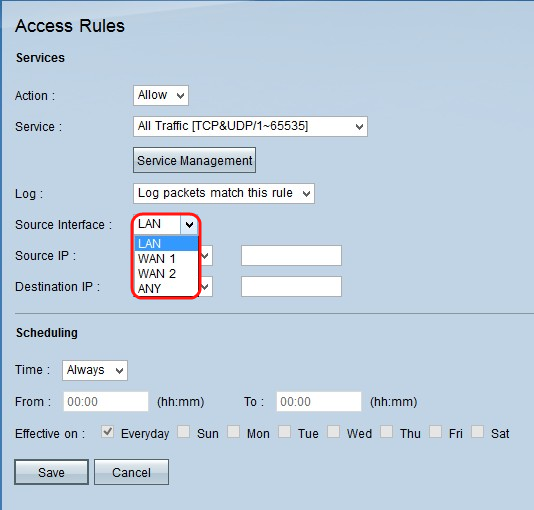
Step 8. Choose the interface that is affected by this rule from the Source Interface drop-down list. The source interface is the interface from which the traffic is initiated.
• LAN — The local area network of the router.
• WAN1 — The wide area network or the network from which router gets internet from the ISP or next hop router.
• WAN2 — The same as WAN1 except that it is a secondary network.
• ANY — Allows any interface to be used.
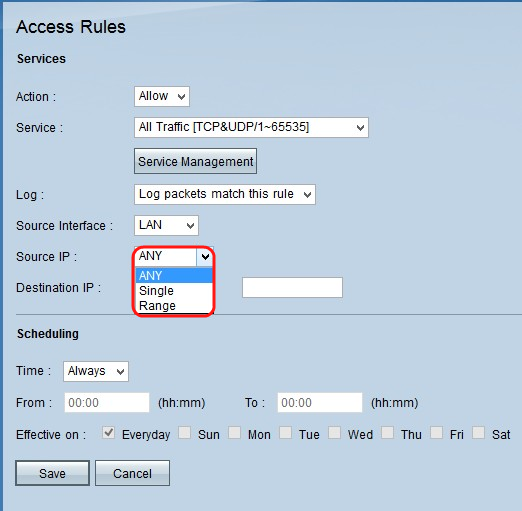
Step 9. In the Source IP drop-down list, choose an option to specify the range of source IP addresses that are to be allowed or denied by the interface. Packets that arrive on the interface are verified by the source IP and destination IP.
• Any — Access rule will be applied on all the traffic from the source interface. There wont be any fields to the right of the drop-down list available.
• Single — Access rule will be applied on a single IP address from the source interface. Enter the desired IP address in the address field.
• Range — Access rule will be applied on a subnet network from the source interface. Enter the IP address and the prefix length.
Step 9. In the Destination drop-down list, choose an option to specify the range of destination addresses that are to be allowed or denied by the interface. Packets that arrive on the interface are verified by the source IP and destination IP.
• Any — Access rule will be applied on all the traffic to the destination interface. There wont be any fields to the right of the drop-down list available.
• Single — Access rule will be applied on a single IP address to the destination interface. Enter the desired IP address in the address field.
• Range — Access rule will be applied on a subnet network to the destination interface. Enter the IP address and the prefix length.
Click Save to save all changes made on the access rule. A confirmation windows appears that provides the status of changes made on the device.

Step 10. Click OK to add another access rule. Click Cancel to return the Access Rules page.

Step 11 (Optional). Choose the desired access rule from the list and then click Edit button to edit the access rule configuration.

Step 12 (Optional). Choose the desired access rules from the list and then click Delete button to delete the access rule from the access rules list.

Schedule IPv4 Access Rules
Scheduling of access rules helps to specify a schedule when these access rules are active in terms of day and time. It only works with IPv4.
Step 1. Use the web configuration utility and choose Firewall > Access Rules. The IPv4 Access Rules page opens:
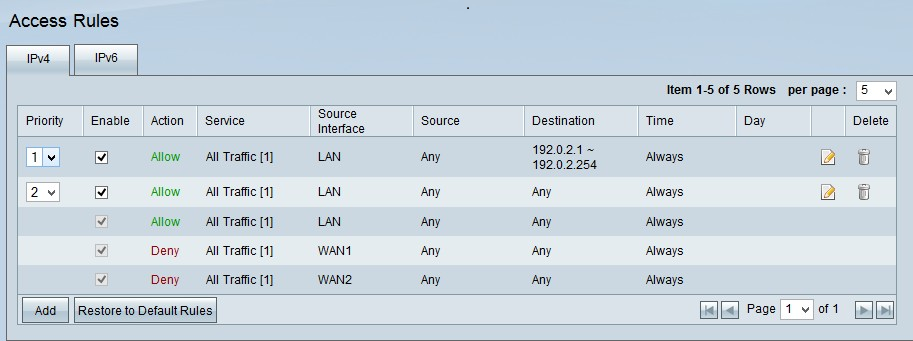
Step 2. Choose the access rule from the table and click the Edit icon to add the scheduling feature to that access rule.
Note: You can also add the scheduling feature when you add a new access rule.

Step 3. Choose the time from the Time drop-down list. It specifies when to use the scheduling.
• Always — Access rule applies at all times and on all days of the week. It is chosen by default. If you choose this option, click Save and skip to step 6.
• Interval — Based on the user given time interval the access rule is applied.
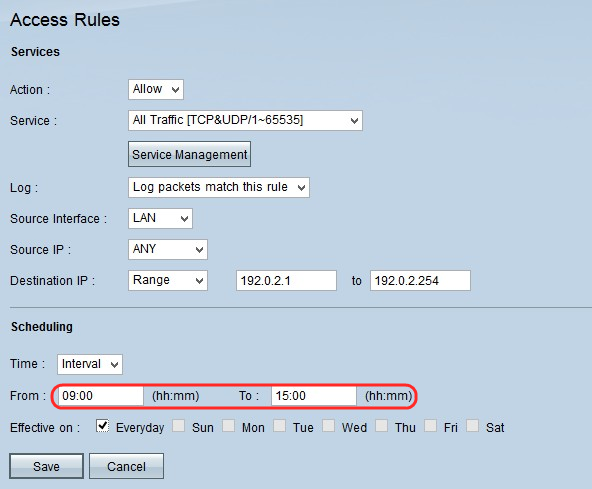
Step 4. Enter the time interval in 24 hours format during which the access rule is applied in the From and To fields.

Step 5. Check the check boxes next to the days you want to apply the access rule. The access rule will be effective only on the checked days. By default, Everyday is chosen.
Click Save to save all changes made on the access rule. Confirmation windows appears which provides the status of changes made on the device.

Step 6. Click OK to add another access rule. Click Cancel to return the access rule page.

Conclusion
You have now set up IPv4 access rules on your RV016, RV042, RV042G,or RV082 VPN Router.
If you would like to access all support for these routers, check out the product page by clicking here.
Revision History
| Revision | Publish Date | Comments |
|---|---|---|
1.0 |
10-Dec-2018 |
Initial Release |
 Feedback