One-to-One Network Address Translation (NAT) on RV130 and RV130W VPN Routers
Available Languages
For a video showing how to configure One-to-One NAT, visit https://youtu.be/azt7b8hMXHs
Objective
One-to-one Network Address Translation (NAT) maps local IP addresses behind your firewall to global IP addresses. By allowing systems configured with private IP addresses behind a firewall to appear to have public IP addresses, they can become visible to external networks and available for inbound connections.
The objective of this document is to explain how to configure One-to-One NAT on the RV130 and RV130W Router.
Applicable Devices
• RV130
• RV130W
Software Version
• v1.0.1.3
Create One-to-One NAT
Adding a New One-to-One NAT Rule
Step 1. Log into the web configuration utility and choose Firewall > One-to-One NAT. The One-to-One NAT page opens:

Step 2. Click Add Row to add a new One-To-One NAT rule.

Step 3. In the Private Range Begin field, enter the starting IP address of the private (LAN) IP address range that you want to be available to public networks.

Note: Note: The LAN IP address of the router should not be included in the range you specify.
Step 4. In the Public Range Begin field, enter the starting IP address of the public (WAN) IP address range. This IP address is usually provided by your Internet Service Provider. The first public IP address you enter will be matched with the first private IP address you entered, the second public IP address will be paired with the second private IP address, and so on.

Note: The WAN IP address of the router should not be included in the range you specify.
Step 5. In the Range Length field, enter the number of public IP addresses that should be mapped to private addresses, given the private and public beginning ranges previously entered. The range length cannot exceed the number of valid IP addresses. To map a single address, enter “1”.

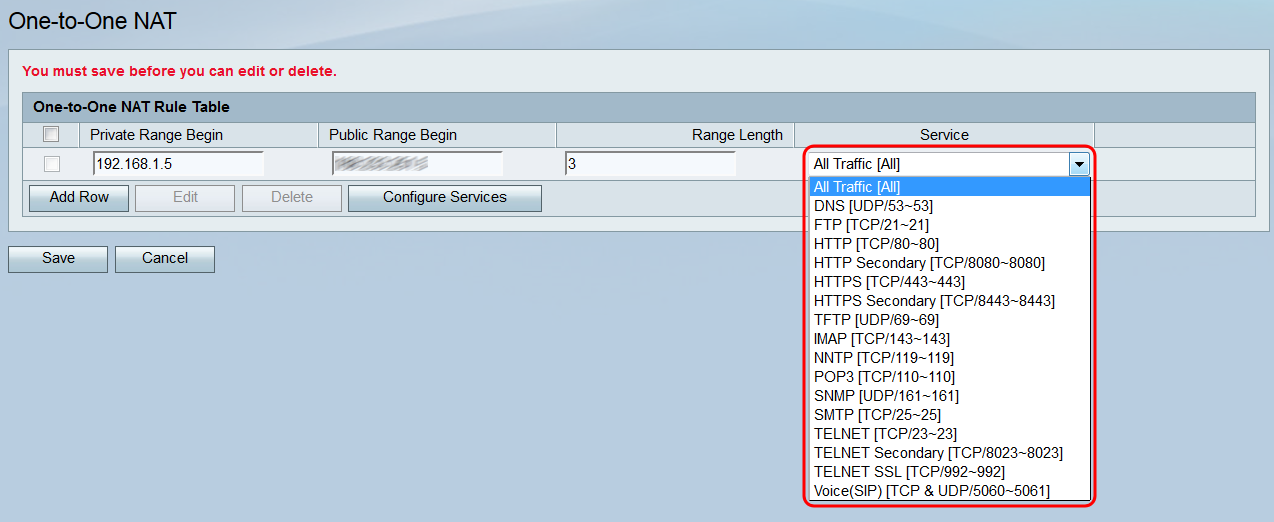
Step 6. In the Service drop-down list, choose which service will be accepted by the private IP (LAN) address when traffic is sent to the corresponding public IP address.

Note: If you want to change the services available in this field, click the Configure Services button to open the Service Management page. For more information, refer to the article Service Management on the RV130 and RV130W.
Step 7. Click Save to save your configuration for your one-to-one NAT rule.

Note: A maximum of ten rules can be made.
Editing/Deleting a One-to-One NAT Rule
Step 1. Check the check box(s) corresponding to the desired rule(s) you want to edit or delete.

Step 2. If you want to edit the selected rule(s), click Edit. If you want to delete the selected rule(s), click Delete. If you click Delete, skip to Step 4.

Note: Clicking Delete will cause a warning to appear saying that you must click Save to save your changes.
Step 3. If you clicked Edit, the fields of the rule(s) you selected will become available. Make any necessary changes.

Step 4. Click Save to apply your changes or delete the specified rule(s).

Revision History
| Revision | Publish Date | Comments |
|---|---|---|
1.0 |
10-Dec-2018 |
Initial Release |
 Feedback