Configuration of LAN and Remote Management Web Access on the RV130 and RV130W
Available Languages
For a video showing how to configure LAN and remote management, visit https://youtu.be/9R0Rd5bS1W8
Objective
Clients that are connected to the LAN or WAN interface of the router can access the router’s web configuration utility. Configuration of LAN/VPN Web Access can allow clients on the Local Area Network to connect to the router securely via Secure Socket Layer. Configuration of Remote Management Web Access can allow clients from outside the corporate network to connect to the router via its IP Address. Remote Management Web Access may be useful if an administrator wants to access or configure the router from a remote location.
The objective of this document is to show you how to configure the LAN and Remote Management Web Access on the RV130 and RV130W routers.
Applicable Devices
• RV130
• RV130W
Software Version
• v1.0.1.3
LAN/VPN and Remote Management Web Access Configuration
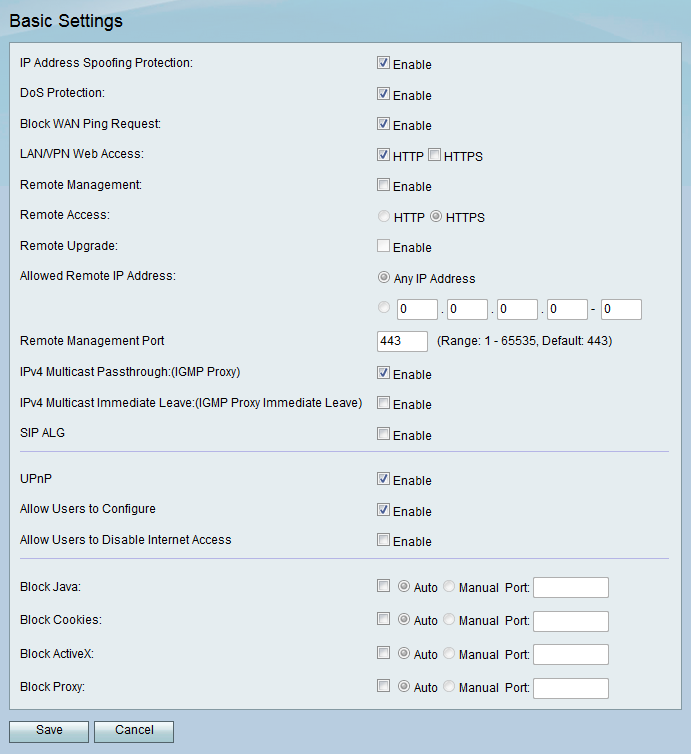
Step 1. Log in to the web configuration utility and choose Firewall > Basic Settings. The Basic Settings page opens:

Step 2. In the LAN/VPN Web Access field, check the check boxes corresponding to the desired type(s) of Web Access protocols. The protocols are used to connect to the device from members of the LAN interface.

The available options are defined as follows:
• HTTP — Clients can connect to internal web sites via the standard Hypertext Transfer Protocol (HTTP). HTML elements from your websites are sent directly to the client device. Connecting to web sites via HTTP is faster than HTTPS.
• HTTPS — Using the HyperText Transfer Protocol Secure (HTTPS), clients can connect to internal websites only when the digital certificates installed on the web site is authenticated with the web server associated with it. This prevents any man-in-the-middle attacks between the client and the web site. Checking this option also provides bidirectional encryption between the client and the web site.
Note: Check only the HTTP check box if web pages on your domain do not have the required SSL Certificates installed. Check only the HTTPS check box if all of the web pages on your domain have the SSL Certificates installed. You can check both check boxes for HTTP and HTTPS if you want versatility in how your clients access the router.
Step 3. In the Remote Management field, check the Enable check box to enable administrators remote access to the device web configuration utility. By default, Remote Management is disabled. If unchecked, skip to Step 8.

Note: When Remote Management is enabled, the router can be accessed by anyone who knows its IP address. It is important to change the default password of the device before enabling this feature.
Step 4. In the Remote Access field, select a desired radio button corresponding to the type of Remote Access protocol. The protocol will be used to connect devices from a remote Wide Area Network (WAN) directly to the router. HTTPS is more secure than HTTP and is the recommended option.

The available options are defined as follows.
• HTTP — Clients can connect to internal web sites via the standard Hypertext Transfer Protocol (HTTP). HTML elements from your websites are sent directly to the client device. Connecting to web sites via HTTP is faster than HTTPS.
• HTTPS — Using the HyperText Transfer Protocol Secure (HTTPS), clients can connect to internal websites only when the digital certificates installed on the web site is authenticated with the web server associated with it. This prevents any man-in-the-middle attacks between the client and the web site. Checking this option also provides bidirectional encryption between the client and the web site.
Step 5. In the Remote Upgrade field, check the Enable check box to allow administrators to upgrade the device from a remote WAN.

Step 6. In the Allowed Remote IP Address field, choose which IP addresses will have remote access to the device. Click the Any IP Address radio button to allow any remote device to connect, or click the radio button below it to manually enter a range of allowed IP addresses.

Step 7. Enter the port on which remote access is allowed. The default port is 443.

Note: When remotely accessing the router, you must enter the remote management port as part of the IP address. For example: https://<remote-ip>:<remote-port>, or https://168.10.1.11:443.
Step 8. Click Save to save your settings.

Revision History
| Revision | Publish Date | Comments |
|---|---|---|
1.0 |
10-Dec-2018 |
Initial Release |
 Feedback