Configuring Schedules on the RV130 and RV130W
Available Languages
Objective
Schedules can be applied to Firewall Access Rules and Internet Access Policies. This means a rule or policy can be scheduled according to the time when the rule or policy needs to be applied to the router. The administrator can schedule the rule or policy for the router with a specific start and a stop time. As a result, the router can block or allow traffic into the network during certain times of the week.
The objective of this document is to show you how to add, edit, and delete schedules on the RV130 and RV130W.
Applicable Devices
• RV130
• RV130W
Adding a Schedule
Step 1. Login to the Router Configuration Utility and choose Firewall > Schedule Management. The Schedule Management page opens:

Step 2. Click Add Row to add a new schedule.

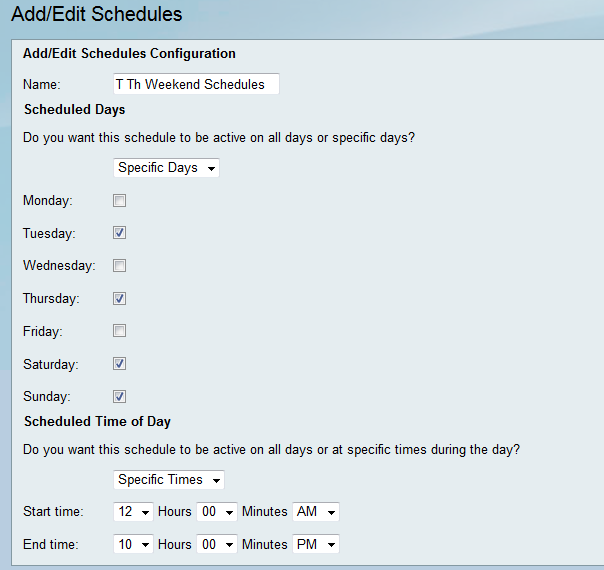
The Add/Edit Schedules page opens:

Step 3. Enter a name for the new schedule in the Name field.

Step 4. Select All Days or Specific Days from the Scheduled Days drop-down menu. Select All Days if you want the schedule to occur every day and Specific Days if you want the schedule to occur on select days. If you choose All Days, skip to Step 6.

Step 5. Check the following checkboxes for the specific days you want the schedule to be active.

Step 6. Select All Times or Specific Times from the Scheduled Time of Day drop-down menu. Select All Times if you want the schedule to occur continuously and Specific Times if you want the schedule to occur during a specified period. If you choose All Times, skip to Step 8.

Step 7. If you chose Specific Times in Step 6, set the starting time for the active schedule in the Start time section.

Step 8. Set the ending time for the active schedule in the End time field.

Step 9. Click Save to save the newly configured schedule.

The newly configured schedule is added to the Schedule Table.

Editing a Schedule
Step 1. In the Schedule Management page, check the checkbox next to the schedule you want to edit.

Step 2. Click Edit to edit the schedule.

The Add/Edit Schedules page opens:

Step 3. Reconfigure the parameters as desired and then click Save.
Deleting a Schedule
Step 1. In the Schedule Management page, check the checkbox next to the schedule you want to delete.

Step 2. Click Delete to delete the schedule.

Step 3. Click Save to save the configurations.

Revision History
| Revision | Publish Date | Comments |
|---|---|---|
1.0 |
13-Dec-2018 |
Initial Release |
 Feedback