Firmware/Language Upgrade on RV130 and RV130W Using the Web Interface
Available Languages
Objective
Upgrading to the latest firmware can help fix bugs and other intermittent issues on the router. Language files can also be applied to change the native language of the configuration utility.
The objective of this document is to show you how to upgrade the firmware and/or language on the RV130 and RV130W Routers.
Applicable Devices | Firmware Version
- RV130 | 1.0.3.52 (Download latest)
- RV130W | 1.0.3.52 (Download latest)
Upgrading the Language/Firmware
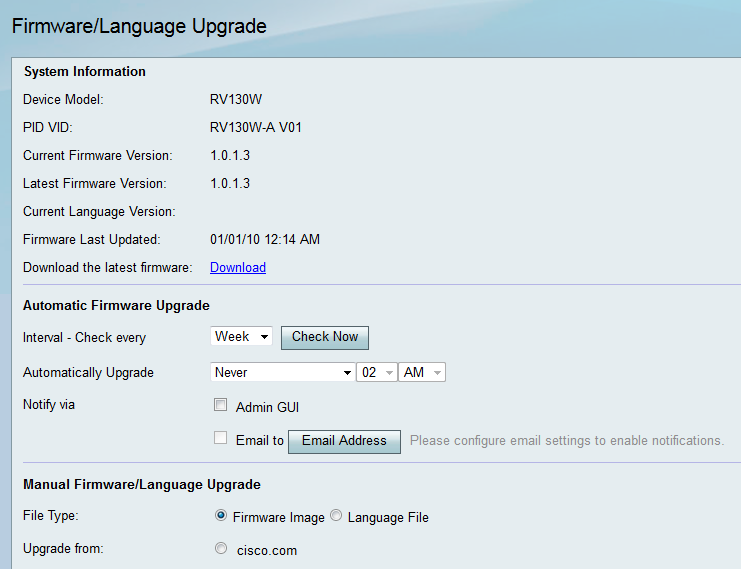
Step 1. Log in to the web configuration utility and choose Administration > Firmware/Language Upgrade. The Firmware/Language Upgrade page opens:

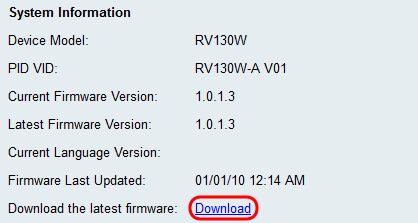
Note: You can check the device model and current firmware version in the System Information area.
Automatic Firmware Upgrade
Step 1. From the Interval – Check every drop-down list, choose how often you would like the device to automatically check with Cisco for possible firmware revisions.

The options are listed as follows:
- Never
- Week
- Month
Step 2. Click the Check Now button to check for a firmware upgrade now.

Step 3. From the Automatically Upgrade drop-down list, choose when you would like the device to automatically upgrade once new firmware has been detected.

The available options are defined as follows:
- Never - Allows you to manually control the upgrade configurations of all devices on your network. Manually upgrading may be helpful if you have a complex network, and devices require specific configurations.
- Immediately - Ensures that your devices will have the latest firmware as soon as new firmware has been detected.
- At the specified time - Allows you to select an appropriate time for devices to automatically upgrade. At appropriate time to choose might be when there is little to no traffic on your network.
Step 4. If you chose At the specified time in Step 3, enter the specific time to automatically upgrade in the corresponding drop-down lists. Otherwise, you may skip this step.

Step 5. In the Notify via field, check the desired check boxes to indicate how the device informs you when new firmware becomes available and/or when it is automatically installed by the device.

The available options are defined as follows:
- Admin GUI - The notifications will appear on the administrator’s interface.
- Email to - The notifications will be sent to a configured e-mail address.
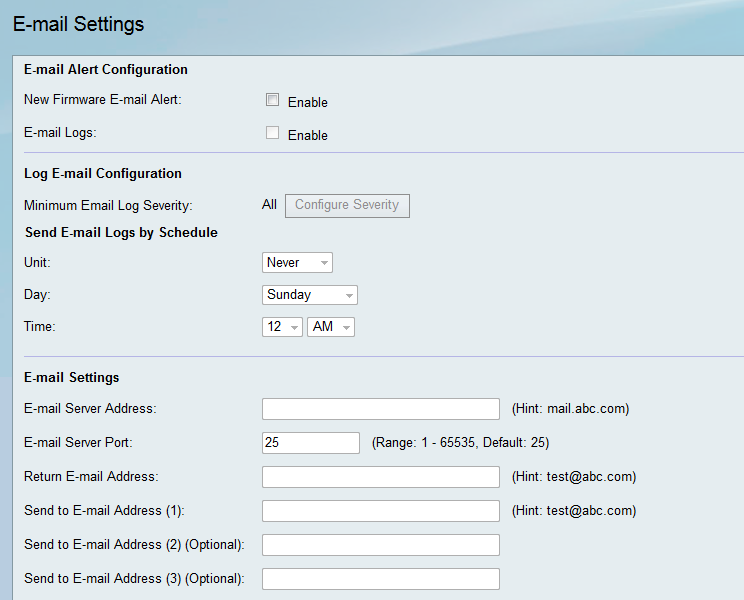
Step 6. If you checked the Email to check box in Step 5, click the Email Address button. The E-mail Settings page appears:

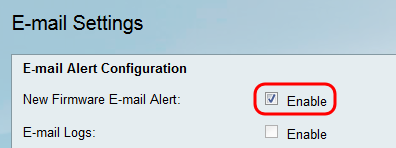
Step 7. In the New Firmware E-mail Alert field, check the Enable check box to enable the device to alert you of firmware upgrades via e-mail.

Note: In order to fully configure the e-mail alert, refer to Email Settings on the RV130 and RV130W. Once you are finished, navigate back to the Firmware/Language Upgrade page by choosing Administration > Firmware/Language Upgrade.
Manual Firmware/Language Upgrade
Step 1. In the File Type field, click the radio button for the type of file you wish to load onto the device.

The available options are defined as follows:
- Firmware Image - A Firmware Image is used to upgrade the firmware version of a device.
- Language File - A Language File that is used to upgrade the native language of the device.
Step 2. In the Upgrade from field, choose where you want the upgrade file for your device to be uploaded from.

The available options are defined as follows:
- cisco.com - Installs the latest upgrade file directly from the Cisco Support & Downloads webpage. This option is unavailable for Language Files, because language upgrades require custom specification of which language to change to. If this is chosen, skip to Step 4.
- PC - Installs an existing upgrade file from a directory on your personal computer. Upgrading from your PC may be useful if you have the file for a specific firmware version or language that you want to upgrade to.
Step 3. If you chose to upgrade from your PC in Step 2, Firmware Images and Language Files provided by Cisco can be manually downloaded onto your computer. Otherwise you may skip this step. Under the System Information section of the page, click the Download link in the Download the latest firmware field. A new browser window will open directing you to the Cisco Support & Downloads webpage.

Step 4. (Optional) If you want the device to revert to factory default settings when the firmware/language upgrade is applied, check the Reset all configurations/settings to factory defaults check box. The changes are applied after the device reboots.

Step 5. Click Start Upgrade to begin the upgrade. The device will automatically reboot once the update is complete.

Revision History
| Revision | Publish Date | Comments |
|---|---|---|
1.0 |
12-Dec-2018 |
Initial Release |
 Feedback