Port Forwarding on the RV130 and RV130W
Available Languages
Objective
Ports identify individual programs on your computer and allow communication with other computers sharing the same connection. Port Forwarding is a feature that is used to pass data to a specific device within a private LAN. It does so by mapping traffic from chosen ports on your device to corresponding ports on the network. Port forwarding allows your computer to efficiently direct traffic where it is needed in order to improve performance and network load balancing characteristics. The RV130 and RV130W supports single port forwarding, port range forwarding, and port range triggering.
Single port forwarding is a feature that is used to open only one port. Single port forwarding is considered to be a static method of port forwarding. Static port forwarding poses a security risk due to a configured port always being open.
Port range forwarding is a feature that is used to open a range of ports. Port range forwarding is also considered to be a static method of port forwarding.
Port range triggering is a method of dynamic port forwarding. When a host that is connected to the router opens a trigger port that is configured in a port range triggering rule, the router forwards the configured ports to the host. Once the host closes the triggered port, the router closes the forwarded ports. Port triggering is more secure than single port forwarding and port range forwarding. This is because with port triggering, the ports remain closed until they are triggered thereby limiting the possibility of unwanted port access.
The objective of this document is to show you how to configure port forwarding on the RV130 and RV130W through the use of single port forwarding, port range forwarding, and trigger port forwarding.
Applicable Devices
• RV130
• RV130W
Software Version
• 1.0.1.3
Port Forwarding Configuration
Single Port Forwarding
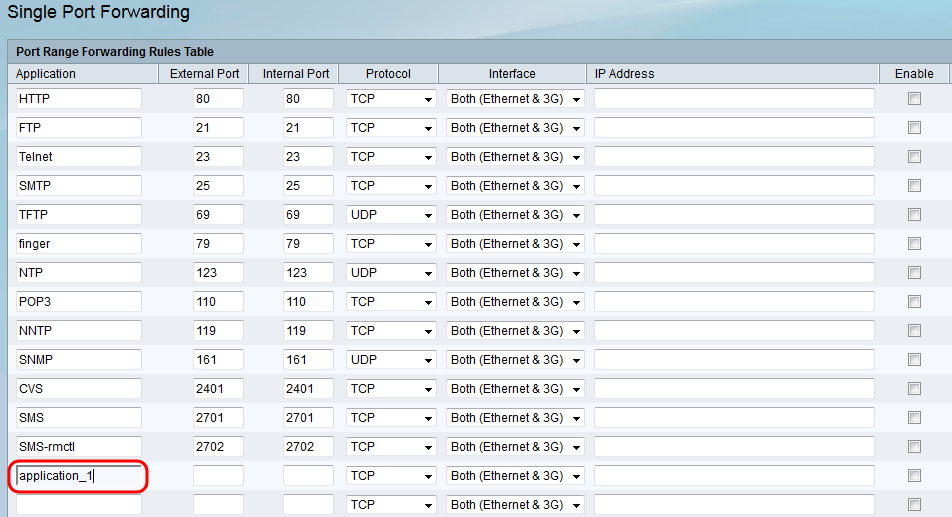
Step 1. Log in to the web configuration utility and choose Firewall > Single Port Forwarding. The Single Port Forwarding page opens:

Step 2. Enter a name for the application that you want to configure ports for in the Application field.

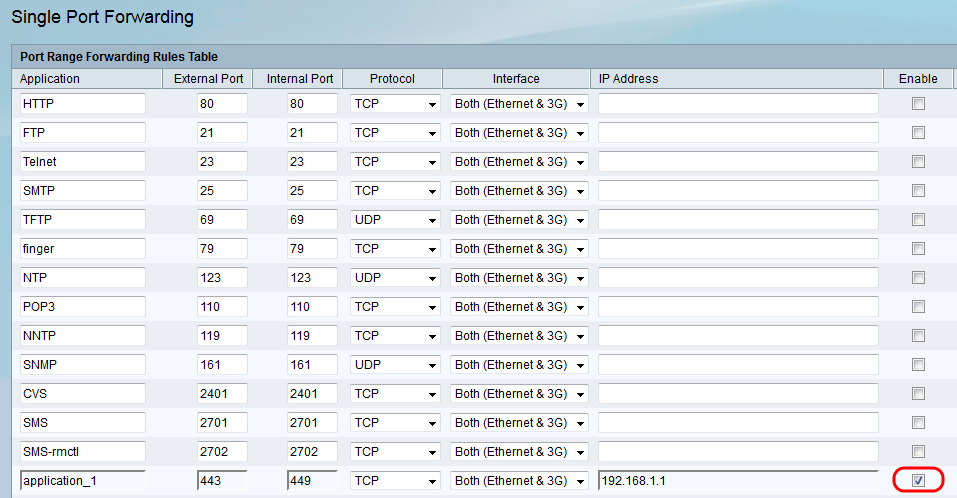
Step 3. Enter a port number in the External Port field. An external port is the outside port that handles requests from the internet. Internet users will connect to the application or server using this port number.

Note: A port number can range between 1 and 65535.
Step 4. Enter a port number in the Internal Port field. An internal port is the inside port that forwards incoming internet traffic to your local network. This is the destination port to which traffic will be forwarded.

Note: Generally the internal and external port numbers are the same when single port forwarding. However, if they are different, the router will perform a port address translation in order to forward the traffic appropriately.
Step 5. From the Protocol drop-down list, choose the transport protocol that is used by the application.

The available options are defined as follows:
• TCP — Application will use Transmission Control Protocol (TCP). TCP is a transport protocol that offers reliability and accuracy over speed. Applications that transport sensitive data, such as E-mail, are generally transmitted using TCP since the delivery of data is guaranteed.
• UDP — Application will use User Datagram Protocol (UDP). UDP is a transport protocol that offers speed over reliability and accuracy. Applications that transport voice and video traffic are generally transmitted using UDP since the timely delivery of data is a priority.
• TCP & UDP — Application will use both TCP and UDP. If you are unsure what protocol the application uses, choose this option.
Step 6. From the Interface drop-down list, choose the interface to which the rule applies to.

The available options are defined as follows:
• Both (Ethernet & 3G) — Rule applies when the router is supplied internet through an Ethernet connection in the WAN port, or through a 3G modem in the USB port.
• Ethernet — Rule applies only when the router is supplied internet through an Ethernet connection in the WAN port.
• 3G — Rule applies only when the router is supplied internet through a 3G modem in the USB port.
Step 7. In the IP Address field, enter the IP address of the host on the LAN to which the IP traffic will be forwarded to.

Step 8. Check the Enable check box to enable the configured rule.

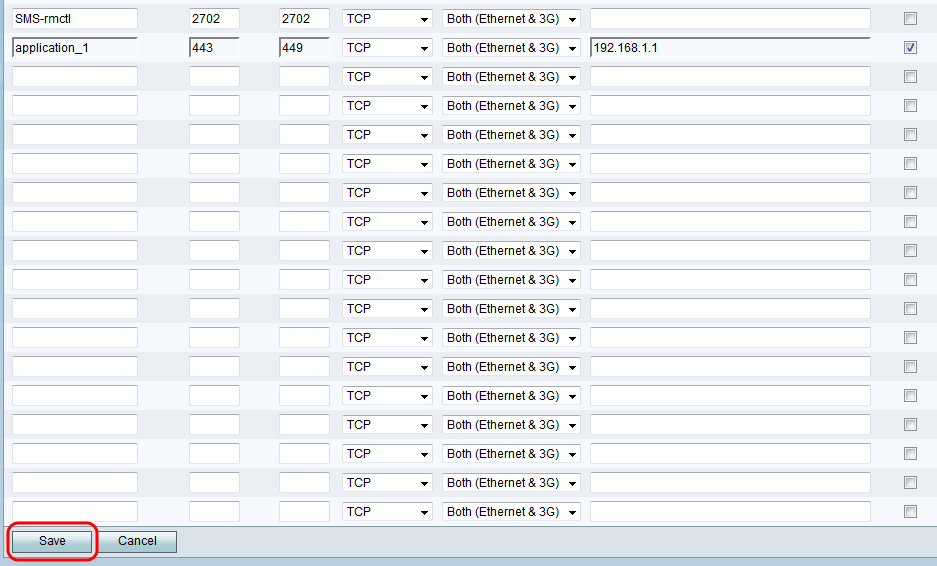
Step 9. Click Save at the bottom of the page.

Port Range Forwarding
Step 1. Log in to the web configuration utility and choose Firewall > Port Range Forwarding. The Port Range Forwarding page opens:

Step 2. Enter a name for the application that you want to configure ports for in the Application field.

Step 3. Enter the port that begins the range of ports used by the application in the Start field.

Note: A port number can range between 1 and 65535.
Step 4. Enter the port that ends the range of ports used by the application in the End field.

Step 5. From the Protocol drop-down list, choose the transport protocol that is used by the application.

The available options are defined as follows:
• TCP — Application will use Transmission Control Protocol (TCP). TCP is a transport protocol that offers reliability and accuracy over speed. Applications that transport sensitive data, such as E-mail, are generally transmitted using TCP since the delivery of data is guaranteed.
• UDP — Application will use User Datagram Protocol (UDP). UDP is a transport protocol that offers speed over reliability and accuracy. Applications that transport voice and video traffic are generally transmitted using UDP since the timely delivery of data is a priority.
• TCP & UDP — Application will use both TCP and UDP. If you are unsure what protocol the application uses, choose this option.
Step 6. From the Interface drop-down list, choose the interface to which the rule applies to.

The available options are defined as follows:
• Both (Ethernet & 3G) — Rule applies when the router is supplied internet through an Ethernet connection in the WAN port, or through a 3G modem in the USB port.
• Ethernet — Rule applies only when the router is supplied internet through an Ethernet connection in the WAN port.
• 3G — Rule applies only when the router is supplied internet through a 3G modem in the USB port.
Step 7. In the IP Address field, enter the IP address of the host on the LAN to which the IP traffic will be forwarded to.

Step 8. Check the Enable check box to enable the configured rule.

Step 9. Click Save at the bottom of the page.
Port Range Triggering
Step 1. Log in to the web configuration utility and choose Firewall > Port Range Triggering. The Port Range Triggering page opens:

Step 2. Enter a name for the application that you want to configure ports for in the Application field.

Step 3. Enter the range of ports used by the application that will trigger the rule in the Triggered Range fields.

Note: You can trigger the rule with a single port if you use the same port number for a given range (e.g. 6000 – 6000).
Step 4. Enter the range of ports that will be forwarded when the rule is triggered in the Forwarded Range fields.

Note: A port number can range from 1 to 65535. As previously mentioned, you can forward the traffic to a single port if you use the same port number for a given range.
Step 5. From the Interface drop-down list, choose the interface to which the rule applies to.

The available options are defined as follows:
• Both (Ethernet & 3G) — Rule applies when the router is supplied internet through an Ethernet connection in the WAN port, or through a 3G modem in the USB port.
• Ethernet — Rule applies only when the router is supplied internet through an Ethernet connection in the WAN port.
• 3G — Rule applies only when the router is supplied internet through a 3G modem in the USB port.
Step 6. Check the Enable check box to enable the configured rule.

Note: A triggering rule does not require an IP address because any computer connected to the router can utilize the rule, however only one computer can use the rule at a time.
Step 7. Click Save at the bottom of the page.
Revision History
| Revision | Publish Date | Comments |
|---|---|---|
1.0 |
12-Dec-2018 |
Initial Release |
 Feedback