Configure Advanced Virtual Private Network (VPN) Setup on RV110W Firewall
Available Languages
Objective
Virtual Private Network (VPN) uses the public network, or the internet, to establish a private network to securely communicate. An Internet Key Exchange (IKE) is a protocol that establishes secure communication between two networks. It is used to exchange a key before the traffic flows, which ensures authenticity for both ends of the VPN tunnel.
Both ends of the VPN should follow same VPN policy to communicate with each other successfully.
The objective of this document is to explain how to add an IKE profile and configure VPN policy on the RV110W Wireless Router.
Applicable Devices
• RV110W
Software Version
• 1.2.0.9
IKE Policy Settings
Internet Key Exchange (IKE) is a protocol used to establish a secure connection for communication in a VPN. This established, secure connection is called a Security Association (SA). This procedure explains how to configure an IKE policy for the VPN connection to use for security. For a VPN to function properly, the IKE policies for both end points should be identical.
Step 1. Log in to the web configuration utility and choose VPN > Advanced VPN Setup. The Advanced VPN Setup page opens:

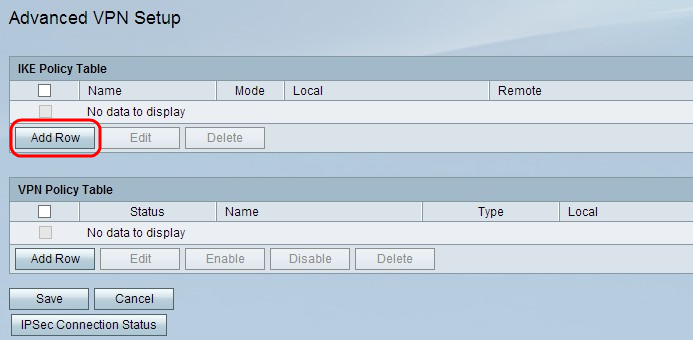
Step 2. Click Add Row to create a new IKE policy. The Advanced VPN Setup page opens:

Step 3. In the Policy Name field, enter a name for the IKE policy to easily identify.
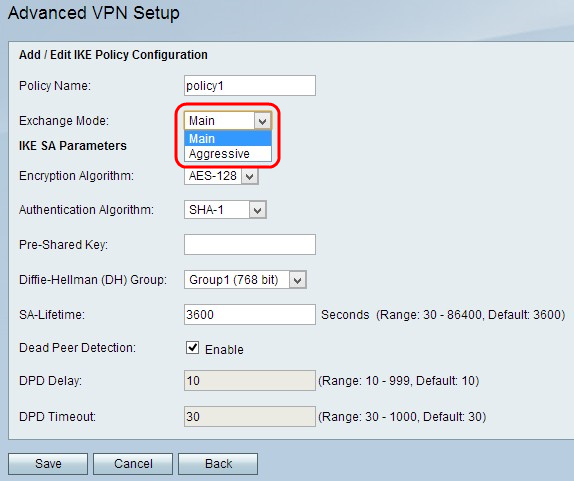
Step 4. Choose an option from the Exchange Mode drop-down list:
• Main — Allows the IKE policy to operate more securely but slower than aggressive mode. Choose this option if a more secure VPN connection is needed.
• Aggressive — Allows the IKE policy to operate faster but less securely than main mode. Choose this option if a faster VPN connection is needed.
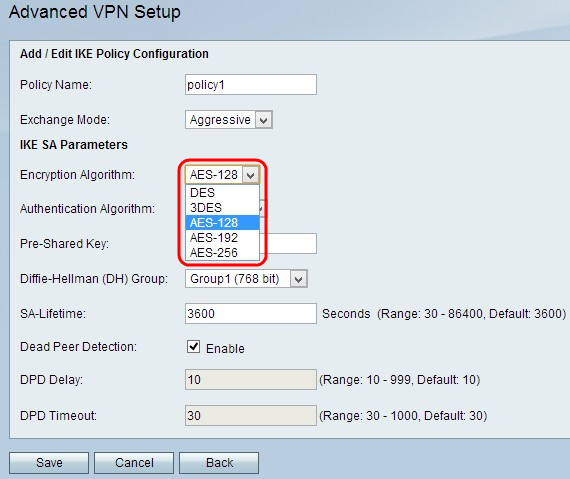
Step 5. Choose an algorithm from the Encryption Algorithm drop-down list:
• DES — Data Encryption Standard (DES) uses a 56-bit key size for data encryption. DES is outdated and should be only used if one endpoint only supports DES.
• 3DES — Triple Data Encryption Standard (3DES) performs DES three times but varies the key size from 168 bits to 112 bits and from 112 bits to 56 bits depending on the round of DES performed. 3DES is more secure than DES and AES.
• AES-128 — Advanced Encryption Standard with 128-bit key (AES-128) uses a 128-bit key for AES encryption. AES is faster and more secure than DES. In general, AES is also faster but less secure than 3DES, but some types of hardware enable 3DES to be faster. AES-128 is faster but less secure than AES-192 and AES-256.
• AES-192 — AES-192 uses a 192-bit key for AES encryption. AES-192 is slower but more secure than AES-128, and AES-192 is faster but less secure than AES-256.
• AES-256 — AES-256 uses a 256-bit key for AES encryption. AES-256 is slower but more secure than AES-128 and AES-192.
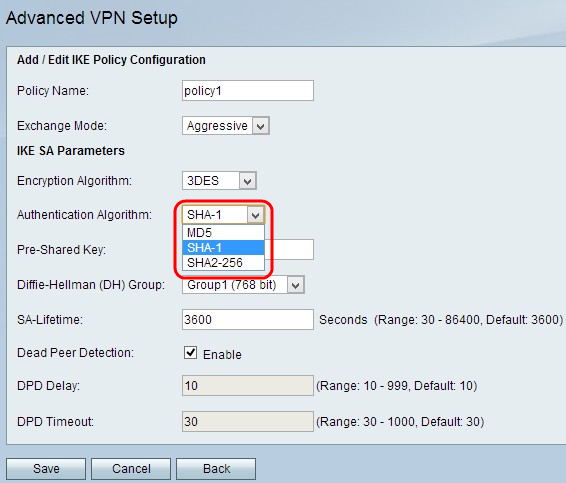
Step 6. Choose desired authentication from the Authentication Algorithm drop-down list:
• MD5 — Message-Digest Algorithm 5 (MD5) uses a 128-bit hash value for authentication. MD5 is less secure but faster than SHA-1 and SHA2-256.
• SHA-1 — Secure Hash Function 1 (SHA-1) uses a 160-bit hash value for authentication. SHA-1 is slower but more secure than MD5, and SHA-1 is faster but less secure than SHA2-256.
• SHA2-256 — Secure Hash Algorithm 2 with a 256-bit hash value (SHA2-256) uses a 256-bit hash value for authentication. SHA2-256 is slower but secure than MD5 and SHA-1.
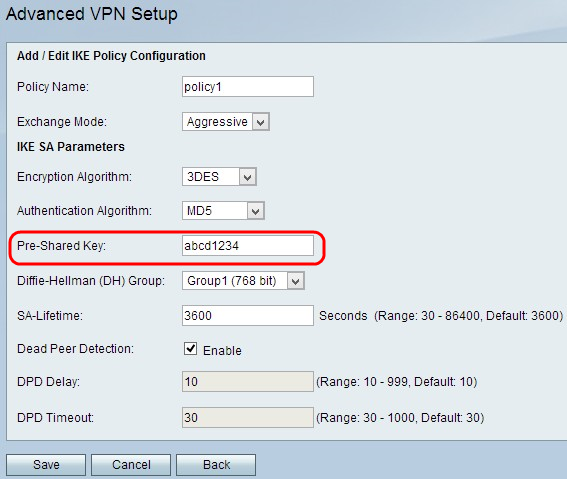
Step 7. In the Pre-Shared Key field, enter a pre-shared key that the IKE policy uses.

Step 8. From the Diffie-Hellman (DH) Group drop-down list, choose which DH group the IKE uses. Hosts in a DH group can exchange keys without knowledge of each other. The higher the group bit number is, the more secure the group is.
• Group 1 - 768 bit —The lowest strength key and the most insecure authentication group. But it takes less time to compute the IKE keys. This option is preferred if the speed of the network is low.
• Group 2 - 1024 bit — The higher strength key and more secure authentication group. But it needs some time to compute the IKE keys.
• Group 5 - 1536 bit — Represents the highest strength key and the most secure authentication group. It needs more time to compute the IKE keys. It is preferred if the speed of the network is high.

Step 9. Enter how long (in seconds) an SA for the VPN lasts before the SA is renewed in the SA-Lifetime field.
Step 10. (Optional) Check the Enable check box in the Dead Peer Detection field to enable Dead Peer Detection. Deed Peer Detection monitors IKE peers to see if a peer has ceased to function. Dead Peer Detection prevents the waste of network resources on inactive peers.
Step 11. (Optional) If you enabled Deed Peer Detection in Step 9, enter how often (in seconds) the peer is checked for activity in the Deed Peer Delay field.
Step 12. (Optional) If you enabled Deed Peer Detection in Step 9, enter how many seconds to wait before an inactive peer is dropped inn the Deed Peer Detection Timeout field.
Step 13. Click Save to apply all settings.
VPN Policy Configuration
Step 1. Log in to the web configuration utility and choose VPN > Advanced VPN Setup. The Advanced VPN Setup page opens:

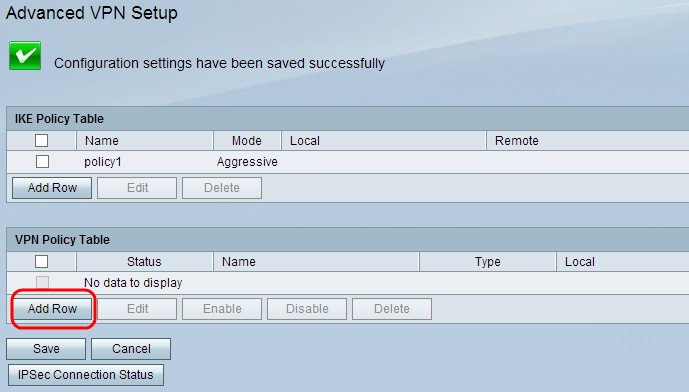
Step 2. Click Add Row from the VPN Policy Table. The Advanced VPN Policy Setup window appears:
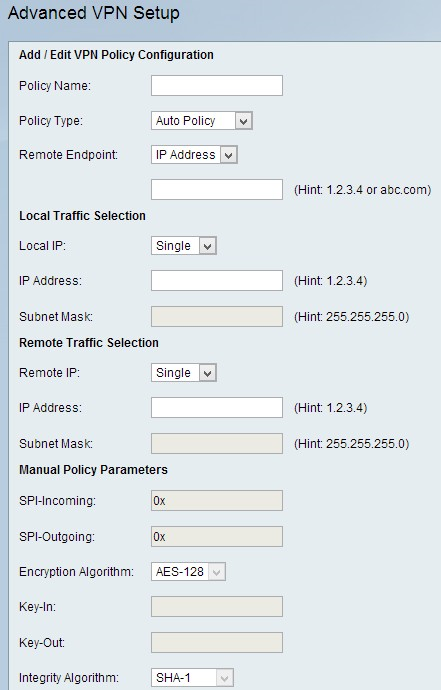
Add/Edit VPN Policy Configuration
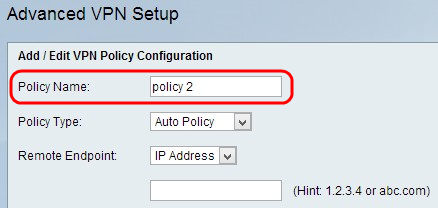
Step 1. Enter a unique name for the policy in the Policy Name field to easily identify.
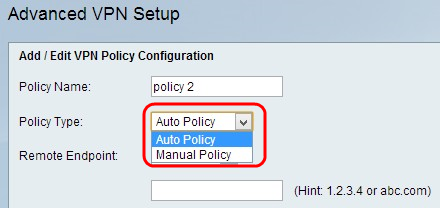
Step 2. Choose the appropriate policy type from the Policy Type drop-down list.
• Auto Policy — The parameters could be set automatically. In this case, in addition to the policies, it is required that the IKE (Internet Key Exchange) protocol negotiates between the two VPN endpoints.
• Manual Policy — In this case all settings which include settings for keys for the VPN tunnel, are manually input for each endpoint.
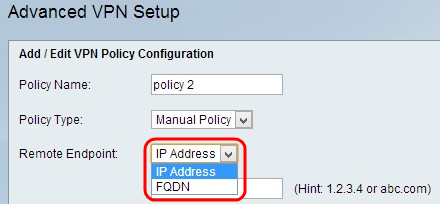
Step 3. Choose the type of IP identifier that identifies the gateway at the remote endpoint from the Remote Endpoint drop-down list.
• IP Address — IP address of the gateway on the remote endpoint. If you choose this option, enter the IP address in the field.
• FQDN (Fully Qualified Domain Name) — Enter the Fully Qualified Domain Name of the gateway on the remote endpoint. If you choose this option, enter the fully qualified domain name in the field provided.
Local Traffic Selection

Step 1. Choose the type of identifier that you want to provide for the end point from the Local IP drop-down list.

• Single — This limits the policy to one host. If you choose this option, enter the IP address in the IP address field.

• Subnet — This is a mask which defines the boundaries of an IP. This only allows hosts from the specified subnet to connect to the VPN. To connect to VPN, a computer is selected by a logical AND operation. A computer is selected if the IP falls in to the same range required. If you choose this option, enter the IP address and Subnet in the IP address and Subnet field.
RemoteTraffic Selection

Step 1. Choose the type of identifier that you want to provide for the end point from the Local IP drop-down list:

• Single — This limits the policy to one host. If you choose this option, enter the IP address in the IP address field.

• Subnet — This is a mask which defines the boundaries of an IP. This only allows hosts from the specified subnet to connect to the VPN. To connect to VPN, a computer is selected by a logical AND operation. A computer is selected if the IP falls in to the same range required. If you choose this option, enter the IP address and Subnet in the IP address and Subnet field.
Manual Policy Parameters
To configure Manual Policy Parameters, choose Manual Policy from the Policy Type drop-down list in Step 2 of the Add/Edit VPN Policy Configuration section.

Step 1. Enter a hexadecimal value between 3 and 8 in the SPI-Incoming field. Stateful Packet Inspection (SPI) is a technology referred to as Deep Packet Inspection. SPI implements a number of security features that help keep your computer network safe. SPI-Incoming value is correspond to the the SPI-Outgoing of the previous device. Any value is acceptable, provided the remote VPN endpoint has the same value in its SPI-Outgoing field.
Step 2. Enter a hexadecimal value between 3 and 8 in the SPI-Outgoing field.
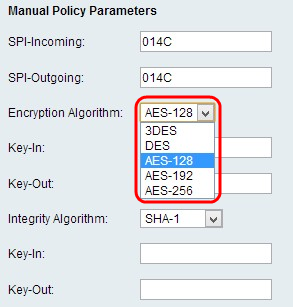
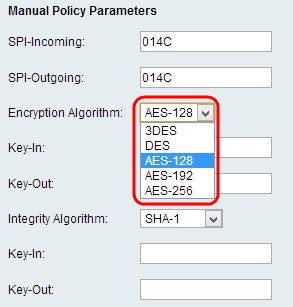
Step 3. Choose the appropriate encryption algorithm from the Encryption Algorithm drop-down list.
• DES — Data Encryption Standard (DES) uses a 56-bit key size for data encryption. DES is outdated and should be only used if one endpoint only supports DES.
• 3DES — Triple Data Encryption Standard (3DES) performs DES three times but varies the key size from 168 bits to 112 bits and from 112 bits to 56 bits based on the round of DES performed. 3DES is more secure than DES and AES.
• AES-128 — Advanced Encryption Standard with 128-bit key (AES-128) uses a 128-bit key for AES encryption. AES is faster and more secure than DES. In general, AES is also faster but less secure than 3DES, but some types of hardware enable 3DES to be faster. AES-128 is faster but less secure than AES-192 and AES-256.
• AES-192 — AES-192 uses a 192-bit key for AES encryption. AES-192 is slower but more secure than AES-128, and AES-192 is faster but less secure than AES-256.
• AES-256 — AES-256 uses a 256-bit key for AES encryption. AES-256 is slower but more secure than AES-128 and AES-192.
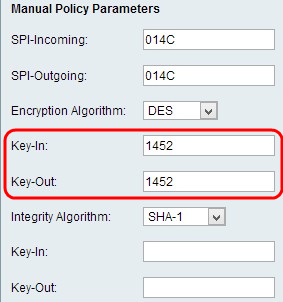
Step 4. Enter the encryption key of the inbound policy in the Key-In field. The length of the key depends on the algorithm chosen in Step 3.
Step 5. Enter the encryption key of the outbound policy in the Key-Out field.
Step 6. Choose the appropriate integrity algorithm from the Integrity Algorithm drop-down list. This algorithm will verify the integrity of the data:
• MD5 — This algorithm specifies the key length to 16 characters. Message-Digest Algorithm five (MD5) is not collision resistant and is suitable for applications like SSL certificates or digital signatures that rely on this property. MD5 compresses any byte stream into a 128 bit value, but SHA compresses it into a 160 bit value. MD5 is slightly cheaper to compute, however MD5 is an older version of hash algorithm and is vulnerable to collision attacks.
• SHA1 — Secure Hash Algorithm version 1 (SHA1) is a 160 bit hash function which is more secure than MD5 but it takes more time to compute.
• SHA2-256 — This algorithm specifies the key length to 32 characters.
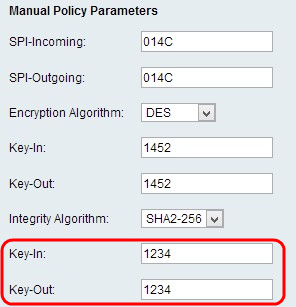
Step 7. Enter the integrity key (for ESP with Integrity-mode) for the inbound policy. The length of the key depends on the algorithm chosen in Step 6.
Step 8. Enter the integrity key of the outbound policy in the Key-Out field. The VPN connection is setup for outbound to inbound, therefore the outbound keys from one end need to match the inbound keys on the other end.
Note: SPI-Incoming and Outgoing, Encryption Algorithm, Integrity Algorithm, and Keys need to be the same on the other end of VPN tunnel for a successful connection.
Auto Policy Parameters

Step 1. Enter the duration of the security association (SA) in seconds in the SA Lifetime field. The SA lifetime is when any key has reached its lifetime, any associated SA is automatically renegotiated.

Step 2. Choose the appropriate Encryption Algorithm from the Encryption Algorithm drop-down list:
• DES — Data Encryption Standard (DES) uses a 56-bit key size for data encryption. DES is outdated and should be only used if one endpoint only supports DES.
• 3DES — Triple Data Encryption Standard (3DES) performs DES three times but varies the key size from 168 bits to 112 bits and from 112 bits to 56 bits based on the round of DES performed. 3DES is more secure than DES and AES.
• AES-128 — Advanced Encryption Standard with 128-bit key (AES-128) uses a 128-bit key for AES encryption. AES is faster and more secure than DES. In general, AES is also faster but less secure than 3DES, but some types of hardware enable 3DES to be faster. AES-128 is faster but less secure than AES-192 and AES-256.
• AES-192 — AES-192 uses a 192-bit key for AES encryption. AES-192 is slower but more secure than AES-128, and AES-192 is faster but less secure than AES-256.
• AES-256 — AES-256 uses a 256-bit key for AES encryption. AES-256 is slower but more secure than AES-128 and AES-192.
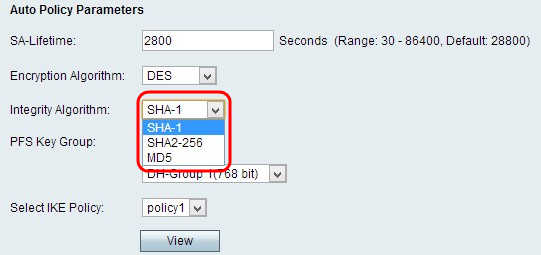
Step 3. Choose the appropriate Integrity Algorithm from the Integrity Algorithm drop-down list. This Algorithm verifies the integrity of the data.
• MD5 — This algorithm specifies the key length to 16 characters. Message-Digest Algorithm five (MD5) is not collision resistant and is suitable for applications like SSL certificates or digital signatures that rely on this property. MD5 compresses any byte stream into a 128 bit value, but SHA compresses it into a 160 bit value. MD5 is slightly cheaper to compute, however MD5 is an older version of hash algorithm and is vulnerable to collision attacks.
• SHA1 — Secure Hash Algorithm version 1 (SHA1) is a 160 bit hash function which is more secure than MD5 but it takes more time to compute.
• SHA2-256 — This algorithm specifies the key length to 32 characters.
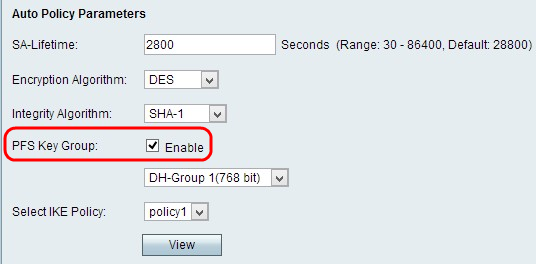
Step 4. (Optional) Check the Enable check box in the PFS Key Group field to enable Perfect Forward Secrecy, which is to improve security.
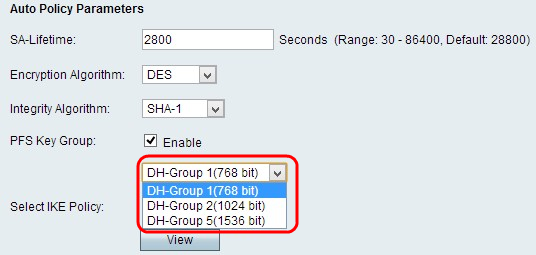
Step 5. If you checked Enable in Step 4, choose the appropriate Diffie-Hellman key-exchange from the PFS Key Group field drop-down list.
• Group 1 - 768 bit — Represents the lowest strength key and the most insecure authentication group. But it needs less time to compute the IKE keys. It is preferred if the speed of the network is low.
• Group 2 - 1024 bit — Represents higher strength key and more secure authentication group. But it needs some time to compute the IKE keys.
• Group 5 - 1536 bit — Represents the highest strength key and the most secure authentication group. It needs more time to compute the IKE keys. It is preferred if the speed of the network is high.
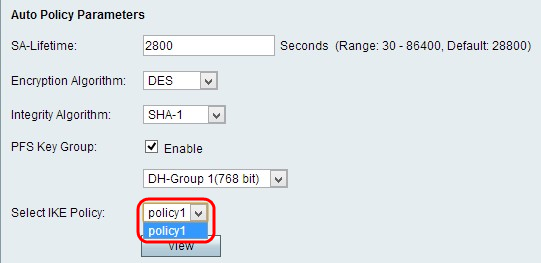
Step 6. Choose the appropriate IKE Policy from the Select IKE Policy drop-down list. Internet Key Exchange (IKE) is a protocol used to establish a secure connection for communication in a VPN. This established, secure connection is called a Security Association (SA). For a VPN to function properly, the IKE policies for both end points should be identical.
Step 7. Click Save to apply all settings.
Note: SA -Lifetime, Encryption Algorithm, Integrity Algorithm, PFS Key Group and the IKE Policy need to be the same on the other end of VPN tunnel for a successful connection.
If you want to view more articles on the RV110W, click here.
 Feedback