Configure My Certificate on RV320 and RV325 VPN Routers
Available Languages
Objective
Certificates are used to verify the identity of a person or device, authenticate a service, or encrypt files. On the RV320, you can add a maximum of 50 certificates by self-signing or third-party authorization. You can export a certificate for a client or administrator and save it on a PC or USB device, and then import it.
The objective of this document is to show you how to select a primary certificate, export a certificate, and import a certificate on the RV32x Series VPN Routers.
Applicable Devices
• RV320 Dual WAN VPN Router
• RV325 Gigabit Dual WAN VPN Router
Software Version
• v1.1.0.09
My Certificate
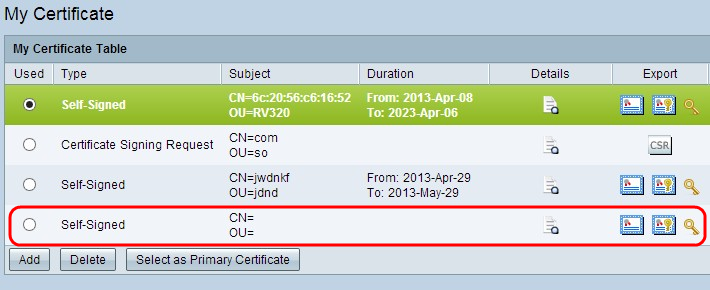
Step 1. Log in to the web configuration utility and choose Certificate Management > My Certificate. The My Certificate page opens:

There are two types of certificates:
• Self-Signed — A Secure Socket Layer (SSL) certificate which is signed by its own creator. This type is less secure since it cannot be cancelled if the private key is compromised by an attacker.
• Certificate Signing Request — A Public Key Infrastructure (PKI) which is sent to the certificate authority to apply for a digital identity certificate. It is more secure than self-signed since the private key is kept secret.
Step 2. Click the desired radio button from the My Certificate Table to choose a certificate.
Step 3. Click Select as Primary Certificate to make the selected certificate the primary certificate.
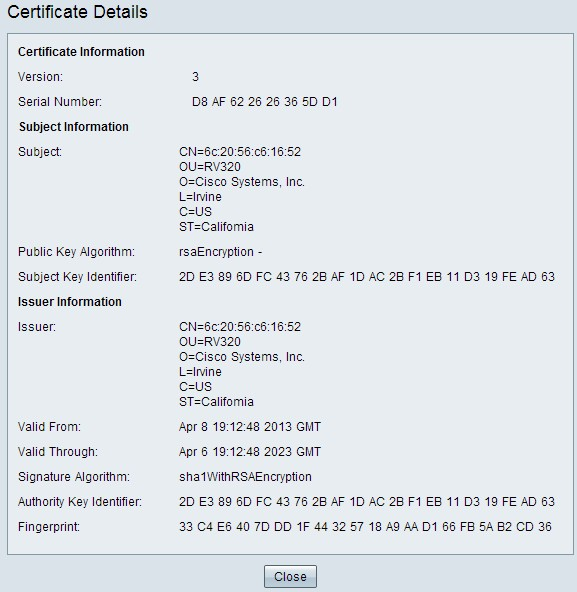
Step 4. (Optional) To view detailed information about the certificate, click the Details icon.

The Certificate Details window opens:

Step 5. (Optional) To delete a certificate, click the radio button of the certificate you want to delete, and then click Delete.
Step 6. Click Save to save the settings.
Export a Self-Signed Certificate
Step 1. Click the desired icon button in the Export column to export a self-signed certificate.

The available icon buttons are defined as follows:
• Export Certificate for Client — Export a client certificate which is used to connect the client to the Virtual Private network (VPN).
• Export Certificate for Administrator — Export an administrator certificate. A private key is generated and a copy is kept for backup.
• Export Private Key — Export a private key for VPN client software, which needs separate credentials for a VPN connection.
Step 2. Click Open to view the key.
Step 3. Click Save to save the key.
Export a Certificate Signing Request
Step 1. Click CSR (Export Certificate Signing Request).

Step 2. Click Open to view.
Step 3. Click Save to save the key on your PC or USB.
Import a Certificate
Step 1. Click Add to import a certificate.

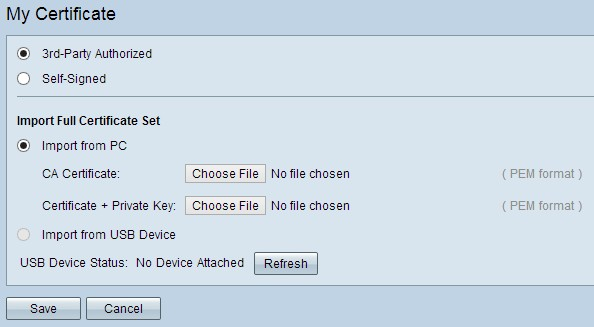
The following window appears:

Step 2. Click the desired radio button to define the type of certificate you are importing.

• 3rd-Party Authorized — a Public Key Infrastructure (PKI) in which the certificate authority provides the digital signature.
• Self-Signed — A Secure Socket Layer (SSL) certificate which is signed by its own creator.
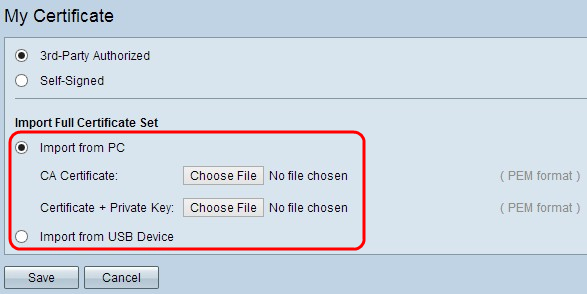
Step 3. Click the desired radio button to choose how you want to import the certificate.

• Import from PC — Certificate is imported from your PC where you saved it.
• Import from USB — Certificate is imported from your USB drive.
Import Certificate from PC
Step 1. If you are importing a 3rd-Party Authorized certificate, click Choose File next to CA Certificate to browse for the location of the file and select it.
Step 2. Click Choose File next to Certificate + Private Key to browse for the location of the file and select it.
Step 3. Click Save to save the settings. The imported certificate will appear in the My Certificate Table.

Import Certificate from USB
Step 1. Choose the appropriate USB device from the Source USB Device drop-down list.

Step 2. If you are importing a 3rd-Party Authorized certificate, click the appropriate radio button to import the CA Certificate that you saved on your USB.
Step 3. Choose the appropriate radio button to import the Certificate + Private Key that you saved on your USB.
Step 4. Click Save to save the settings. The imported certificate will appear in the My Certificate Table.

 Feedback