Advanced Routing Configuration on RV320 and RV325 VPN Routers
Available Languages
Objective
The objective of this document is to show how to set up advanced routing on the RV32x VPN Router Series.
Introduction
Advanced Routing has two kinds of settings: Static and Dynamic. In the Static routing mechanism, a static or predetermined route is created when a router is connected to more than one network. The network information routes through this predetermined pathway to reach a particular host or network. Dynamic routing enables the router to adjust automatically to physical changes in the network layout.
The Routing Information Protocol (RIP) has four basic components: routing update process, RIP routing metrics, routing stability, and routing timers. RIP sends routing-update messages at regular intervals and when the network topology changes. These RIP packets contain information about the networks that the devices can reach, as well as the number of routers or gateways that a packet must travel through to reach the destination address.
Using the dynamic RIP protocol, the router calculates the most efficient route for the network data packets to travel between the source and destination. The RIP protocol regularly broadcasts routing information to other routers on the network. It determines the best route based on the fewest number of hops between the source and the destination.
Applicable Devices
• RV320 Dual WAN VPN Router
• RV325 Gigabit Dual WAN VPN Router
Software Version
• 1.1.0.09
IPv4 Routing Configuration
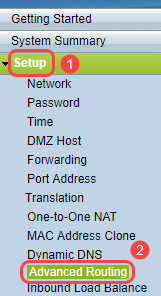
Step 1. Log in to the web configuration utility and choose Setup > Advanced Routing.
Step 2. Click the IPv4 tab for configuration of IPv4 Routing.

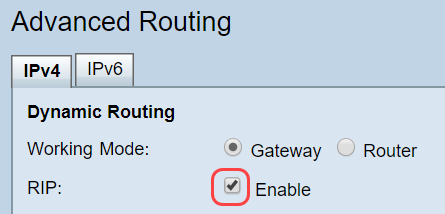
Step 3. Click the desired radio button for Working Mode based on your needs.
• Gateway — Choose this mode if the router is hosting your network’s connection to the Internet. This is the default setting.
• Router — Choose this mode if the router exists on a network with other routers, and another router acts as the network gateway to the Internet. In Router mode, Internet connectivity is available only if you have another router that functions as the Gateway. Since firewall protection is provided by the gateway router, disable this router’s firewall.

Step 4. Routing Information Protocol (RIP) allows a router to exchange routing information automatically with other routers, and to dynamically adjust routing tables as network changes occur. RIP prevents routing loops by using a hop limit. To enable this option, check Enabled. Otherwise, keep the default setting Disabled.
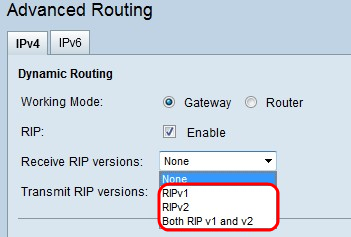
Step 5. From the Receive RIP versions drop-down list, choose the RIP protocol for receiving network data: RIPv1, RIPv2, or Both RIP v1 and v2.
• None — Select None if you do not want to select any routing protocol.
• RIPv1 — A class-based routing version. It does not include subnet information and therefore does not support variable length subnet masks (VLSM). RIPv1 also lacks support for router authentication, making it vulnerable to attacks.
• RIPv2 — Carries a subnet mask and supports password authentication security.
• Both RIPv1 and RIPv2 — Uses both RIPv1 and RIPv2 protocols.
Step 6. From the Transmit RIP versions drop-down list — Choose the RIP protocol for transmitting network data: RIPv1, RIPv2 - Broadcast, or RIPv2 - Multicast
• None — Select None if you do not want to select any routing protocol.
• RIPv1 — Is a class-based routing version. It does not include subnet information and therefore does not support variable length subnet masks (VLSM). RIPv1 also lacks support for router authentication, making it vulnerable to attacks.
• RIPv2 - Broadcast — (Recommended) Broadcasts data in the entire subnet.
• RIPv2 - Multicast — Sends data to multicast addresses. RIPv2 - Multicast also helps to avoid unnecessary load by multicasting routing tables to adjacent routers rather than broadcasting to the entire network.

Step 7. To add a static route to the Static Routing table, click Add and enter the IP address, Default Gateway, Hop count and Interface.

Step 8. Click Save to update the changes.

Step 9. (Optional) To view the Routing table, click on View Routing Table.

Step 10. The Routing Table Entry List appears. You can click Refresh to update the data, or click Close to close the pop-up window. The Routing Table Window opens:

IPv6 Routing Configuration
Step 1. Choose Setup > Advanced Routing using the navigation tree.

Step 2. Click IPv6 to configure routing for IPv6.

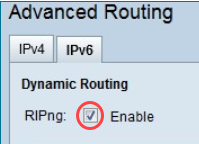
Step 3. Check Enable to enable the dynamic routing protocol RIPng. RIPng (Routing Information Protocol next generation) is an information routing protocol for the IPv6. RIPng for IPv6 is based on protocols and algorithms used extensively in the IPv4 Internet such as RIP and RIP2.
Note: Only add a static route if a route is not appeared on the routing table
Step 4. (Optional) To add a static route manually, click Add. Even after enabling the RIPng dynamic routing protocol, sometimes a route may not appear on the routing table. In those situations, configure a static route to reach the specific route.

Step 5. If Step 4 is performed, configure the following fields:
• Destination IP — Enter the Destination IPv6 Address which is not reachable with RIPng protocol.
• Prefix Length — Enter the Subnet Mask based on your requirement.
• Default Gateway — Enter the Gateway IPv6 Address.
• Hop Count — Enter the hop count for the number of hops the route passes.
• Interface — Choose the Interface either LAN or WAN based on your requirements.
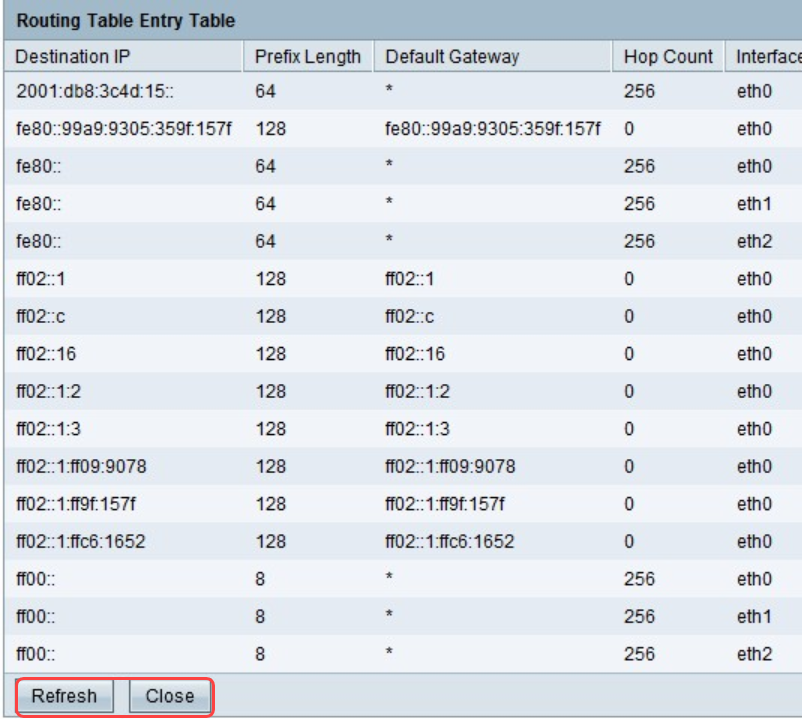
Step 6. (Optional) To view the routing table of IPv6, click View.

Step 7. (Optional) To get the most recent routing table update, click Refresh. To close the pop-up window, click Close.

 Feedback