Resource Management on RV320 and RV325 VPN Routers
Available Languages
Objective
A Secure Sockets Layer Virtual Private Network (SSL VPN) allows the flexibility to configure a VPN but does not require you to install any VPN client on the device of the client. SSL VPN also allows the user to use standard Microsoft terminal services like Word, Excel, PowerPoint, Access, Outlook, Explorer, FrontPage, or ERP without installing them on the client devices. Resources are configured on the RV32x VPN Router Series to be made available on every terminal to the users.
This article explains how to manage resources on the RV32x VPN Router Series.
Applicable Devices
• RV320 Dual WAN VPN Router
• RV325 Gigabit Dual WAN VPN Router
Software Version
• v1.1.0.09
Resource Management
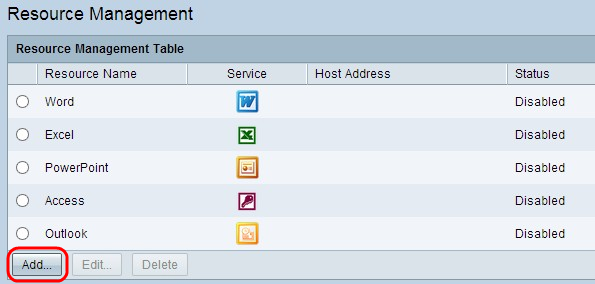
Step 1. Log in to the web configuration utility and choose SSL VPN > Resource Management. The Resource Management page opens:

Add a New Resource

Step 1. Click Add to add any new resource. A new window appears.


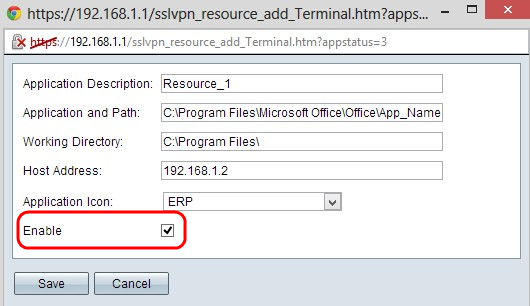
Step 2. Enter a brief description for the new resource in the Application Description field.
Step 3. Enter the path in the server where the resource is available in the Application and Path field.
Step 4. Enter the working directory of the server in the Working Directory field.
Step 5. Enter the IP address of the device where the resource is available in the Host Address field.

Step 6. Choose an Icon to display for the resource from the Application Icon drop-down list.

Step 7. Check Enable check box if you want to enable the resource.
Step 8. Click Save to save the settings. This adds the new resource in the Resource Management Table.

Edit An Existing Resource

Step 1. Click the appropriate radio button beside the resource which you want to edit.
Step 2. Click Edit to edit any information about an existing resource. A new window appears.

Step 3. Edit the necessary information about the existing resource. Follow Step 2 to Step 7 in the Add A New Resource section.
Step 4. Click Save to save the settings.
Delete An Existing Resource
Step 1. Click the appropriate radio button beside the resource which you want to delete.
Step 2. Click Delete to delete the resource.
 Feedback