Configure Single Client to Gateway Virtual Private Network (VPN) on RV320 and RV325 VPN Router Series
Available Languages
Objective
The objective of this document is to show you how to configure a single client to gateway Virtual Private Network (VPN) on RV32x Series VPN Routers.
Introduction
A VPN is a private network used to virtually connect a remote user through a public network. One type of VPN is a client-to-gateway VPN. A client-to-gateway VPN is a connection between a remote user and the network. The client is configured in the user's device with VPN client software. It allows users to remotely connect to a network securely.
Applicable Devices
- RV320 Dual WAN VPN Router
- RV325 Gigabit Dual WAN VPN Router
Software Version
- v1.1.0.09
Configure Single Client to Gateway VPN
Step 1. Log in to the web configuration utility and choose VPN > Client to Gateway. The Client to Gateway page opens:

Step 2. Click the Tunnel radio button to add a single tunnel for client to gateway VPN.

Add a New Tunnel
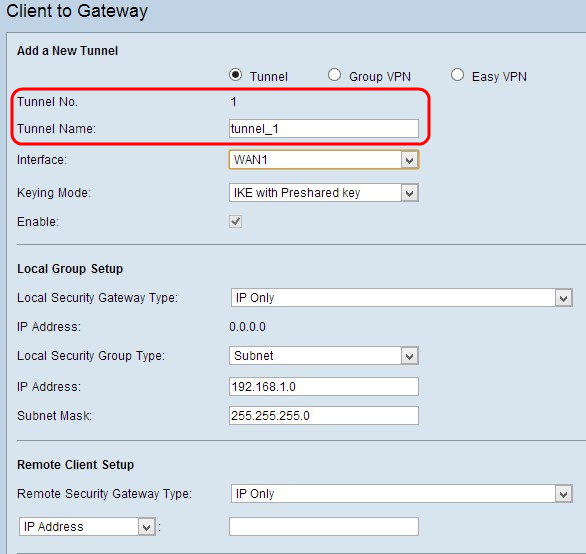
Note: Tunnel No - Represents the number of the tunnel. This number is generated automatically.
Step 1. Enter the name of the tunnel in the Tunnel Name field.
Step 2. Choose the interface through which the remote client accesses the VPN from the Interface drop-down list.

Step 3. Choose the appropriate mode of key management to ensure security from the Keying Mode drop-down list. The default mode is IKE with Preshared key.

The options are defined as follows:
- Manual - Custom security mode to generate a new security key by yourself and no negotiation with the key. It is best for use during troubleshooting or in a small static environment.
- IKE with Preshared key - Internet Key Exchange (IKE) protocol is used to automatically generate and exchange a preshared key to establish authenticated communication for the tunnel.
- IKE with Certificate - Internet Key Exchange (IKE) protocol with certificate is a more secure method to automatically generate and exchange preshared keys to establish more secure communication for the tunnel.
Step 4. Check the Enable check box to enable client to gateway VPN. It is enabled by default.
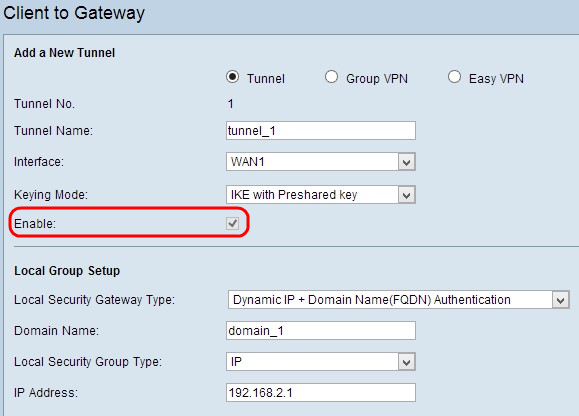
Step 5. If you want to save the settings you have so far, scroll down and click Save to save the settings.
Local Group Setup
Local Group Setup with Manual or IKE with Preshared Key
Note: Follow the below steps if you chose Manual or IKE with Preshared key from the Keying Mode drop-down list in Step 3 of the Add a New Tunnel section.
Step 1. Choose the appropriate router identification method from Local Security Gateway drop-down list to establish a VPN tunnel.
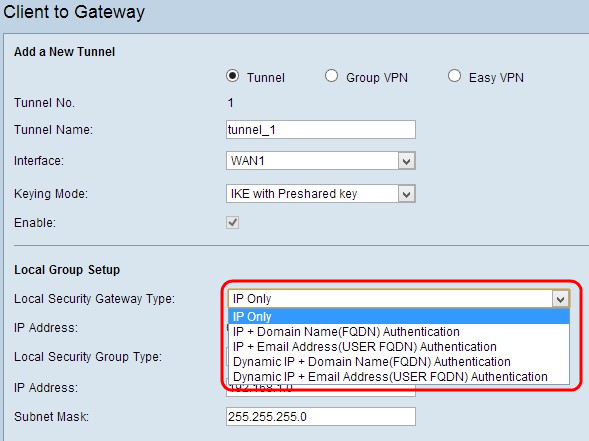
The options are defined as follows:
- IP Only - Access to the tunnel is possible through a static WAN IP only. You can choose this option if only the router has any static WAN IP. The static WAN IP address is generated automatically.
- IP + Domain Name (FQDN) Authentication - Access to the tunnel is possible through a static IP address and a registered domain. If you choose this option, enter the name of the registered domain in the Domain Name field. The static WAN IP address is generated automatically.
- IP + E-mail Addr.(USER FQDN) Authentication - Access to the tunnel is possible through a static IP address and an email address. If you choose this option, enter the email address in the Email Address field. The static WAN IP address is generated automatically.
- Dynamic IP + Domain Name (FQDN) Authentication — Access to the tunnel is possible through a dynamic IP address and a registered domain. If you choose this option, enter the name of the registered domain in the Domain Name field.
- Dynamic IP + E-mail Addr.(USER FQDN) Authentication - Access to the tunnel is possible through a dynamic IP address and an email address. If you choose this option, enter the email address in the Email Address field.
- IP Address - Represents the IP address of the WAN interface. It is a read only field.
Step 2. Choose the appropriate local LAN user or group of users who can access to the VPN tunnel from the Local Security Group Type drop-down list. The default is Subnet.

- IP - Only one specific LAN device can access the tunnel. If you choose this option, enter the IP address of the LAN device in the IP Address field. The default IP is 192.168.1.0.
- Subnet - All LAN devices on a specific subnet can access the tunnel. If you choose this option, enter the IP address and subnet mask of the LAN devices in the IP Address and Subnet Mask field respectively. The default mask is 255.255.255.0.
- IP Range - A range of LAN devices can access the tunnel. If you choose this option, enter the starting and ending IP address in the Start IP and End IP fields respectively. The default range is from 192.168.1.0 to 192.168.1.254.
Step 3. If you want to save the settings you have so far, scroll down and click Save to save the settings.
Local Group Setup with IKE with Certificate for Tunnel VPN
Note: Follow the below steps if you chose IKE with Certificate from the Keying Mode drop-down list in Step 3 of the Add a New Tunnel section.
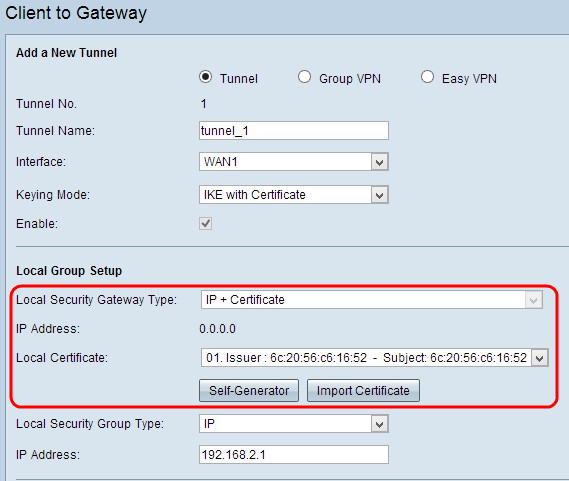
- Local Security Gateway Type - Access to the tunnel is possible through IP with a certificate.
- IP Address - Represents the IP address of the WAN interface. It is a read only field.
Step 1. Choose the appropriate local certificate to identify the router from the Local Certificate drop-down list. Click Self-Generator to generate the certificate automatically or click Import Certificate to import a new certificate.
Note:To know more on how to automatically generate certificates, refer to Generate Certificates on RV320 Routers, and to know how to import certificates refer to Configure My Certificate on RV320 Routers.

Step 2. Choose the appropriate type of local LAN user or group of users who can access the VPN tunnel from the Local Security Group Type drop-down list. The default is Subnet.
- IP - Only one specific LAN device can access the tunnel. If you choose this option, enter the IP address of the LAN device in the IP Address field. The default IP is 192.168.1.0.
- Subnet - All LAN devices on a specific subnet can access to the tunnel. If you choose this option, enter the IP address and subnet mask of the LAN devices in the IP Address and Subnet Mask field respectively. The default mask is 255.255.255.0.
- IP Range - A range of LAN devices can access to the tunnel. If you choose this option, enter the starting and ending IP address in the Start IP and End IP fields respectively. The default range is from 192.168.1.0 to 192.168.1.254.
Step 3. If you want to save the settings you have so far, scroll down and click Save to save the settings.
Remote Client Setup
Remote Client Setup with Manual or IKE with Preshared Key
Note: Follow the below steps if you chose Manual or IKE with Preshared Key from the Keying Mode drop-down list in Step 3 of the Add a New Tunnel section.

Step 1. Choose the appropriate client identification method to establish a VPN tunnel from the Remote Security Gateway drop-down list. The default is IP Only.
- IP Only - Access to the tunnel is possible through the static WAN IP of the client only. You can choose this option only if you know the static WAN IP or domain name of the client. Either choose IP Address from the drop-down list and enter the static IP of the client in the adjacent field, or choose IP by DNS Resolved from the drop-down list and enter the domain name of the IP address in the adjacent field. Through the local DNS server of the IP address, the router can retrieve the IP address automatically.
- IP + Domain Name (FQDN) Authentication - Access to the tunnel is possible through a static IP address of the client and a registered domain. If you choose this option, enter the name of the registered Domain in the Domain Name field. Either choose IP Address from the drop-down list and enter the static IP of the client in the adjacent field, or choose IP by DNS Resolved from the drop-down list and enter the domain name of the IP address in the adjacent field. Through the local DNS server of the IP address, the router can retrieve the IP address automatically.
- IP + E-mail Addr.(USER FQDN) Authentication - Access to the tunnel is possible through a static IP address of the client and an email address. If you choose this option, enter the Email Address in the Email Address field. Either choose IP Address from the drop-down list and enter the static IP of the client in the adjacent field, or choose IP by DNS Resolved from the drop-down list and enter the domain name of the IP address in the adjacent field. Through the local DNS server of the IP address, the router can retrieve the IP address automatically.
- Dynamic IP + Domain Name (FQDN) Authentication - Access to the tunnel is possible through a dynamic IP address of the client and a registered domain. If you choose this option, enter the name of the registered Domain in the Domain Name field.
- Dynamic IP + E-mail Addr.(USER FQDN) Authentication - Access to the tunnel is possible through a dynamic IP address of the client and an email address. If you choose this option, enter the Email Address in the Email Address field.
Note: If you choose Manual from the Keying Mode drop-down list in Step 3 in the Add a New Tunnel Through Tunnel or Group VPN section, this will be the only option available.
Step 2. If you want to save the settings you have so far, scroll down and click Save to save the settings.
Remote Group Setup with IKE with Certificate
Note: Follow the below steps if you chose IKE with Certificate from the Keying Mode drop-down list in Step 3 of the Add a New Tunnel section.
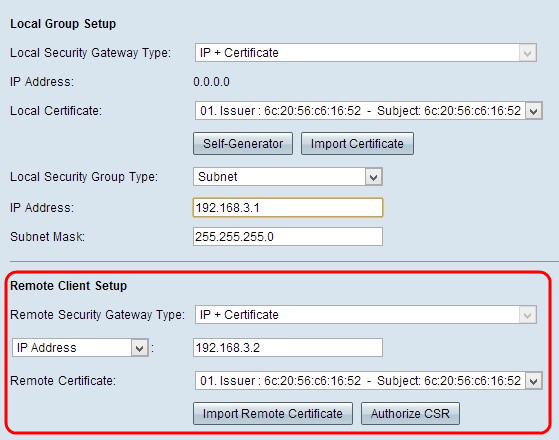
- Remote Security Gateway Type - Client identification is possible through IP with a certificate to establish VPN connection.
Step 1. Choose IP Address or IP by DNS Resolved from the drop-down list.
- IP Address - Access to the tunnel is possible through the static WAN IP of the client only. You can choose this option only if you know the static WAN IP of the client. Enter the static IP of the client in the IP address field.
- IP By DNS Resolved - Useful if you do not know the IP address of the client but you know the domain of that IP address. Enter the domain name of the IP address. Through the local DNS server of the IP address, the router can retrieve the IP address automatically.
Step 2. Choose the appropriate remote certificate from the Remote Certificate drop-down list. Click Import Remote Certificate to import a new certificate or click Authorize CSR to identify certificate with a digital signing request.
Note: If you want to know more on how to import a new certificate refer to View/Add Trusted SSL Certificate on RV320 Routers, and to know more about authorized CSR refer to Certificate Signing Request (CSR) on RV320 Routers.
Step 3. If you want to save the settings you have so far, scroll down and click Save to save the settings.
IPSec Setup
IPSec Setup with Manual Key
Note: Follow the below steps if you chose Manual from the Keying Mode drop-down list in Step 3 of the Add a New Tunnel section.

Step 1. Enter the unique hexadecimal value for the incoming Security Parameter Index (SPI) in the Incoming SPI field. The SPI is carried in the Encapsulating Security Payload Protocol (ESP) header, which together determines the security association (SA) for the incoming packet. The range is 100 to ffffffff, with the default being 100.
Step 2. Enter the unique hexadecimal value for the outgoing Security Parameter Index (SPI) in the Outgoing SPI field. The SPI is carried in Encapsulating Security Payload Protocol (ESP) header which together determines the security association (SA) for the outgoing packet. The range is 100 to ffffffff, with the default being 100.
Note: The Incoming SPI of the connected device and the Outgoing SPI of the other end of the tunnel should match each other to establish a tunnel.

Step 3. Choose the appropriate encryption method from the Encryption drop-down list. The recommended encryption is 3DES. The VPN tunnel needs to use the same encryption method for both of its ends.
- DES - Data Encryption Standard (DES) is a 56 bit, old, more backward compatible encryption method which is not as secure.
- 3DES - Triple Data Encryption Standard (3DES) is a 168 bit, simple encryption method to increase the key size through encrypts the data for three times which provides more security then DES.

Step 4. Choose the appropriate authentication method from the Authentication drop-down list. The recommended authentication is SHA1. The VPN tunnel needs to use the same authentication method for both of its ends.
- MD5 - Message Digest Algorithm-5 (MD5) represents 32 digit hexadecimal hash function which provides protection to the data from malicious attack by the checksum calculation.
- SHA1 - Secure Hash Algorithm version 1 (SHA1) is a 160 bit hash function which is more secure than MD5.

Step 5. Enter the key to encrypt and decrypt data in the Encryption Key field. If you chose DES as encryption method in step 3, enter a 16 digit hexadecimal value. If you chose 3DES as encryption method in Step 3, enter a 40 digit hexadecimal value.
Step 6. Enter a pre-shared key to authenticate the traffic in Authentication Key field. If you choose MD5 as authentication method in step 4, enter 32 digit hexadecimal value. If you choose SHA as authentication method in Step 4, enter 40 digit hexadecimal value. The VPN tunnel needs to use the same preshared key for both of its ends.
Step 7. If you want to save the settings you have so far, scroll down and click Save to save the settings.
IPSec Setup with IKE with Preshared Key or IKE with Certificate
Note: Follow the below steps if you chose IKE with Preshared Key or IKE with Certificate from the Keying Mode drop-down list in Step 3 of the Add a New Tunnel section.

Step 1. Choose the appropriate Phase 1 DH Group from the Phase 1 DH Group drop-down list. Phase 1 is used to establish the simplex, logical security association (SA) between the two ends of the tunnel to support secure authentic communication. Diffie-Hellman (DH) is a cryptographic key exchange protocol which is used during Phase 1 connection to share secret key to authenticate communication.
- Group 1 - 768 bit - Represents the lowest strength key and the most insecure authentication group. But it needs less time to compute the IKE keys. It is preferred if the speed of the network is low.
- Group 2 - 1024 bit - Represents higher strength key and more secure authentication group. But it needs some time to compute the IKE keys.
- Group 5 - 1536 bit - Represents the highest strength key and the most secure authentication group. It needs more time to compute the IKE keys. It is preferred if the speed of the network is high.

Step 2. Choose the appropriate Phase 1 Encryption to encrypt the key from the Phase 1 Encryption drop-down list. AES-256 is recommended as it is the most secure encryption method. The VPN tunnel needs to use the same encryption method for both of its ends.
- DES - Data Encryption Standard (DES) is 56 bit, old encryption method which is not very much secure encryption method.
- 3DES - Triple Data Encryption Standard (3DES) is a 168 bit, simple encryption method to increase the key size through encrypts the data for three times which provides more security then DES.
- AES-128 - Advanced Encryption Standard (AES) is 128 bit encryption method which transforms the plain text into cipher text through 10 cycles of repetition.
- AES-192 - Advanced Encryption Standard (AES) is 192 bit encryption method which transforms the plain text into cipher text through 12 cycles of repetition.
- AES-256 - Advanced Encryption Standard (AES) is 256 bit encryption method which transforms the plain text into cipher text through 14 cycles of repetition.

Step 3. Choose the appropriate authentication method from the Phase 1 Authentication drop-down list. The VPN tunnel needs to use the same authentication method for both of its ends.
- MD5 - Message Digest Algorithm-5 (MD5) represents 32 digit hexadecimal hash function which provide protection to the data from malicious attack by the checksum calculation.
- SHA1 - Secure Hash Algorithm version 1 (SHA1) is a 160 bit hash function which is more secure than MD5.

Step 4. Enter the amount of time in seconds, in Phase 1, the VPN tunnel remains active in the Phase 1 SA Lifetime field. The default time is 28800 seconds.
Step 5. Check Perfect Forward Secrecy check box to provide more protection to the keys. This option allows to generate a new key if any key is compromised. The encrypted data is only compromised through the compromised key. So it provides more secure and authenticate communication as it secures other keys though a key is compromised. This is a recommended action as it provides more security.

Step 6. Choose the appropriate Phase 2 DH Group from the Phase 2 DH Group drop-down list. Phase 1 is used to establish the simplex, logical security association (SA) between the two ends of the tunnel to support secure authenticate communication. Diffie-Hellman (DH) is a cryptographic key exchange protocol which is used during Phase 1 connection to share secret key to authenticate communication.
- Group 1 - 768 bit - Represents the lowest strength key and the most insecure authentication group. But it needs less time to compute the IKE keys. It is preferred if the speed of the network is low.
- Group 2 - 1024 bit - Represents higher strength key and more secure authentication group. But it needs some time to compute the IKE keys.
- Group 5 - 1536 bit - Represents the highest strength key and the most secure authentication group. It needs more time to compute the IKE keys. It is preferred if the speed of the network is high.

Step 7. Choose the appropriate Phase 2 Encryption to encrypt the key from the Phase 2 Encryption drop-down list. AES-256 is recommended as it is the most secure encryption method. The VPN tunnel needs to use the same encryption method for both of its ends.
- DES - Data Encryption Standard (DES) is 56 bit, old encryption method which is not very much secure encryption method.
- 3DES - Triple Data Encryption Standard (3DES) is a 168 bit, simple encryption method to increase the key size through encrypts the data for three times which provides more security then DES.
- AES-128 - Advanced Encryption Standard (AES) is 128 bit encryption method which transforms the plain text into cipher text through 10 cycles repetitions.
- AES-192 - Advanced Encryption Standard (AES) is 192 bit encryption method which transforms the plain text into cipher text through 12 cycles repetitions.
- AES-256 - Advanced Encryption Standard (AES) is 256 bit encryption method which transforms the plain text into cipher text through 14 cycles repetitions.

Step 8. Choose the appropriate authentication method from the Phase 2 Authentication drop-down list. The VPN tunnel needs to use the same authentication method for both of its ends.
- MD5 - Message Digest Algorithm-5 (MD5) represents 32 digit hexadecimal hash function which provide protection to the data from malicious attack by the checksum calculation.
- SHA1 - Secure Hash Algorithm version 1 (SHA1) is a 160 bit hash function which is more secure than MD5.
- Null - No authentication method is used.

Step 9. Enter the amount of time in seconds, in Phase 2, the VPN tunnel remains active in the Phase 2 SA Lifetime field. The default time is 3600 seconds.
Step 10. Check the Minimum Preshared Key Complexity check box if you want to enable strength meter for the preshared key.
Step 11. Enter a key which is shared previously between the IKE peers in the Preshared Key field. Up to 30 alphanumeric characters can be used as preshared key. The VPN tunnel needs to use the same preshared key for both of its ends.
Note: It is strongly recommended to frequently change the preshared key between the IKE peers so the the VPN remains secure.
- Preshared Key Strength Meter - this shows the strength of the preshared key through colored bars. Red indicates weak strength, yellow indicates acceptable strength and green indicates strong strength. If you check Minimum Preshared Key Complexity check box in Step 10 of IPSec Setup section, then only the Preshared Key Strength Meter is appeared.
Note: If you choose IKE with Preshared Key from the Keying Mode drop-down list in Step 3 for Add a New Tunnel section, then only you can have the option to configure Step 10, Step 11 and view the Preshared Key Strength Meter.
Step 12. If you want to save the settings you have so far, scroll down and click Save to save the settings.
Advanced Setup with IKE with Preshared Key or IKE with Certificate
Advanced settings are possible for only IKE with Preshared Key and IKE with Certification key. The Manual key setting does not have any advanced settings.

Step 1. Click Advanced to get the advanced settings for IKE with Preshared key.

Step 2. Check the Aggressive Mode check box if your network speed is low. It exchanges the IDs of the end points of the tunnel in clear text during SA connection, which requires less time to exchange but less secure.
Step 3. Check the Compress (Support IP Payload Compression Protocol (IPComp)) check box if you want to compress the size of IP datagram. IPComp is a IP compression protocol which is used to compress the size of IP datagram, if the network speed is low and the user wants to quickly transmit the data without any loss through the slow network.
Step 4.Check the Keep-Alive check box if you always want the connection of the VPN tunnel remain active. It helps to re-establish the connections immediately if any connection becomes inactive.
Step 5. Check the AH Hash Algorithm check box if you want to authentication the Authenticate Header (AH). AH provides authentication to data origin, data integrity through checksum and protection is extended into the IP header. The tunnel should have same algorithm for both of its sides.
- MD5 - Message Digest Algorithm-5 (MD5) represents 128 digit hexadecimal hash function which provide protection to the data from malicious attack by the checksum calculation.
- SHA1 - Secure Hash Algorithm version 1 (SHA1) is a 160 bit hash function which is more secure than MD5.
Step 6. Check NetBIOS Broadcast if you want to allow non-routable traffic through the VPN tunnel. The default is unchecked. NetBIOS is used to detect network resources like printers, computers etc. in the network through some software applications and Windows features like Network Neighborhood.
Step 7. Check NAT Traversal check box if you want to access the internet from your private LAN through public IP address. NAT traversal is used to appear the private IP addresses of the internal systems as public IP addresses to protect the private IP addresses from any malicious attack or discovery.
Step 8. Check Dead Peer Detection Interval to check the liveliness of the VPN tunnel through hello or ACK in a periodic manner. If you check this check box, enter the duration or interval of the hello messages you want.
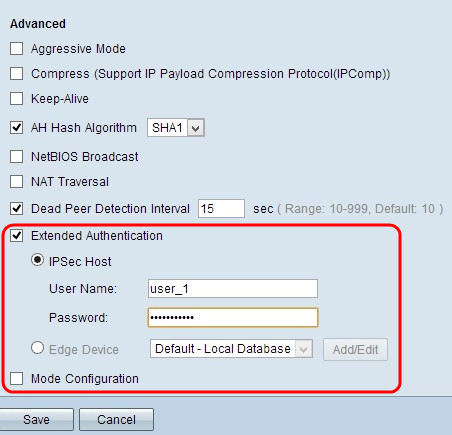
Step 9. Check Extended Authentication to provide more security and authentication to the VPN connection. Click the appropriate radio button to extend the authentication of the VPN connection.
- IPSec Host - Extended authentication through IPSec host. If you choose this option, enter username of the IPSec host in the User Name field and a password in the Password field.
- Edge Device - Extended authentication through the edge device. If you choose this option, choose the database which contains the edge device from the drop-down list. If you want to add or edit the database, click Add/Edit.
Note: To know more on how to add or edit the local database refer to User and Domain Management Configuration on RV320 Router.
Step 10 . Check Mode Configuration to provide IP address for the incoming tunnel requester.
Note: Step 9 to Step 11 are available for the IKE Preshared Keying Mode for Tunnel VPN.
Step 11. Click Save to save the settings.
Conclusion
You have now learned the steps to configure a single client to gateway VPN on RV32x Series VPN Routers
 Feedback