Access Rules Configuration on RV320 and RV325 VPN Routers
Available Languages
Objective
Access Control Lists (ACLs) are lists that block or allow traffic from being sent to and from certain users. Access Rules can be configured to be in effect all the time or based on a defined schedule. An access rule is configured based on various criteria in order to allow or deny access to the network. The access rule is scheduled based on the time when the access rules need to be applied to the router. This article outlines and describes the Access Rule Setup Wizard used to determine whether the traffic is allowed to enter in the network through the firewall of the router or not to ensure security in the network.
Applicable Devices | Firmware Version
- RV320 Dual WAN VPN Router | V 1.1.0.09 (Download latest)
- RV325 Gigabit Dual WAN VPN Router | V 1.1.0.09 (Download latest)
Access Rule Configuration
Step 1. Log in to the web configuration utility, and choose Firewall>Access Rules. The Access Rules page opens:

The Access Rules Table contains the following information:
- Priority — Shows the priority of the access rule
- Enable — Shows whether the access rule is enabled or disabled
- Action — Shows the access rule is allowed or denied.
- Service — Shows the type of service.
- SourceInterface — Shows to which interface the access rule is applied to.
- Source — Shows the IP address of the source device
- Destination — Shows the IP address of the destination device
- Time — Shows the time the access rule is to be applied
- Day — Shows during a week when the access rule is applied
Service Management
Step 1. Click Service Management to add a new service. The Service Management table page opens:

Step 2. Click Add to add a new service.
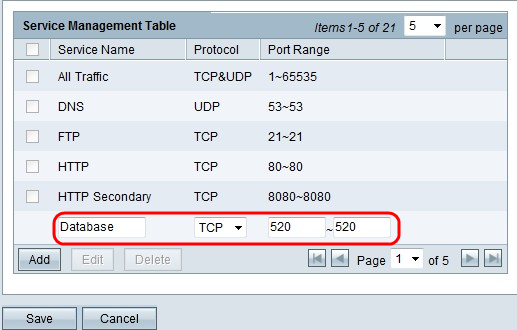
Step 3. Configure the following fields.
- Service Name — Based on your requirement, give a name for the service
- Protocol — Choose a protocol TCP or UDP for your service
- Port Range — Enter the port number range based on your requirement and the port number must be in the range (1-65536).
Step 4. Click Save to save the changes
Access Rule Configuration on IPv4

Step 1. Click Add to configure a new access rule. The Edit Access Rules window appears.

Step 2. Choose the appropriate option from the Action drop-down list to allow or restrict traffic for the rule you are about to setup. Access rules limit access to the network based on various values.
- Allow — Allows all traffic.
- Deny — Restricts all the traffic.

Step 3. Choose the appropriate service that you need to filter from the Service drop-down list.

Step 4. Choose the appropriate Log option from the Log drop-down list. The log option determines if the device keeps a log of the traffic that corresponds to the access rules set.
- Log packets matching this access rule — The router keeps a log that tracks the service which are selected.
- Not Log — The router does not keep logs for the access rule.
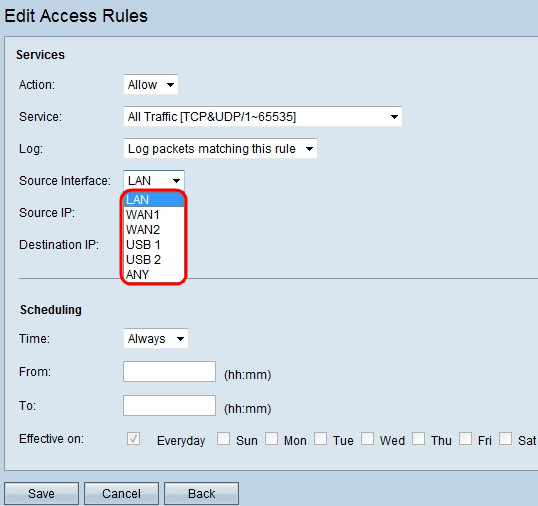
Step 5. From the Interface drop-down list, choose the appropriate source interface. This interface is where the access rule would be enforced.
- LAN — The access rule affects only the LAN traffic.
- WAN 1 — The access rule affects only the WAN 1 traffic.
- WAN 2 — The access rule affects only the WAN 2 traffic.
- Any — The access rule affects all traffic in any of the interfaces of the device.
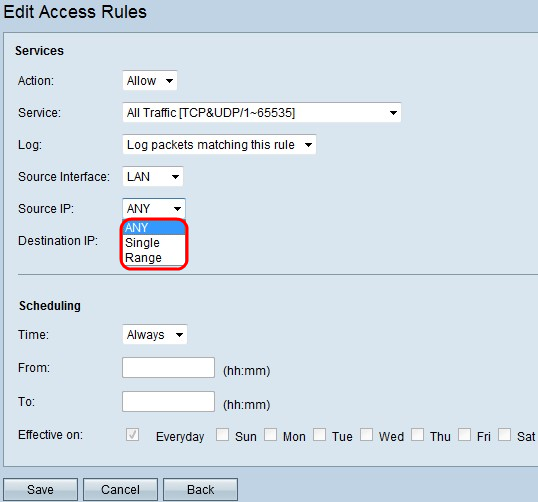
Step 6. Choose the appropriate source IP type to which the access rule is applied from the Source IP drop-down list.
- Any — Any IP address of the network of the device has the rule applied to them.
- Single — Only a single specified IP address on the network of the device has the rule applied to it. Enter the desired IP address in the adjacent field.
- Range — Only a specified range of IP addresses on the network of the device have the rule applied to them. If you choose Range, you need to enter the first and last IP addresses for the range in the adjacent fields.
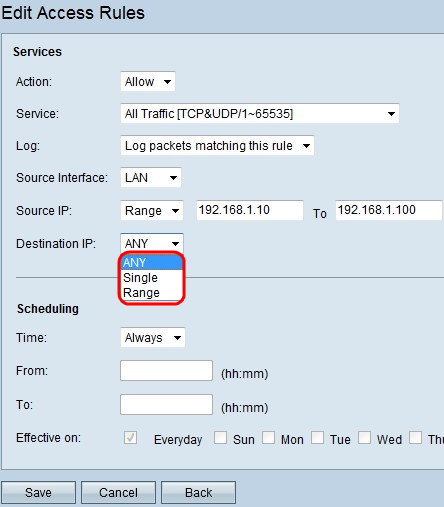
Step 7. Choose the appropriate destination IP type to which the access rule is applied from the available drop-down list.
- Any — Any destination IP address has the rule applied to them.
- Single — Only a single specified IP address has the rule applied to it. Enter the desired IP address in the adjacent field.
- Range — Only a specified range of IP address outside of the of the network of the device have the rule applied to them. If you choose Range, you need to enter the first and last IP addresses for the range in the adjacent fields.
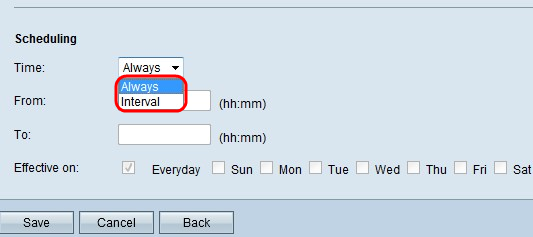
Timesaver: By default, the time is set to Always. If you want to apply the access rule to a specific time or day, follow Step 8 to Step 11. If not, skip to Step 12.
Step 8. Choose Interval from the drop-down list, Access rules are active for some specific times. you need to enter the time interval for the access rule to be enforced.

Step 9. Enter the time when you want to start to apply the access list in the From field. The format for the time is hh:mm.
Step 10. Enter the time when you no longer want to apply the access list in the To field. The format for the time is hh:mm.
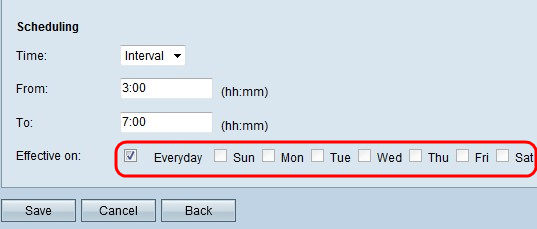
Step 11. Check the check box of the specific days when you want to apply the access list.
Step 12. Click Save to save the changes.

Step 13. (Optional) If you want to restore the default rules, click Restore to Default Rules. All the access rules configured by you are lost.
Access Rule Configuration on IPv6

Step 1. Click on the IPv6 tab to configure IPv6 access rules.

Step 2. Click Add to add a new IPv6 access rule. The Edit Access Rules window appears.

Step 3. Choose the appropriate option from the Action drop-down list to allow or restrict the rule you need to setup. Access rules limit access to the network by allowing or denying traffic access from specific services or devices.
- Allow — Allows all traffic.
- Deny — Restricts all the traffic.

Step 4. Choose the appropriate service that you need to filter from the Service drop-down list.
Note: To allow all traffic, choose All Traffic [TCP&UDP/1~65535] from the service drop-down list if action has been set to allow. The list contains all types of services you might want to filter.
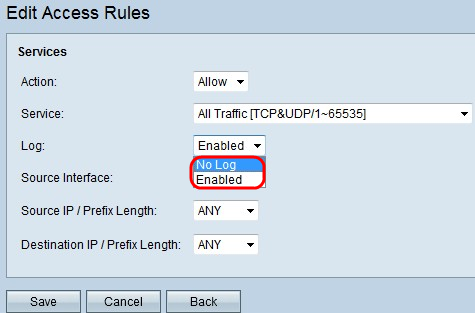
Step 5. Choose the appropriate Log option from the Log drop-down list. The log option determines if the device will keep a log of the traffic that corresponds to the access rules set.
- Enabled — Enables the router to keep log tracking for the service which has been selected.
- Not Log — Disables the router to keep log tracking.
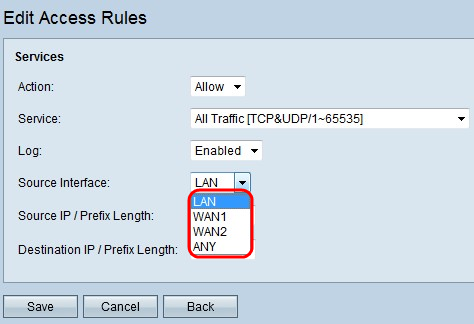
Step 6. Click the Interface drop-down list and choose the appropriate source interface. This interface is where the access rule would be enforced.
- LAN — The access rule affects only the LAN traffic.
- WAN 1 — The access rule affects only the WAN 1 traffic.
- WAN 2 — The access rule affects only the WAN 2 traffic.
- Any — The access rule affects all traffic in any of the interfaces of the device.

Step 7. Choose the appropriate source IP type to which the access rule is applied from the Source IP/ Prefix Length drop-down list.
- ANY — Any packets that are received from a network of the device has the rule applied to them.
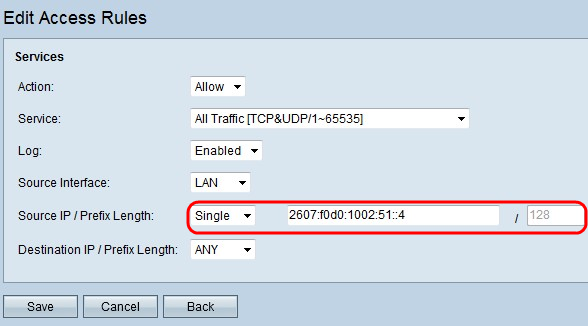
- Single — Only a single specified IP address in the network of the device has the rule applied to it. Enter the desired IPv6 address in the adjacent field.
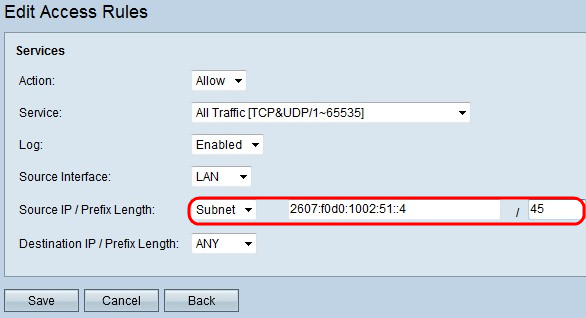
- Subnet — Only the IP addresses of a subnet have the rule applied to it. Enter the IPv6 network address and prefix length of the desired subnet in the adjacent fields.

Step 8. Choose the appropriate destination IP type to which the access rule is applied from the Destination IP / Prefix Length drop-down list.
- Any — Any destination IP address has the rule applied to them.
- Single — Only a single specified IP address on the network of the device has the rule applied to it. Enter the desired IPv6 address.
- Subnet — Only the IP addresses of a subnet have the rule applied to it. Enter the IPv6 network address and prefix length of the desired subnet in the adjacent fields.
Step 9. Click Save for the changes to be effective.
 Feedback