DHCPv6 Configuration and Monitoring on RV32x VPN Router Series
Available Languages
Objective
This article guides you through the setup of the DHCP IPv6 settings and explains the DHCP IPv6 Status page on the RV32x VPN Router Series. DHCP is a network protocol that allows a server, in this case the router, to assign IP addresses to devices connected on its networks from a pool of valid addresses. It is an efficient way for devices on a network to automatically acquire IP addresses. These settings can be configured and are explained in the DHCP Setup section. The DHCP Status section gives an explanation of the DHCP information that this feature displays.
Applicable Device
• RV320 Dual WAN VPN Router
• RV325 Gigabit Dual WAN VPN Router
Software Version
• v1.1.0.09
DHCP Setup
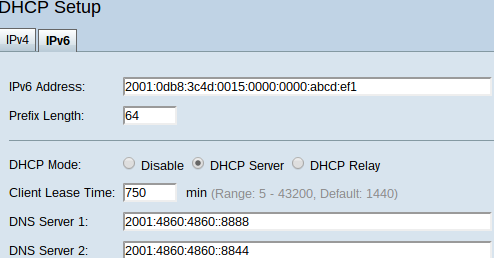
Step 1. Log in to the Router Configuration Utility and choose DHCP > DHCP Setup. The DHCP Setup page opens:

Step 2. Click the IPv6 tab to configure the DHCP IPv6 settings.
Note: The IPv6 tab is only available if Dual-Stack IP is enabled on the Network Setup page.

Step 3. Enter the IPv6 address for the router in the IPv6 Address field. The IPv6 address is the 128-bit identification address used so that devices can communicate with each other.
Step 4. Enter the prefix length for the IPv6 address of the router in the Prefix Length field to establish the subnet of the IPv6 address.
Step 5. In the DHCP Mode field, click the desired radio button to choose the mode of DHCP to use.
• Disable — Disables DHCP on the router. No other parameters are editable.
• DHCP Server — Router acts as DHCP server. Handles the DHCP request from clients and designates IPv6 addresses.
• DHCP Relay — Router passes DHCP requests and replies to another DHCP server. It does not do any IPv6 addressing to other devices. No other parameters are editable.
Step 6. Enter time, in minutes, for lease duration in the Client Lease Time field. It is the amount of time a client is allowed to connect to the router with the IP address it was given through the DHCP process.
Step 7. (Optional) Static entered DNS servers are able to provide faster DNS queries than dynamically assigned DNS servers since they do not have to look around for a server. Enter the IPv6 address of static DNS servers in the DNS 1 and DNS 2 fields if desired. The DNS 2 server is used in the case that the DNS 1 server is not available.
Note: The IPv6 Address Pool Table shows the range of IPv6 addresses that can be assigned through DHCP. This can be added to or modified.

Step 8. Click Add to enter an address range. The Start Address, End Address, and Prefix Length fields in the IPv6 Address Pool Table become editable.

Step 9. Enter the starting IPv6 address, the ending IPv6 address, and prefix length of such range in their respective fields.
Step 10. Click Save to save additions to the IPv6 Address Pool Table.

Step 11. To modify an IPv6 Address Pool Table range, check the check box of the desired range.
Step 12. Click Edit to edit an entry - the range input fields become editable - or click Delete to delete an IPv6 Address Pool Table range.
Step 13. Click Save to finish configuring the IPv6 DHCP settings.
DHCP Status
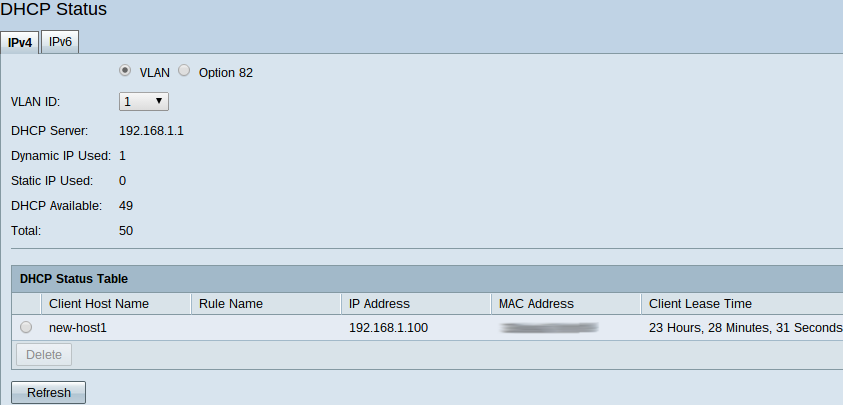
Step 1. Log in to the Router Configuration Utility and choose DHCP > DHCP Status. The DHCP Status page opens:

Note: DHCP Status displays information on the DHCP server and its clients.
Step 2. Click the IPv6 tab to display IPv6 information.

Step 3. Choose the IPv6 prefix about which you wish to view information from the Prefix drop-down list.
The following statuses are displayed:
• DHCP Server — Displays the IPv6 address of the DHCP server the router utilizes.
• Dynamic IP Used — Displays the number of dynamic IPv6 addresses that are currently used.
• Static IP Used — Not applicable for IPv6.
• DHCP Available — Displays the number of available dynamic IPv6 addresses that the DHCP server has.
• Total — Displays the total number of IPv6 addresses that the DHCP server manages.
Note: The DHCP Status Table displays DHCP client information. It displays the following client information:
• Client Host Name — The name of a device on the network.
• IP Address — The dynamic IPv6 address that the DHCP server assigns to the client for a period of time.
• Client Lease Time — The exact amount of time that a network user can have the IPv6 address that was assigned by the DHCP server.
Step 4. (Optional) To update the data displayed click Refresh.
 Feedback