DHCPv4 Configuration and Monitoring on RV32x VPN Router Series
Available Languages
Objective
This document guides you through the setup of the DHCP IPv4 settings and DHCP IPv4 status explanations on the RV32x VPN Router Series.
Dynamic Host Control Protocol DHCP is a network protocol that allows a server, in this case the router, to assign IP addresses to devices connected on its networks from a pool of valid addresses. It is an efficient way for devices on a network to automatically acquire IP addresses instead of manual IP assignment. These settings can be configured and are explained in the DHCP Setup section. The DHCP Status section gives an explanation of the DHCP information that this feature displays.
Applicable Devices
• RV320 Dual WAN VPN Router
• RV325 Gigabit Dual WAN VPN Router
Software Version
• v1.1.0.09
DHCP Setup
Step 1. Log in to the Router Configuration Utility and choose DHCP > DHCP Setup. The DHCP Setup page opens:

Step 2. Click the IPv4 tab to configure DHCP settings.
Note: IPv4 DHCP services can be configured for both VLANs and Option 82 circuit IDs. The difference between the application of VLANs and Option 82 is that Option 82 offers a more secure way to provide DHCP services. This security comes from the addition of circuit IDs, which are inserted into requests that are forwarded to a DHCP server.
IPv4 VLAN DHCP

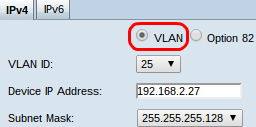
Step 1. Click the VLAN radio button to configure DHCP settings for a specific VLAN. Virtual Local Area Networks (VLANs) are networks that are logically divided into different broadcast domains.
Step 2. From the VLAN ID drop-down list choose the desired VLAN to configure how devices in that VLAN acquire IP addresses.
Note: A default management IPv4 address appears once a VLAN ID is chosen.
Step 3. Enter the desired management IPv4 address for the VLAN in the Device IP Address field. This is the IP address that the VLAN uses to communicate with the router and with other networks.
Step 4. Choose the subnet mask for the management IPv4 address from the Subnet Mask drop-down list. This determines the range of hosts to be present on the VLAN.

Step 5. In the DHCP Mode field click the desired radio button to choose the type of DHCP to use.
• Disable — Disables DHCP on the router. No other parameters are editable. If this radio button is clicked go to Step 14.
• DHCP Server — Router acts as a DHCP server. Handles the DHCP requests from clients and designates IP addresses. The Remote DHCP Server field becomes uneditable. If this radio button is clicked go to Step 6.
• DHCP Relay — Router passes DHCP requests to another DHCP server and forwards the DHCP replies of the server. It does not do any IP addressing to devices. To finish the configuration it is only needed to enter the IPv4 address of a DHCP server in the Remote DHCP Server field and continue to Step 14.
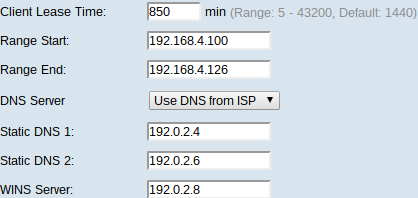
Step 6. Enter the time, in minutes, for the lease duration in the Client Lease Time field. It is the amount of time a client is allowed to connect to the router with the IP address it was given through the DHCP process.
Step 7. In the Range Start and Range End fields, enter the desired IPv4 addresses for the start and the end of the pool of IPv4 addresses that can be assigned through DHCP.
Caution: Make sure there are not any static IP addresses in this range and that they are in the same subnet as the entered management IP address for the chosen VLAN.
Step 8. From the DNS Server drop-down list choose the type of DNS to use. Domain Name System (DNS) is an Internet service that translates domain names, which are more easily understandable to users, into IP addresses that devices work with.
• Use DNS Proxy — Router performs as DNS server for its DHCP clients. The router acts as an intermediary for all DNS incoming queries on it and sends unknown requests out and stores them for future use.
• Use DNS from ISP — Gives DHCP clients the Internet Service Provider ISP DNS servers IPs for DNS queries.
• Use DNS as Below — Gives DHCP clients the user entered DNS server IP addresses to resolve DNS queries.
Timesaver: Steps 9 to 13 are not required to set up DHCP. Skip to Step 14 if you do not need to configure the DNS server IP address, WINS server IP address, or TFTP information.
Step 9. Enter the IPv4 addresses of static DNS servers in the Static DNS 1 and Static DNS 2 fields. Use these if Use DNS as Below is chosen from the DNS Server drop-down list. Static DNS servers are, at times, able to resolve DNS queries faster than dynamic DNS servers since they do not have to be looked for. DNS 2 is used if DNS 1 is not found or unable to resolve a query.
Step 10. Enter the IPv4 address of a Windows Internet Naming Service (WINS) server in the WINS Server field. A WINS server resolves NetBIOS names to IP addresses.

Step 11. Enter host name of a TFTP server in the TFTP Server Host Name field. A Trivial File Transfer Protocol TFTP server stores a devices backup configurations and settings. Useful when many devices need to be configured and manual input would be too time consuming.
Step 12. Enter the IP address of the TFTP server in the TFTP Server IP field.
Step 13. Enter the name the configuration file to be saved in the Configuration Filename field.
Step 14. Click Save to finish the configuration of the IPv4 DHCP settings.
IPv4 Option 82 DHCP

Step 1. Click the Option 82 radio button to configure DHCP with circuit IDs. Circuit IDs are user specified interface names at which the DHCP client is connected.
Note: For circuit IDs to be available they must be entered. Refer to the Option 82 Configuration on RV320 Router article for more information.
Step 2. From the Circuit ID drop-down list choose the desired Circuit ID to configure the DHCP mode it uses.
Note: A default management IPv4 address appears once a circuit ID is chosen.
Step 3. Enter an IPv4 management address for the router in the Device IP Address field. This is the IP address that the Option 82 circuit ID uses to communicate with the router and with other networks.
Step 4. Choose the subnet mask for the IPv4 address of the router from the Subnet Mask drop-down list.

Step 5. Enter the time, in minutes, for the lease duration in the Client Lease Time field. It is the amount of time a client is allowed to connect to the router with the IP address it was given through the DHCP process.
Step 6. In the Range Start and Range End fields enter the desired IPv4 addresses for the start and the end of the pool of IPv4 addresses that can be assigned through DHCP.
Caution: Make sure there are not any static IP addresses in this range and that they are in the same subnet as the entered management IP address for the chosen circuit ID.
Step 7. From the DNS Server drop-down list choose the type of DNS to use. Domain Name System (DNS) is an Internet service that translates domain names, which are more easily understandable to users, into IP addresses that devices work with.
• Use DNS Proxy — Router performs as DNS server for its DHCP clients. The router acts as an intermediary for all DNS incoming queries on it and sends unknown requests out and stores them for future use.
• Use DNS from ISP — Gives DHCP clients the Internet Service Provider ISP DNS servers IPs for DNS queries.
• Use DNS as Below — Gives DHCP clients the user entered DNS server IP addresses to resolve DNS queries.
Timesaver: Steps 8 to 12 are not required to set up DHCP. Skip to Step 13 if you do not need to configure the DNS server IP address, WINS server IP address, or TFTP information.
Step 8. Enter the IPv4 addresses of static DNS servers in the Static DNS 1 and Static DNS 2 fields. Use these if Use DNS as Below is chosen from the DNS Server drop-down list. Static DNS servers are, at times, able to resolve DNS queries faster than dynamic DNS servers since they do not have to be looked for. DNS 2 is used if DNS 1 is not found or unable to resolve a query.
Step 9. Enter the IPv4 address of a Windows Internet Naming Service (WINS) server in the WINS Server field. A WINS server resolves NetBIOS names to IP addresses.

Step 10. Enter host name of a TFTP server in the TFTP Server Host Name field. A Trivial File Transfer Protocol TFTP server stores a devices backup configurations and settings. Useful when many devices need to be configured and manual input would be too time consuming.
Step 11. Enter the IP address of the TFTP server in the TFTP Server IP field.
Step 12. Enter the name the configuration file to be saved in the Configuration Filename field.
Step 13. Click Save to finish the configuration of the IPv4 DHCP settings.
DHCP Status
Step 1. Log in to the Router Configuration Utility and choose DHCP > DHCP Status. The DHCP Status page opens:

The DHCP Status page displays information on the DHCP server and its clients.
Step 2. Click the IPv4 tab to display the IPv4 status information.
Step 3. Click either the VLAN or Option 82 radio button to view their respective DHCP statuses.
Step 4. If the VLAN radio button is clicked, choose a VLAN from the VLAN ID drop-down list to see its DHCP statuses. If the Option 82 radio button is clicked, choose a circuit ID from the Circuit ID drop-down list to see its DHCP statuses.

The following statuses are displayed for both VLAN and Option 82 IPv4 DHCP.
• DHCP Server — Displays the IP address of the DHCP server the router utilizes.
• Dynamic IP Used — Displays the number of dynamic IP addresses that are currently used.
• Static IP Used — Displays the number of static IP addresses that are currently used.
• DHCP Available — Displays the number of available dynamic IP addresses that the DHCP server has.
• Total — Displays the total number of IP addresses that the DHCP server manages.

The DHCP Status Table displays DHCP client information and allows you to release IP addresses from clients. It displays the following client information:
• Client Host Name — The name of a device on the network.
• IP Address — The dynamic IP address that the DHCP server assigns to the client for a period of time.
• MAC Address — The Media Access Control (MAC) address of a device. It is a non-configurable address specific to the Network Interface Controller (NIC) of a device.
• Client Lease Time — The exact amount of time that a network user can have the IP address that was assigned by the DHCP server.

Step 5. (Optional) Releasing a client allows for that assigned IP address to be free from that device and available for another device to be assigned to by the DHCP server. To release an IP address from a client, click the radio button of the client and click Delete.
Step 6. (Optional) To update the data displayed, click Refresh.
 Feedback