Manage Router Advertisement on RV320 and RV325 VPN Router Series
Available Languages
Objective
Router Advertisement is used to automatically configure IPv6 on multicast and point-to-point capable links. Each router multicasts its IP address periodically from each of its interfaces as a router advertisement. Hosts can listen to the advertisement and can discover the neighbor router prefix and parameters easily. On RV32x VPN Router Series, you can automatically configure IPv6 or you can manually configure IPv6 if you know the prefix and other parameters of IPv6.
Note: Before you configure router advertisement you have to enable Dual-Stack IP on the Setup Network page. If you do not configure Dual-Stack IP before you configure router advertisement, you are not able to open the Setup Network page.
This article explains how to manage router advertisement on the RV32x VPN Router Series.
Applicable Devices
• RV320 Dual WAN VPN Router
• RV325 Gigabit Dual WAN VPN Router
Software Version
• v1.1.0.09
Manage Router Advertisement
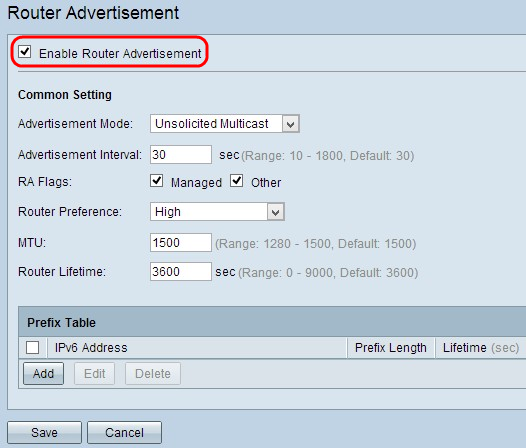
Step 1. Log in to the Web Configuration Utility and choose DHCP > Router Advertisement. The Router Advertisement page opens:

IPv6 Auto Configuration through Router Advertisement

Step 1. Check the Enable Router Advertisement check box to activate router advertisement.

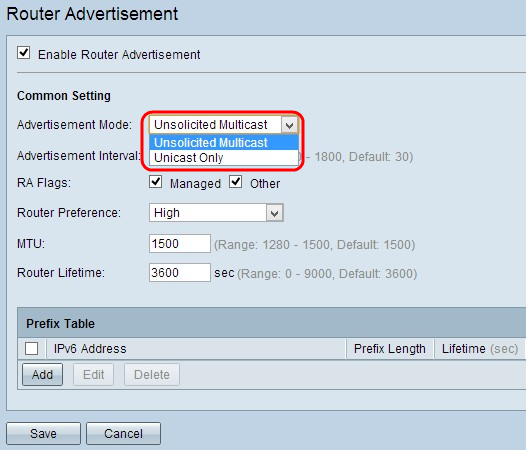
Step 2. Choose the appropriate mode of advertisement from the Advertisement Mode drop-down list.
• Unsolicited Multicast — Represents that the advertisement messages of the router are sent via multicast to each interface of the multicast group.
• Unicast Only — Represents that the advertisement messages of the router are sent to only some of the known IPv6 addresses. If you choose this option, skip Step 3.

Step 3. Enter the time duration that the router waits to send the next advertisement message in the Advertisement Interval field. The range is from 10 to 1800 seconds. The default value is 30 seconds.
Step 4. Check the appropriate RA Flags check box. A Router Advertisement (RA) flag is used to determine whether or not the host is able to use DHCPv6 to get the IP address and its related information.
• Managed — Represents that the host uses a self control and stateful DHCPv6 protocol to achieve stateful addresses and its related information through DHCPv6. A stateful address is an address that does not contain its prefix and parameters.
• Other — Represents that the host uses a self control and stateful DHCPv6 protocol to achieve non-address information like the IP address of the DNS server.

Step 5. Choose the appropriate router preference metric from the Router Preference drop-down list. The router preference is used in the situation where a host has access to multiple routers. Through the preference metric the host is able to choose the preferred router. If the host has access to only one router, the preference metric does not affect the host.
• High — Represents that the highest preference router is chosen when there are multiple routers. The default setting for router preference is High.
• Medium — Represents that the medium preference router is chosen when there are multiple routers.
• Low — Represents that the lowest preference router is chosen when there are multiple routers.

Step 6. Enter the size for the largest packet that can be sent through the network in the MTU field. The MTU (Maximum Transmission Unit) is used to guarantee the transmission of all messages in the network. The range is from 1280 bytes to 1500 bytes. The default value is 1500 bytes for Ethernet network. If you use a PPPoE connection, the default value is 1492 bytes.
Step 7. Enter the duration in seconds that the advertisement message of the router exists on the router in the Router Lifetime field. The default value is 3600 seconds.
Step 8. Click Save to save the settings.
IPv6 Manual Configuration

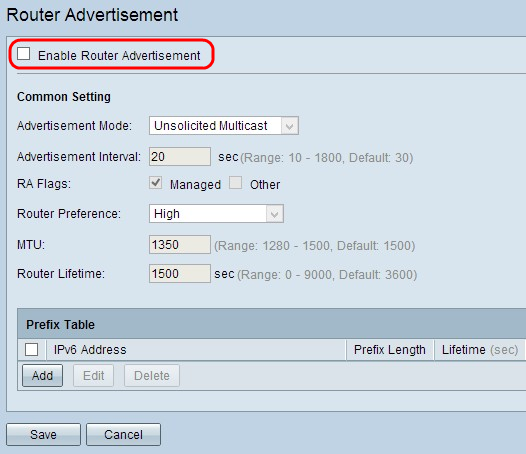
Step 1. To configure IPv6 manually, uncheck the Enable Router Advertisement check box to disable automatic router advertisement.

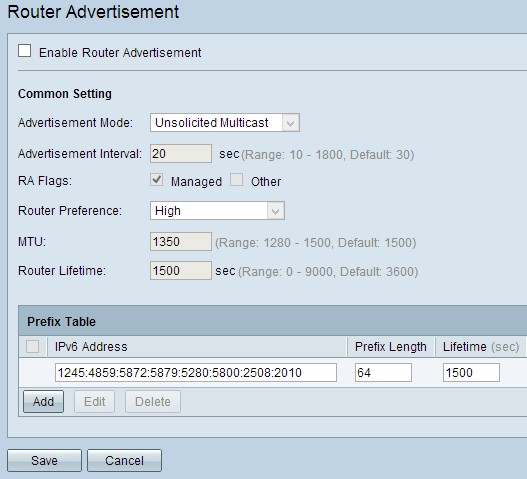
Step 2. Click Add to add a new IPv6 address that you want to broadcast in the Prefix Table. A new row is added in the Prefix Table:

Step 3. Enter the IPv6 address of the network that you want to broadcast in IPv6 Address field.

Step 4. Enter the prefix of the given IPv6 address in Prefix Length field. The prefix is used to route packets on the network. They are the most significant bits of the address.
Step 5. Enter the duration in seconds that the advertisement message of the router exists on the router in the Lifetime field.
Step 6. (Optional) To change any of the information, check the check box beside the appropriate IPv6 Address to select it, click Edit, and change the necessary information.
Step 7. (Optional) To delete any of the router advertisement check the check box beside the appropriate IPv6 Address to select it and click Delete.
Step 8. Click Save to save the settings.
 Feedback