Configure Simple Network Management Protocol (SNMP) on RV320 and RV325 VPN Routers
Available Languages
Objective
Simple Network Management Protocol (SNMP) is an application layer protocol which is used to manage and monitor network traffic. SNMP keeps all the activity records of various devices in the network to help you quickly find the source of issues in the network when needed. In the RV32x VPN Router Series, you can enable SNMPv1/v2c, SNMPv3, or both at the same time to have the desired performance of the network.
The objective of this document is to explain how to configure SNMP on the RV32x VPN Router Series.
Applicable Device
• RV320 Dual WAN VPN Router
• RV325 Gigabit Dual WAN VPN Router
Software Version
• v1.1.0.09
SNMP Configuration
Step 1. Log in to the web configuration utility and choose System Management > SNMP. The SNMP page opens:

Step 2. Enter the host name in System Name field.
Step 3. Enter the name or contact information of the person who is responsible for the router in the System Contact field.
Step 4. Enter the physical location of the router in the System Location field.
Note: The information entered in the System Contact and System Location fields do not modify the behavior of the device. You can input them as desired to help best manage your devices (for example, you may find it desirable to include a phone number in the System Contact field).
Step 5. Enter the trap community name to which the agent belongs in the Trap Community Name field. A trap is a message that is sent by the device when a specific event occurs. The trap community name can be up to 64 alphanumerical characters. The default trap community name is public.
Step 6. Click Save to save the settings.
SNMPv1/SNMPv2c Configuration
SNMPv1 is the first version of SNMP, and is now considered insecure. SNMPv2c is an improved version of SNMP. It provides more security than SNMPv1 and improved error handling.

Step 1. Check Enable SNMPv1/v2c to enable SNMPv1/2c.

Step 2. Enter a community name in the Get Community Name field. Get Community Name is the read only community string to authenticate the SNMP Get command. The Get command is used to retrieve the information from the SNMP device. The Get Community Name can be up to 64 alphanumerical characters. The default Get Community Name is public.
Step 3. Enter a community name in the Set Community Name field. It is the read/write community string to authenticate the SNMP Set command. The Set command is used to modify or set the variables on the device. The Set Community Name can be up to 64 alphanumerical characters. The default Set Community Name is private.
Step 4. Enter the IP address or domain name of the specific server where the SNMP management software runs in the SNMPv1/v2c Trap Receiver IP Address field. A trap message is sent to the administrator from the server to notify the administrator if any error or fault occurs.
Step 5. Click Save to save the settings.
SNMPv3 Configuration
SNMPv3 is the latest version of SNMP, and it provides the highest level of security among the three SNMP versions. It also provides remote configuration.

Step 1. Check Enable SNMPv3 to enable SNMPv3.
SNMPv3 Group Management
SNMPv3 group management allows you to create groups with different levels of access to the device. You can then map users into these groups as you deem appropriate.
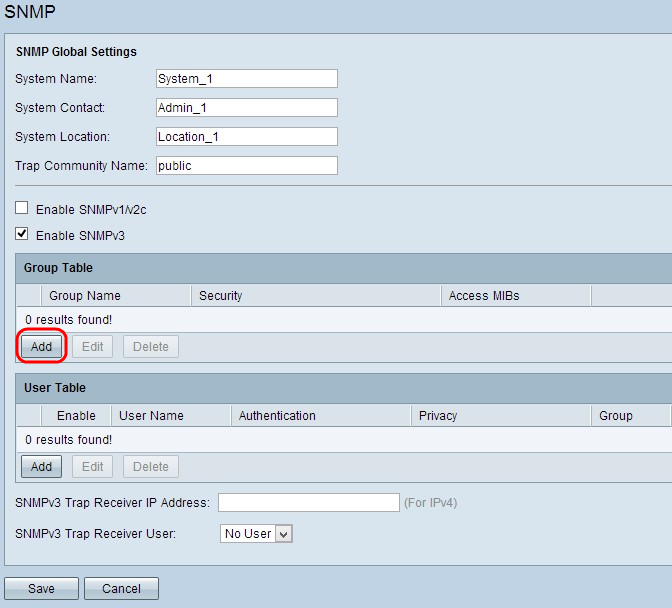
Step 1. Click Add in the Group Table to add a new group in the SNMPv3 Group Management table. The SNMPv3 Group Management page opens:

Step 2. Enter the name of the group in the Group Name field.

Step 3. Choose the type of security from the Security Level drop-down list. The types of security are described as follows:
• No Authentication, No Privacy — Users in this group will not be required to set an authentication password or to set a privacy password. Messages will not be encrypted, and users will not be authenticated
• Authentication, No Privacy — Users will be required to set an authentication password, but not a privacy password. Users will be authenticated when messages are received, but the messages will not be encrypted.
• Authentication Privacy — Users will be required to set both an authentication password and a privacy password. Users will be authenticated when messages are received. The messages will also be encrypted using the privacy password.
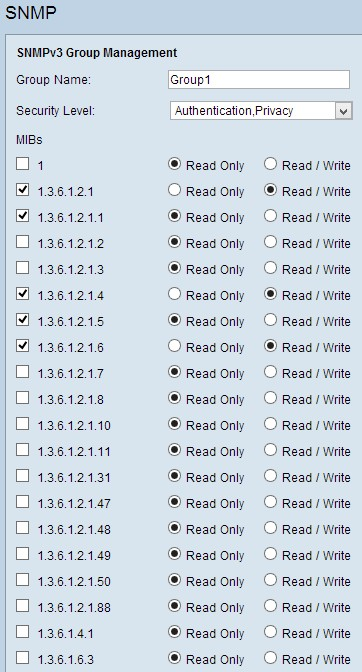
Step 4. Check the check boxes to select the specific Management Information Base (MIBs) to which you want the group to have access. MIBs are used to define the necessary information of the managed system. It is represented as iso.org.dod.internet.mgmt.mib. By setting specific MIBs, you can allow groups to have access to different parts of the device.
Step 5. Click the specific radio button for each checked MIB to choose the permission level available to the group. The permissions levels are defined as follows:
• Read Only — Users in this group will be able to read from the MIB, but not modify it.
• Read / Write — Users in this group will be able to both read from the MIB, and to modify it.
Step 6. Scroll down and click Save to save the settings. This adds the group to the Group Table.
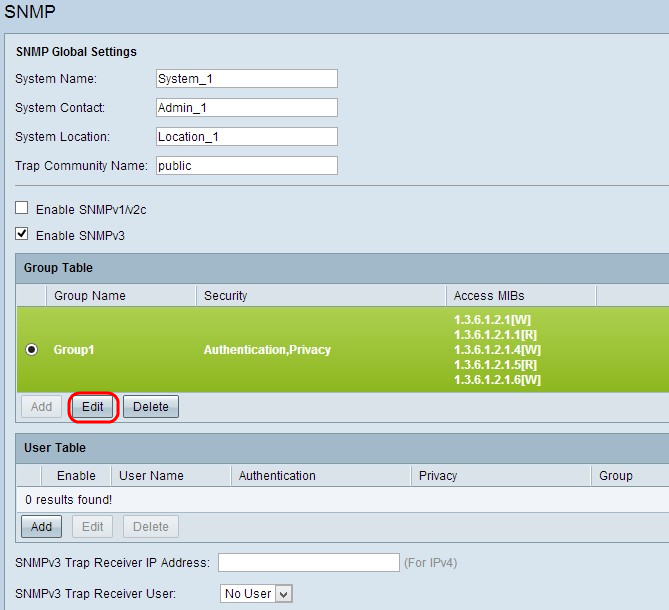
Step 7. (Optional) If you want to change the configured group, click the radio button of the desired group and then click Edit and change the respective field(s).
Step 8. (Optional) If you want to delete the configured group, click the desired radio button of the group and then click Delete.
SNMPv3 User Management
SNMP users are the remote users for whom the SNMP services are executed.
Note: You have to add a group to the Group Table before you can add a user in the User Table.

Step 1. Click Add from the User Table to add a new user in the SNMPv3 User Management Table. The SNMPv3 User Management page opens:

Step 2. Check Enable to enable user management for SNMP.
Step 3. Enter a user name in User Name field.
Step 4. Choose the desired group from the Group drop-down list. The new user is added to this specific group.
Step 5. Click the specific radio button to choose an Authentication Method. The Authentication Methods are described as follows:
• MD5 — Message Digest Algorithm-5 (MD5) is a 32 digit hexadecimal hash function.
• SHA — Secure Hash Algorithm (SHA) is a 160 bit hash function considered more secure than MD5.
Step 6. Enter a password for the authentication in the Authentication Password field. The authentication password is the password which is shared in advance between the devices. When they exchange traffic, they use the specific password to authenticate the traffic.
Step 7. Click the specific radio button to choose the desired encryption method in the Privacy Method field.
• DES — Data Encryption Standard (DES) is a 56-bit encryption method. It is considered insecure, but may be necessary when the device is used in conjunction with other devices that do not support AES.
• AES — Advanced Encryption Standard (AES) uses a 128-bit, 192-bit or 256-bit encryption method. It is considered more secure than DES.
Step 8. Enter a password for the privacy in the Privacy Password field. The privacy password is the password which is used to encrypt messages.
Step 9. Click Save to save the settings. This adds the user to the User Table.
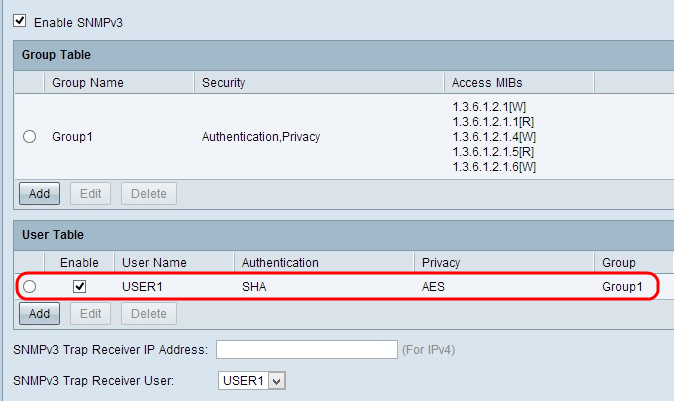
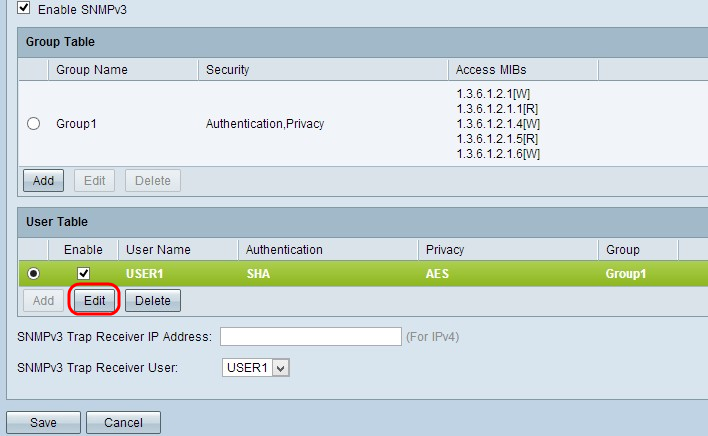
Step 10. (Optional) If you want to change the configured user, click the radio button of the desired user, and then click Edit and change the respective field.
Step 11. (Optional) If you want to delete the configured user, click the radio button of the desired user, and then click Delete.

Step 12. Enter the IP address of the SNMPv3 Trap Receiver in the SNMPv3 Trap Receiver IP Address field.
Step 13. Choose the respective trap user from the SNMPv3 Trap Receiver User drop-down list. This is the user who receives the trap message when a trap event occurs.
Step 14. Click Save to save the settings.
 Feedback