Setup Wizard on RV215W
Available Languages
Objective
The Setup Wizard allows a network administrator to configure the basic settings for the RV215W quickly and conveniently. This article explains how to configure the Setup Wizard for the RV215W.
Applicable Devices
• RV215W
Software Version
• 1.1.0.5
Advanced VPN Setup
Configure WAN with DHCP
Dynamic Host Configuration Protocol (DHCP) allows you to connect your router to the Internet automatically. The Internet Service Provider (ISP) uses DHCP to configure the settings for the router for you. Perform this procedure if your ISP uses DHCP for Internet connectivity.
Step 1. Log in to the web configuration utility and choose Administration > Setup Wizard. The Setup Wizard page opens:
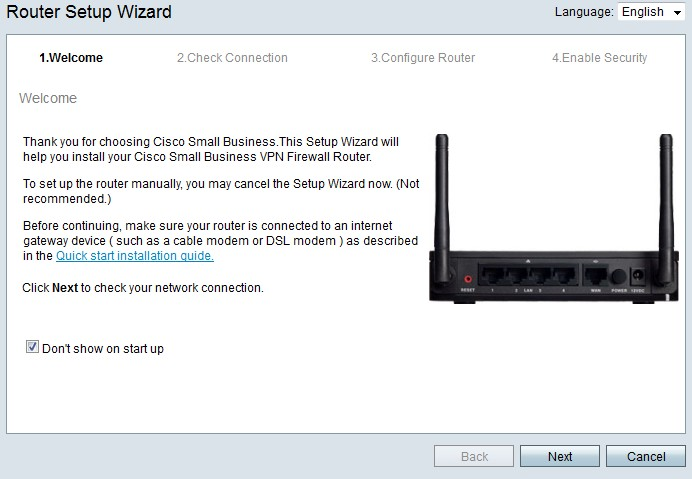
Step 2. Check the Don't show on start up check box to prevent the display of the Setup Wizard after login.
Step 3. Click Next.
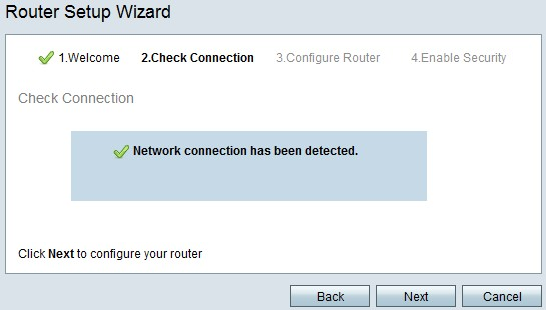
Step 4. The RV215W checks for an Internet connection. After it finishes, click Next.

Step 5. Click the Dynamic IP Address, or DHCP (Recommended) radio button
Step 6. Click Next.
Configure WAN with Static IP Address
A static IP address is an address that does not change. These generally have to be purchased from an ISP. Perform this procedure if your ISP uses static IP addresses for Internet connectivity. This procedure explains how to configure a static IP WAN connection with the Setup Wizard.
Step 1. Log in to the web configuration utility and choose Administration > Setup Wizard. The Setup Wizard page opens:

Step 2. Check the Don't show on start up check box to prevent the display of the Setup Wizard after login.
Step 3. Click Next.

Step 4. The RV215W checks for an Internet connection. After it finishes, click Next.

Step 5. Click the Static IP radio button.
Step 6. Click Next.

Step 7. In the Static IP Address field, enter the static IP address of the WAN interface.
Step 8. In the Subnet Mask field, enter the subnet mask for the static WAN interface address.
Step 9. In the Gateway IP field, enter the IP address of the gateway that the WAN interface is to use to connect to the Internet.
Step 10. In the DNS field, enter the IP address of the primary Domain Name System (DNS) server. A DNS server maps domain names to IP addresses to be used by network devices.
Step 11. (Optional) In the Secondary DNS (optional) field, enter the IP address of the secondary Domain Name System (DNS) server.
Step 12. Click Next.
Configure WAN with PPPoE
Point-to-Point Protocol over Ethernet (PPPoE) uses a simple username and password to access the Internet connection of the ISP. Perform this procedure if your ISP uses PPPoE for Internet connectivity. The procedure explains how to configure settings for PPPoE.
Step 1. Log in to the web configuration utility and choose Administration > Setup Wizard. The Setup Wizard page opens:

Step 2. Check the Don't show on start up check box to prevent the display of the Setup Wizard after login.
Step 3. Click Next.

Step 4. The RV215W checks for an Internet connection. After it finishes, click Next.
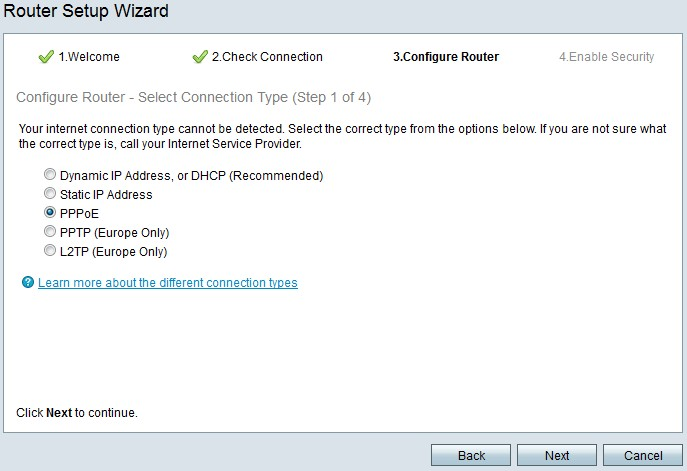
Step 5. Click the PPPoE radio button.
Step 6. Click Next.
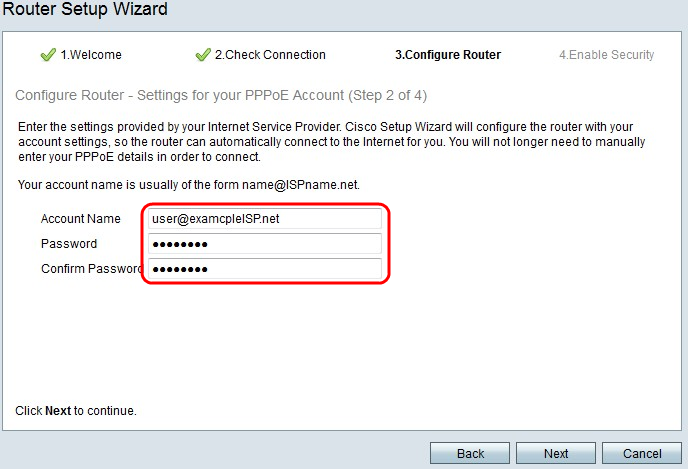
Step 7. In the Account Name field, enter the account name registered with the ISP.
Step 8. In the Password field, enter the password for the PPPoE account.
Step 9. In the Confirm Password field, retype the password.
Step 10. Click Next.
Configure WAN with PPTP
Point-to-Point Tunneling Protocol (PPTP) uses both a static IP address and an account with the ISP to connect to the Internet. Perform this procedure if your ISP uses a PPTP connection for Internet connectivity. This procedure explains how to configure settings for PPTP.
Step 1. Log in to the web configuration utility and choose Administration > Setup Wizard. The Setup Wizard page opens:

Step 2. Check the Don't show on start up check box to prevent the display of the Setup Wizard after login.
Step 3. Click Next.

Step 4. The RV215W checks for an Internet connection. After it finishes, click Next.

Step 5. Click the PPTP (Europe Only) radio button
Step 6. Click Next.

Step 7. In the Account Name field, enter the account name registered with the ISP.
Step 8. In the Password field, enter the password for the PPTP account.
Step 9. In the Confirm Password field, retype the password.
Step 10. In the Static IP Address field, enter the static IP address of the WAN interface.
Step 11. In the Subnet Mask field, enter the subnet mask for the static WAN interface address.
Step 12. In the Gateway IP field, enter the IP address of the gateway that the WAN interface is to use to connect to the Internet.
Step 13. In the Server field, enter the IP address of the Internet server for the ISP.
Step 14. Click Next.
Configure WAN with L2TP
Layer 2 Tunneling Protocol (L2TP) also uses both a static IP address and an account with the ISP to connect to the Internet. Perform this procedure if your ISP uses an l2TP connection for Internet connectivity. This procedure explains how to configure settings for L2TP.
Step 1. Log in to the web configuration utility and choose Administration > Setup Wizard. The Setup Wizard page opens:
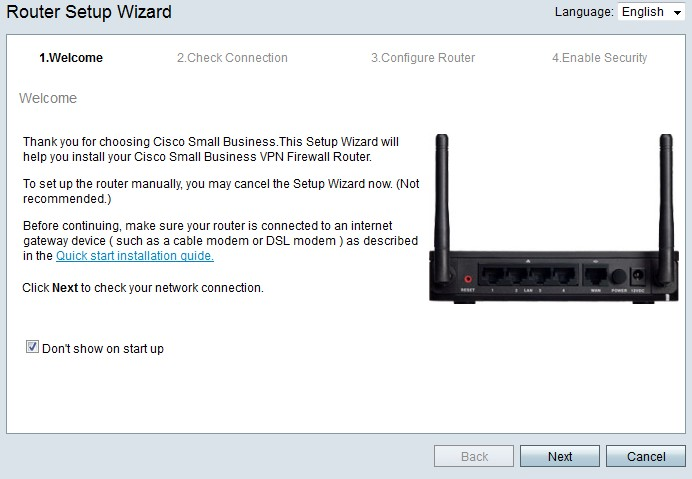
Step 2. Check the Don't show on start up check box to prevent the display of the Setup Wizard after login.
Step 3. Click Next.
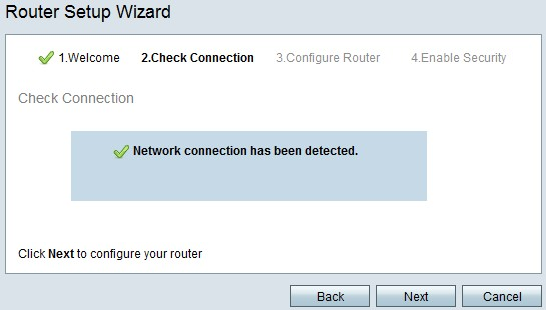
Step 4. The RV215W checks for an Internet connection. After it finishes, click Next.

Step 5. Click the L2TP (Europe Only) radio button
Step 6. Click Next.

Step 7. In the Account Name field, enter the account name registered with the ISP.
Step 8. In the Password field, enter the password for the L2TP account.
Step 9. In the Confirm Password field, retype the password.
Step 10. In the Static IP Address field, enter the static IP address of the WAN interface.
Step 11. In the Subnet Mask field, enter the subnet mask for the static WAN interface address.
Step 12. In the Gateway IP field, enter the IP address of the gateway that the WAN interface is to use to connect to the Internet.
Step 13. In the Server field, enter the IP address of the Internet server for the ISP.
Step 14. Click Next.
Final Settings
Perform this procedure after you have configure the WAN Internet connection type. This procedure explains how to configure the final settings for the Setup Wizard.

Step 1. From the Time Zone drop-down list, choose a time zone to apply to the RV215W.
Step 2. Perform one of the following actions:
• Enable Network Time Protocol synchronization — Click this radio button to use an Internet resource to set the date and time on the RV215W.
• Set the date and time manually — Click this radio button to manually set the date and time on the RV215W.
• click here to import them from your computer — Click the here link to automatically set the date and time to the date and time of the connected computer.
Step 3. (Optional) If you chose Set the date and time manually in Step 2, choose the date and time from the Year, Month, Day, and Time drop-down lists.
Step 4. Click Next.
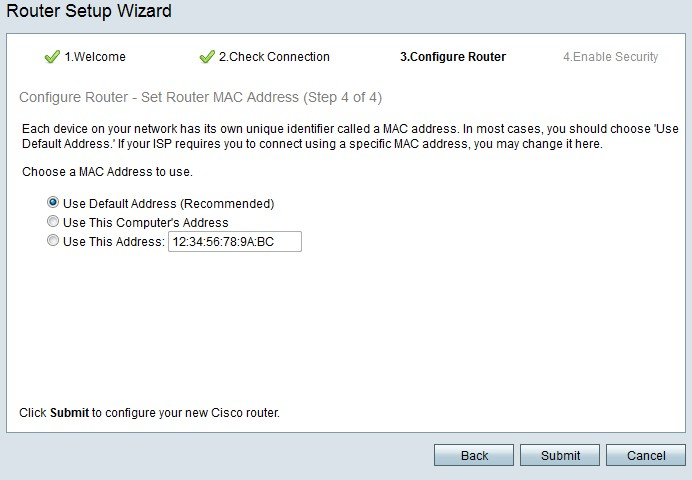
Step 5. Click a radio button according to the desired type of MAC address.
• Use Default Address (Recommended) — This option sets the default MAC address of the RV215W as the MAC address for the RV215W. This option should be used in most situations.
• Use This Computer's Address — This option sets the MAC address of the connected computer as the MAC address for the RV215W.
• Use This Address — This option allows you to enter a MAC address for the device to use. Use this option if your ISP requires the RV215W to have a specific MAC address

Step 6. (Optional) If you chose Use This Address in Step 5, enter the MAC address in the adjacent text-entry field to Use This Address.
Step 7. Click Submit.

Step 8. Click Next.

Step 9. In the Router Password, enter the password for the administrative account.
Step 10. In the Confirm Password, re-enter the password for the administrative account.
Step 11. (Optional) Check the Disable Password Strength Enforcement check box to disable password strength requirements. This option makes your network less secure.
Step 12. Click Next.

Step 13. In the Network Name field, enter a name with which the network to be identified.
Step 14. Click Next.

Step 15. Click a radio button according to the desired type of network security.
• Best Security (WPA2 Personal - AES) — This option is the most secure for wireless networks but does not work with all devices especially older devices.
• Better Security (WPA Personal - TKIP/AES) — This option is not as secure as WPA2 Personal - AES but works with most devices.
• No Security (Not Recommended) — This option uses no security for the wireless network and leaves network vulnerable. This option is not recommended.

Step 16. In the text-entry field, enter a 8 to 63 characters or 64 hexadecimal digits for the security key, or use the automatically generated security key provided in the field.
Step 17. Click Next.
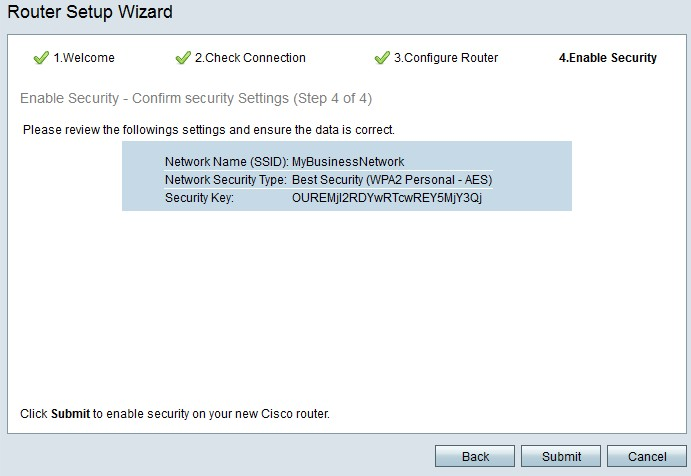
Step 18. Click Submit. The Setup Wizard finalizes your settings.

Step 19. Click Finish.
 Feedback