Advanced VPN Setup on RV215W
Available Languages
Objective
A Virtual Private Network (VPN) is a secure connection established within a network or between networks. VPNs serve to isolate traffic between specified hosts and networks from the traffic of unauthorized hosts and networks. This article explains how to configure the Advanced VPN Setup on the RV215W.
Applicable Devices
• RV215W
Software Version
• 1.1.0.5
Advanced VPN Setup
Initial Settings
This procedure explains how to configure the initial settings of the Advanced VPN Setup.
Step 1. Log in to the web configuration utility and choose VPN > Advanced VPN Setup. The Advanced VPN Setup page opens:

Step 2. (Optional) Check the Enable check box in the NAT Traversal field if you want to enable Network Address Translation (NAT) Traversal for the VPN connection. NAT Traversal allows a VPN connection to be made between gateways that use NAT. Choose this option if your VPN connection passes through a NAT-enabled gateway.
Step 3. (Optional) Check the Enable check box in the NETBIOS field if you want to enable Network Basic Input/Output System (NetBIOS) broadcasts to be sent through the VPN connection. NetBIOS allows hosts to communicate with each other within a LAN.
IKE Policy Settings
Internet Key Exchange (IKE) is a protocol used to establish a secure connection for communication in a VPN. This established, secure connection is called a Security Association (SA). This procedure explains how to configure an IKE policy for the VPN connection to use for security. For a VPN to function properly, the IKE policies for both end points should be identical.
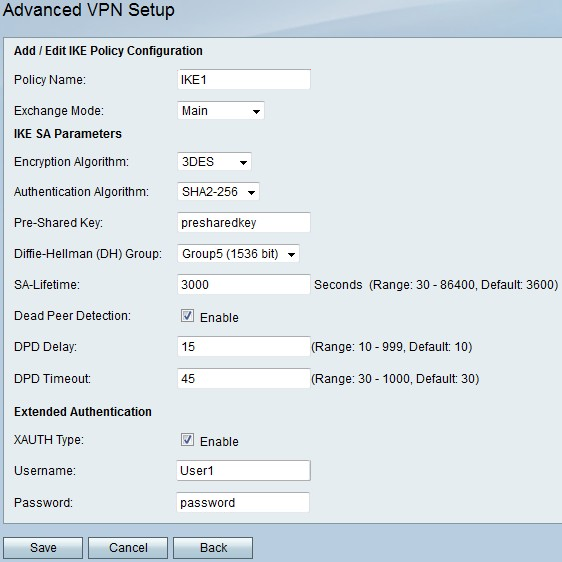
Step 1. In the IKE Policy Table, click Add Row to create a new IKE policy. To edit an IKE policy, check the check box for the policy and click Edit. The Advanced VPN Setup page changes:

Step 2. In the Policy Name field, enter a name for the IKE policy.
Step 3. From the Exchange Mode drop-down list, choose an option.
• Main — This option allows the IKE policy to operate more securely but slower than aggressive mode. Choose this option if a more secure VPN connection is needed.
• Aggressive — This option allows the IKE policy to operate faster but less securely than main mode. Choose this option if a faster VPN connection is needed.

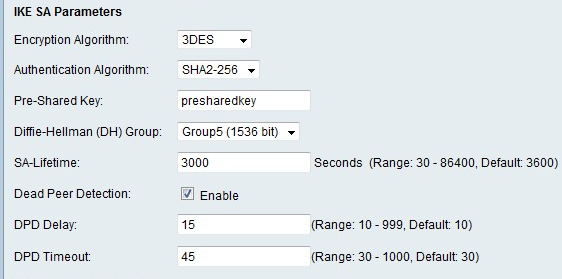
Step 4. From the Encryption Algorithm drop-down list, choose an option.
• DES — Data Encryption Standard (DES) is a 56-bit, old encryption method which is not a very secure encryption method, but may be required for backwards compatibility.
• 3DES — Triple Data Encryption Standard (3DES) is a 168-bit, simple encryption method used to increase the key size because it encrypts the data three times. This provides more security than DES but less security than AES.
• AES-128 — Advanced Encryption Standard with 128-bit key (AES-128) uses a 128-bit key for AES encryption. AES is faster and more secure than DES. In general, AES is also faster and more secure than 3DES. AES-128 is faster but less secure than AES-192 and AES-256.
• AES-192 — AES-192 uses a 192-bit key for AES encryption. AES-192 is slower but more secure than AES-128, and faster but less secure than AES-256.
• AES-256 — AES-256 uses a 256-bit key for AES encryption. AES-256 is slower but more secure than AES-128 and AES-192.
Step 5. From the Authentication Algorithm drop-down list, choose an option.
• MD5 — Message-Digest Algorithm 5 (MD5) uses a 128-bit hash value for authentication. MD5 is less secure but faster than SHA-1 and SHA2-256.
• SHA-1 — Secure Hash Function 1 (SHA-1) use a 160-bit hash value for authentication. SHA-1 is slower but more secure than MD5, and SHA-1 is faster but less secure than SHA2-256.
• SHA2-256 — Secure Hash Algorithm 2 with a 256-bit hash value (SHA2-256) uses a 256-bit hash value for authentication. SHA2-256 is slower but secure than MD5 and SHA-1.
Step 6. In the Pre-Shared Key field, enter a preshared key that the IKE policy uses.
Step 7. From the Diffie-Hellman (DH) Group drop-down list, choose which DH group the IKE uses. Hosts in a DH group can exchange keys without knowledge of each other. The higher the group bit number is, the more secure the group is.
Step 8. In the SA-Lifetime field, enter how long in seconds a SA for the VPN lasts before the SA is renewed.
Step 9. (Optional) Check the Enable check box in the Dead Peer Detection field to enable Dead Peer Detection (DPD). DPD monitors IKE peers to see if a peer has ceased to function. DPD prevents the waste of network resources on inactive peers.
Step 10. (Optional) If you enabled DPD in Step 9, enter how often (in seconds) the peer is checked for activity in the DPD Delay field.
Step 11. (Optional) If you enabled DPD in Step 9, enter how many seconds to wait before an inactive peer is dropped inn the DPD Timeout field.

Step 12. (Optional) Check the Enable check box in the XAUTH Type field to enable Extended Authentication (XAUTH). XAUTH allows multiple users to use a single VPN policy rather than a VPN policy for each user.
Step 13. (Optional) If you enabled XAUTH in Step 12, enter the username to use for the policy in the Username field.
Step 14. (Optional) If you enabled XAUTH in Step 12, enter the password to use for the policy in the Password field.
Step 15. Click Save. The original Advanced VPN Setup page re-appears.
VPN Policy Settings
This procedure explains how to configure a VPN policy for the VPN connection to use. For a VPN to function properly, the VPN policies for both end points should be identical.
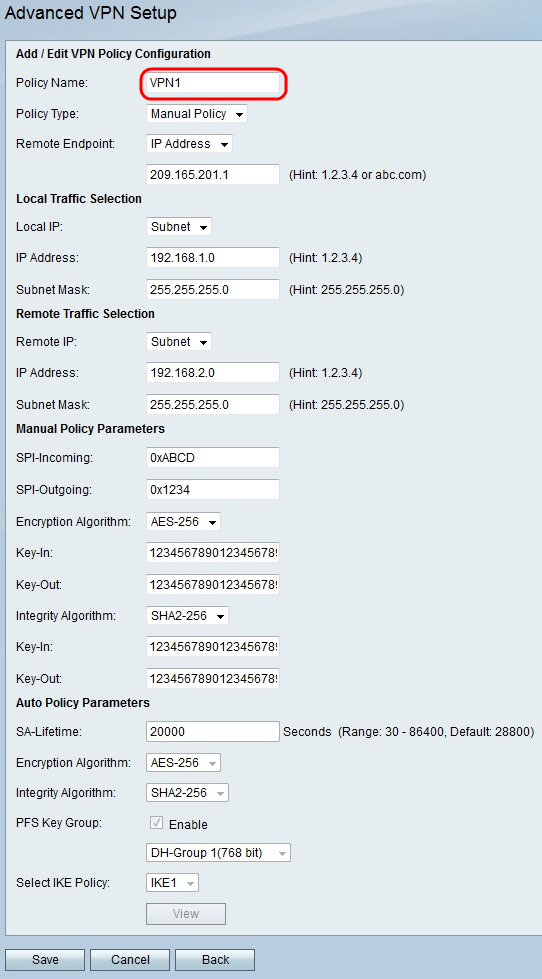
Step 1. In the VPN Policy Table, click Add Row to create a new VPN policy. To edit a VPN policy, check the check box for the policy and click Edit. The Advanced VPN Setup page changes:

Step 2. In the Policy Name field, enter a name for the VPN policy.
Step 3. From the Policy Type drop-down list, choose an option.
• Manual Policy — This option allows you configure the keys for data encryption and integrity.
• Auto Policy — This option uses an IKE policy for data integrity and encryption key exchanges.
Step 4. From the Remote Endpoint drop-down list, choose an option.
• IP Address — This option identifies the remote network by a public IP address.
• FQDN — This option uses a Fully Qualified Domain Name (FQDN) to a identify the remote network.

Step 5. In the text-entry field below the Remote Endpoint drop-down list, enter either the public IP address or domain name of the remote address.

Step 6. From the Local IP drop-down list, choose an option.
• Single — This option uses a single host as the local VPN connection point.
• Subnet — This option uses a subnet of the local network as the local VPN connection point.
Step 7. In the IP Address field, enter the host or subnet IP address of the local subnet or host.
Step 8. (Optional) If you chose Subnet in Step 6, enter the subnet mask for the local subnet in the Subnet Mask field.
Step 9. From the Remote IP drop-down list, choose an option.
• Single — This option uses a single host as the remote VPN connection point.
• Subnet — This option uses a subnet of the remote network as the remote VPN connection point.

Step 10. In the IP Address field, enter the host or subnet IP address of the remote subnet or host.
Step 11. (Optional) If you chose Subnet in Step 9, enter the subnet mask for the remote subnet in the Subnet Mask field.
Note: If you chose Manual Policy in Step 3, perform Step 12 through Step 19; otherwise, skip Step 20.

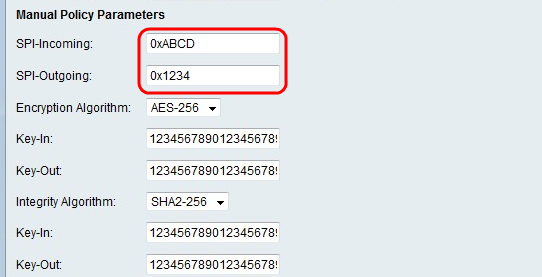
Step 12. In the SPI-Incoming field, enter a three to eight hexadecimal characters for Security Parameter Index (SPI) tag for incoming traffic on the VPN connection. The SPI tag is used to distinguish the traffic of one session from the traffic of other sessions.
Step 13. In the SPI-Outgoing field, enter a three to eight hexadecimal characters for SPI tag for outgoing traffic on the VPN connection.
Step 14. From the Encryption Algorithm drop-down list, choose an option.
• DES — Data Encryption Standard (DES) is a 56-bit, old encryption method which is not a very secure encryption method, but may be required for backwards compatibility.
• 3DES — Triple Data Encryption Standard (3DES) is a 168-bit, simple encryption method used to increase the key size because it encrypts the data three times. This provides more security than DES but less security than AES.
• AES-128 — Advanced Encryption Standard with 128-bit key (AES-128) uses a 128-bit key for AES encryption. AES is faster and more secure than DES. In general, AES is also faster and more secure than 3DES. AES-128 is faster but less secure than AES-192 and AES-256.
• AES-192 — AES-192 uses a 192-bit key for AES encryption. AES-192 is slower but more secure than AES-128, and faster but less secure than AES-256.
• AES-256 — AES-256 uses a 256-bit key for AES encryption. AES-256 is slower but more secure than AES-128 and AES-192.

Step 15. In the Key-In field, enter a key for the inbound policy. The key length depends on the algorithm chosen in Step 14.
• DES uses a 8 character key.
• 3DES uses a 24 character key.
• AES-128 uses a 12 character key.
• AES-192 uses a 24 character key.
• AES-256 uses a 32 character key.
Step 16. In the Key-Out field, enter a key for the outgoing policy. The key length depends on the algorithm chosen in Step 14. The key lengths are the same as Step 15.
Step 17. From the Integrity Algorithm drop-down list, choose an option.
• MD5 — Message-Digest Algorithm 5 (MD5) uses a 128-bit hash value for data integrity. MD5 is less secure but faster than SHA-1 and SHA2-256.
• SHA-1 — Secure Hash Function 1 (SHA-1) use a 160-bit hash value for data integrity. SHA-1 is slower but more secure than MD5, and SHA-1 is faster but less secure than SHA2-256.
• SHA2-256 — Secure Hash Algorithm 2 with a 256-bit hash value (SHA2-256) uses a 256-bit hash value for data integrity. SHA2-256 is slower but secure than MD5 and SHA-1.

Step 18. In the Key-In field, enter a key for the inbound policy. The key length depends on the algorithm chosen in Step 17.
• MD5 uses a 16 character key.
• SHA-1 uses a 20 character key.
• SHA2-256 uses a 32 character key.
Step 19. In the Key-Out field, enter a key for the outgoing policy. The key length depends on the algorithm chosen in Step 17. The key lengths are the same as Step 18.
Note: If you chose Auto Policy in Step 3, perform Step 20 through Step 25; otherwise, skip to Step 26.

Step 20. In the SA-Lifetime field, enter how long in seconds the SA lasts before renewal.
Step 21. From the Encryption Algorithm drop-down list, choose an option.
• DES — Data Encryption Standard (DES) is a 56-bit, old encryption method which is not a very secure encryption method, but may be required for backwards compatibility.
• 3DES — Triple Data Encryption Standard (3DES) is a 168-bit, simple encryption method used to increase the key size because it encrypts the data three times. This provides more security than DES but less security than AES.
• AES-128 — Advanced Encryption Standard with 128-bit key (AES-128) uses a 128-bit key for AES encryption. AES is faster and more secure than DES. In general, AES is also faster and more secure than 3DES. AES-128 is faster but less secure than AES-192 and AES-256.
• AES-192 — AES-192 uses a 192-bit key for AES encryption. AES-192 is slower but more secure than AES-128, and faster but less secure than AES-256.
• AES-256 — AES-256 uses a 256-bit key for AES encryption. AES-256 is slower but more secure than AES-128 and AES-192.
Step 22. From the Integrity Algorithm drop-down list, choose an option.
• MD5 — Message-Digest Algorithm 5 (MD5) uses a 128-bit hash value for data integrity. MD5 is less secure but faster than SHA-1 and SHA2-256.
• SHA-1 — Secure Hash Function 1 (SHA-1) use a 160-bit hash value for data integrity. SHA-1 is slower but more secure than MD5, and SHA-1 is faster but less secure than SHA2-256.
• SHA2-256 — Secure Hash Algorithm 2 with a 256-bit hash value (SHA2-256) uses a 256-bit hash value for data integrity. SHA2-256 is slower but secure than MD5 and SHA-1.
Step 23. Check the Enable check box in the PFS Key Group to enable Perfect Forward Secrecy (PFS). PFS increases the VPN security, but slows the speed of connection.
Step 24. (Optional) If you chose to enable PFS in Step 23, choose a Diffie-Hellman (DH) group to join for the below drop-down list. The higher the group number is, the more secure the group is.
Step 25. From the Select IKE Policy drop-down list, choose which IKE policy to use for the VPN policy.
Note: If you click View, you are directed to IKE configuration section of the Advanced VPN Setup page.
Step 26. Click Save. The original Advanced VPN Setup page re-appears.
Step 27. Click Save.
 Feedback