IPv6 Static Routing on RV215W
Available Languages
Objective
If the router is connected to more than one network or there are multiple routers installed on your network, it may be necessary to set up static routes. The static routing function determines the path that data follows over your network before and after it passes through the router. You can use static routing to allow different IP domain users to access the Internet through the router.
This article explains how to configure IPv6 Static Routing on the RV215W.
Applicable Devices
• RV215W
Software Version
• 1.1.0.5
IPv6 Static Routing Configuration
Add Static Routes
Step 1. Log in to the web configuration utility and choose Networking > IPv6 > IPv6 Static Routing. The Static Routing page opens:

Step 2.Click Add Row.

Step 3. Enter the name of the route in the Name field.
Step 4. Enter the destination host IP address in the Destination field.
Step 5. Enter the number of prefix bits of the IP address in the Prefix Length field.
Step 6. Enter the default gateway of the host in the Gateway field.
Step 7. Choose the desired interface from the Interface drop-down list. The available options are:
• WAN — Choose WAN if the router provides internet connectivity for the network or the user connects to another network through the internet.
• LAN — Choose LAN if the router gets internet connectivity from gateway router on the LAN or the default gateway is on a LAN port.
• 6to4 — Choose 6to4 if the router needs to send IPv6 packets over an IPv4 network. 6to4 does not send IPv6 packets to IPv4 sources. It only uses IPv4 for transportation.
Step 8. Enter the metric value in the Metric field. The metric is used to set priority to the route among the existing routes to the same destination. The priority decreases as the metric value increases. The route with the lowest metric will be sent to a destination which has more than one route to it.
Step 9 .Check the Active check box to enable the static route. When it is unchecked, the route will be listed in the routing table but it will not be considered for routing. This feature helps when you create a route before the destination network is ready.
Step 10. Click Save.
Edit Static Routes
Step 1. Log in to the web configuration utility and choose Networking > IPv6 > IPv6 Static Routing. The Static Routing page opens:

Step 2. Check the desired IPv6 static route to be edited.
Step 3. Click Edit. Follow steps 3-9 from the Add Static Routes section to make the necessary changes.
Step 4. Click Save.
Delete Static Routes
Step 1. Log in to the web configuration utility and choose Networking > IPv6 > IPv6 Static Routing. The Static Routing page opens:

Step 2. Check the desired IPv6 static route to be deleted.
Step 3. Click Delete.
Step 4. Click Save.
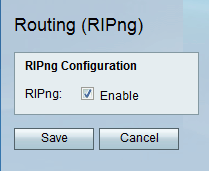
Routing (RIPng)
Routing Information Protocol (RIP) is an Interior Gateway Protocol (IGP) that is commonly used in internal networks. It enables the routers to exchange their routing information automatically with other routers and allows it to dynamically adjust the routing tables and adapt to changes in network.
Note: RIP should not be used in large networks due to its inability to scale to large networks. The maximum hop count of RIP routers is 15, more than that it is assigned as 16 and is unreachable.
Step 1. Log in to the web configuration utility and choose Networking > IPv6 > Routing (RIPng). The Routing (RIPng) page opens:

Step 2. Check the Enable check box to activate RIP routing.
Step 3. Click Save.
 Feedback