LAN Configuration on RV215W
Available Languages
Objective
The LAN Configuration page allows the user to configure the LAN interface of the router. The Dynamic Host Configuration Protocol (DHCP) is used to automatically assign IP addresses to clients on the network. However, if a client is on a subnet that does not contain a DHCP server, the client cannot communicate with it to receive an IP address. If there is a DHCP relay in the subnet, the relay forwards the IP address request to a DHCP server, which then returns the IP address of the client to the DHCP relay, who then transmits it to the client.
This article explains how to configure the LAN settings on the RV215W.
Applicable Devices
• RV215W
Software Version
• 1.1.0.5
LAN Settings
IPv4 Configuration
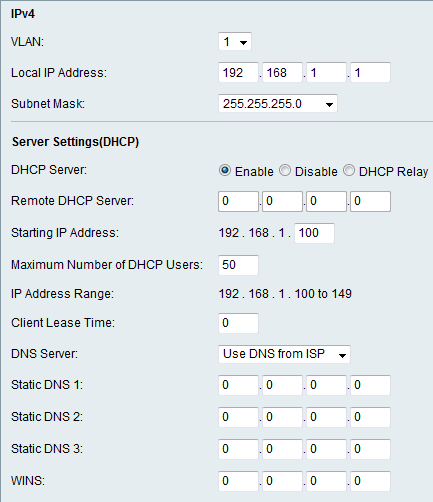
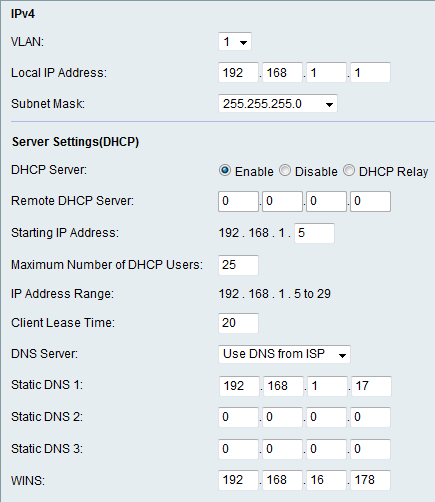
Step 1. Log in to the web configuration utility and choose Networking > LAN > LAN Configuration. The LAN Configuration page opens:

Step 2. Choose the desired VLAN from the VLAN drop-down list. VLAN creation is explained in the article VLAN Membership on RV215W.
Step 3. Enter the IP address of the LAN in the Local IP Address field.
Step 4. Choose the desired mask from the Subnet Mask drop-down list.
DHCP Server Settings
Step 1. Log in to the web configuration utility and choose Networking > LAN > LAN Configuration. The LAN Configuration page opens:

Step 2. Click the desired DHCP Server radio button. The available options are:
• Enable — Allows the RV215W to act as a DHCP server.
• Disable — Disables DHCP on the RV215W.
• DHCP Relay — Allows the RV215W to act as a DHCP Relay. The DHCP Relay Interface allows multiple connections to be established on multiple DHCP servers based on the interfaces provided by the user.
Note: If DHCP Server is enabled follow Steps 3-8. If DHCP Relay is chosen skip to Step 9. If DHCP Server is disabled skip to Step 10.
Step 3. Enter the IP address of the first host in the Starting IP Address field. Any new DHCP client that joins the LAN is assigned with an IP address that follows the starting IP address in numerical order.
Step 4. Enter the maximum number of DHCP clients in the Maximum Number of DHCP Users field.
Note: The IP address range is from the starting IP address entered through the maximum number of users specified. The range is displayed in the IP Address Range display-only field.
Step 5. Enter the amount of time (in seconds) that a network user can be connected to the router with the dynamically assigned address in the Client Lease Time field.
Step 6. Choose the desired DNS server from the DNS Server drop-down list. The available options are:
• Use DNS Proxy — The DNS (Domain Name Server) proxy relays DNS requests to the current public network DNS server for the proxy and replies as a DNS resolver to the client devices on the network.
• Use DNS from ISP — Use the DNS address provided by the Internet Service Provider (ISP).
• Use DNS as Below — Use the DNS address specified in the Static DNS Server IP Address field.
Step 7. Enter the static DNS IP address in the Static DNS (1-3) field.
Step 8. (Optional) Enter the WINS IP address in the WINS field. The Windows Internet Naming Service (WINS) manages each device interaction with the Internet. WINS uses a distributed database that is automatically updated with the names of computers currently available and the IP address assigned to each one.

Step 9. If you chose DHCP Relay in Step 2, enter the remote server address in the Remote DHCP Server field.
Step 10. Click Save.
 Feedback