Time Settings Configuration on RV215W
Available Languages
Objective
The Time Settings page allows the user to automatically or manually change the time on the router and account for Daylight Savings Time (DST).
This article explains how to configure time settings on the RV215W.
Applicable Devices
• RV215W
Software Version
• 1.1.0.5
Time Settings Configuration
Step 1. Log in to the web configuration utility and choose Administration > Time Settings. The Time Settings page opens:

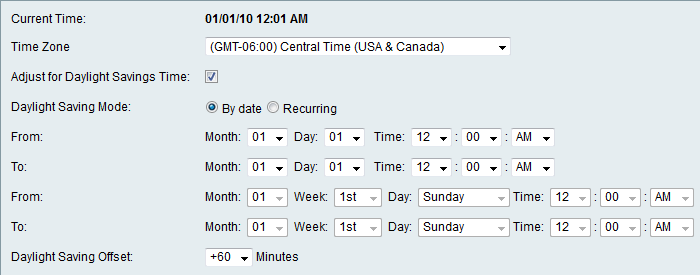
Step 2. Choose the current time zone from the Time Zone drop-down list.
Step 3. Check the Adjust for Daylight Savings Time check box to enable DST on the device. By default it is disabled.
Daylight Savings Time Settings

Step 4. Click the desired mode of Daylight Savings radio button. The available options are:
• By date — Enables DST between specified dates. Choose the desired dates from the Month, Day and Time drop-down list.
• Recurring — Enables DST between days on different months. Choose the desired dates from the Month, Week, Day and Time drop-down list.
Step 5. Choose the desired DST offset from the Daylight Saving Offset drop-down list.
Auto Time Settings

Step 6. Click Auto to automatically set the date and time from the Set Date and Time radio buttons. If Manual is chosen skip to Step 8.
Step 7. Click the desired type of NTP Server. Network Time Protocol (NTP) is used to synchronize the time of the system to a reference time server. The available options are:
• Use Default — The default NTP server is used.
• User Defined — Enter the NTP servers in the fields available. Up to 2 servers can be used.
Manual Time Settings

Step 8. If Manual is chosen from the Set Date and Time radio buttons in Step 6, choose the desired date and time from the Year, Month, Day and Time drop-down lists.
Step 9. Click Save.
 Feedback