Advanced Wireless Settings on RV215W
Available Languages
Objective
The Advanced Wireless Settings page allows the user to change various wireless settings on the RV215W so that the router runs at its optimum performance.
This article explains how to configure advanced wireless settings on the RV215W.
Applicable Devices
• RV215W
Software Version
• 1.1.0.5
Advanced Wireless Settings
Step 1. Log in to the web configuration utility and choose Wireless > Advanced Settings. The Advanced Settings page opens:

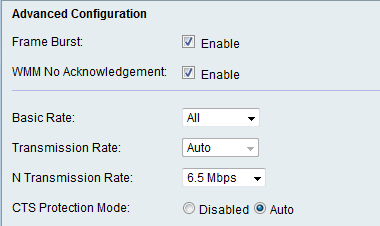
Step 2. Check the Enable check box to enable Frame Burst. The Internet Service Provider (ISP) provides a maximum speed at which data can travel called the Committed Information Rate (CIR). However, when there are available resources packets can be sent above the CIR limit. This option is called Packet Burst. Frame burst enhances the ability of a client to upload data at higher throughputs with the use of inter-frame wait intervals to burst a sequence of up to three packets before it has to wait for a required period. This feature allows packet burst to take place which increases the overall network speed.
Note: The Frame Burst only supports 1-3 clients. If there are more than 3 clients, Frame Burst actually reduces the throughput of the network.
Step 3. Check the Enable check box to enable WMM No Acknowledgement. The Wi-Fi Multimedia option enables the Quality of Service (QoS) function that is used for multimedia applications such as VoIP and video. This allows the network packets of the multimedia application to have priority over regular data network packets, hence allowing multimedia applications to run smoother and with fewer errors. This feature results in more efficient throughput but with higher error rates.
Step 4. Choose the rate at which the device can transmit information from the Basic Rate drop-down list. The available options are:
• 1-2 Mbps — This option works best with older wireless technology.
• Default — This option transmits at all standard wireless rates.
• All — This option transmits at all wireless rates.
Step 5. Choose the desired data transmission rate from the Transmission Rate drop-down list. This option is available if the Wireless Network Mode is not N-only. If N-only is chosen skip to the next step.
Note: The Wireless Network Mode settings can be found in the article Basic Wireless Settings on RV215W.

Step 6. Choose the desired N data transmission rate from the N Transmission Rate drop-down list. The rate of data transmission is set depended on the speed of Wireless-N network. This option allows the user to choose the range of transmission speeds available.
Note: Wireless-N network is the name given for the hardware gadgets that support the 802.11n wireless network.
Step 7. Click the desired CTS Protection Mode radio button. The Clear-To-Send (CTS) Protection option enables the protection mechanism, which is used to minimize collisions among stations in a mixed 802.11b and 802.11g environment. The available options are:
• Disabled — The CTS Protection mode is disabled.
• Auto — The CTS Protection checks only when necessary.

Step 8. Enter the time (in milliseconds) in the Beacon Interval field that a beacon packet is sent out. A beacon is a packet broadcasted by the device to synchronize the wireless network.
Step 9. Enter the desired time interval in the DTIM Interval field. It provides the time interval at which the Delivery Traffic Indication Message (DTIM) should be sent. When the RV215W has buffered broadcast or multicast messages for associated clients, it sends the next DTIM with a DTIM Interval value. When the clients hear the beacons they are awake to receive the broadcast and multicast messages.
Step 10. Enter the threshold value in the Fragmentation Threshold field. This feature provides the maximum size for a packet before data is fragmented into multiple packets.
Note: When there is a greater rate of packet error, the fragment threshold can be increased to reduce the error rate.
Step 11. Enter the threshold value in the RTS Threshold field. This feature provides the time interval at which the Request-To-Send (RTS) frames are sent to the receiver.
Step 12. Click Save.
Revision History
| Revision | Publish Date | Comments |
|---|---|---|
1.0 |
11-Dec-2018 |
Initial Release |
 Feedback