Basic Wireless Settings Configuration on RV215W
Available Languages
Objective
Wireless networks are computer networks that are not connected by cables. A Wireless Local Area Network (WLAN) is a type of wireless network that links multiple devices over a short distance through the use of radio communication.
This article explains how to configure basic wireless settings on the RV215W including configuration of network security.
Index
• General Settings
• Edit Wireless Table
• Disable Security
• Configure WEP Security
• Configure WPA-Personal Security
• Configure WPA-Enterprise Security
• Configure WPA2-Personal/WPA2-Personal Mixed Security
• Configure WPA2-Enterprise/WPA2-Enterprise Mixed Security
• Edit MAC Filtering
• Time of Day Access
• Edit Guest Network
• Configure WPS Method 1
• Configure WPS Method 2
• Configure WPS Method 3
Applicable Devices
• RV215W
Software Version
• 1.1.0.5
Basic Settings Configuration
General Settings
Step 1. Log in to the web configuration utility and choose Wireless > Basic Settings. The Basic Settings page opens:

Step 2. Check Enable in the Radio field to enable the wireless radio.
Step 3. From the Wireless Network Mode drop-down list choose the wireless mode.
• B/G/N-Mixed — The network contains a mix of wireless-B, wireless-G, and wireless-N devices.
• B-Only — The network only contains wireless-B devices.
• G-Only — The network only contains wireless-G devices.
• N-Only — The network only contains wireless-N devices.
• B/G-Mixed — The network contains a mix of wireless-B and wireless-G devices.
• G/N Mixed — The network contains a mix of wireless-G and wireless-N devices.
Step 4. If the network mode contains wireless-N devices click the radio button that corresponds to the desired bandwidth of the wireless signal in the Wireless Band Selection field. The higher the bandwidth the greater the amount of data the signal can carry.
• 20 MHz — The standard frequency for a wireless signal.
• 20/40 MHz — Automatically uses a 20 MHz and 40 MHz signal. A 40 MHz signal provides more bandwidth but is prone to more interference. This option is used only if the connected wireless devices are compatible with 40 MHz frequency.
Step 5. From the Wireless Channel drop-down list choose a wireless channel for the radio. Choose a channel that is not currently in use by neighbor networks.
Step 6. From the AP Management VLAN drop-down list choose a VLAN that is to become the management VLAN.
Step 7. (Optional) Check Enable in the U-APSD field to enable Unscheduled Automatic Power Save Delivery (U-APSD). U-APSD is a feature that allows the radio to conserve power. However U-APSD may reduce throughput performance of the radio.
Step 8. Click Save.
Edit Wireless Table
Step 1. Log in to the web configuration utility and choose Wireless > Basic Settings. The Basic Settings page opens:
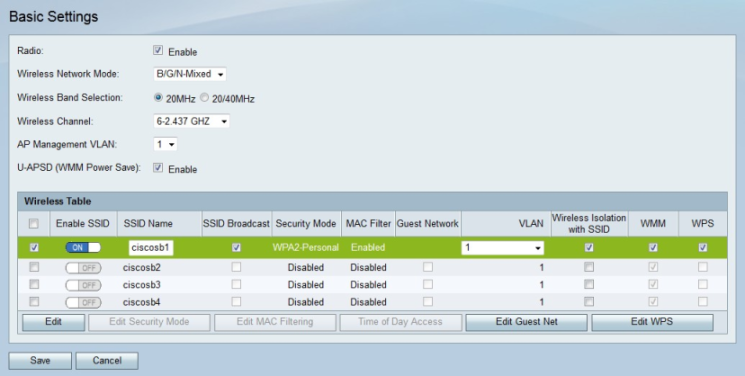
Step 2. Check the check box of the network you want to edit in the Wireless Table.
Step 3. Click Edit to edit the specified network.
Step 4. Click the Enable SSID button to enable the network. Service Set Identifier (SSID) is the name of the wireless network.
Step 5. Enter the name of the network in the SSID Name field. All devices on the network must use this SSID to communicate with each other.
Step 6. Check SSID Broadcast to enable wireless broadcast. The RV215W advertises its availability to nearby wireless devices when SSID broadcast is enabled.
Step 7. Check Guest Network to make the configured network a guest network. A guest network is a small section of a network designed for temporary users. This is used to allow guest to use the network without the need to expose private Wi-Fi keys.
Note: The guest network can not be configured on the AP management VLAN.
Step 8. From the VLAN drop-down list choose the VLAN that is associated with the network.
Step 9. Check Wireless Isolation with SSID to not allow devices on the specified network to communicate with each other.
Step 10. Check WMM to enable Wi-Fi Multimedia (WMM) on the network. WMM is used to enhance the streaming of multimedia over wireless devices. WMM gives multimedia traffic that is sent over a wireless connection higher priority.
Step 11. (Optional) Check WPS to assign the specified network as a Wi-Fi Protected Setup (WPS) network. WPS is a feature that allows for an easy and secure network configuration. This feature allows for devices to easily connect to the network.
Step 12. Click Save.
Disable Security
Wireless security may be disabled on the RV215W for ease of use when setting up test networks, however disabling security is not recommended.
Step 1. Log in to the web configuration utility and choose Wireless > Basic Settings. The Basic Settings page opens.
Step 2. Check the box of the network you want to edit.
Step 3. Click Edit Security Mode to edit the security of the specified network. The Security Settings page opens:
Step 4. (Optional) From the Select SSID drop-down list choose the SSID that you want to configure the security for.
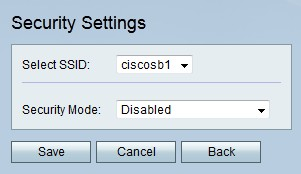
Step 5. From the Security Mode drop-down list choose Disabled. The security is disabled for the wireless network.
Step 6. Click Save.
Configure WEP Security
Wired Equivalent Privacy (WEP) is an algorithm that secures a wireless network. WEP provides a basic encryption method that is less secure than WPA. WEP is used when connected network devices do not support WPA.
Step 1. Log in to the web configuration utility and choose Wireless > Basic Settings. The Basic Settings page opens.
Step 2. Check the box of the network you want to edit.
Step 3. Click Edit Security Mode to edit the security of the specified network. The Security Settings page opens:

Step 4. (Optional) From the Select SSID drop-down list choose the SSID that you want to configure the security for.
Step 5. From the Security Mode drop-down list choose WEP.
Step 6. From the Authentication Type drop-down list choose an authentication type for the wireless network.
• Open System — Anyone can associate with the access point, but the WEP key is needed to pass traffic through the access point of the network.
• Shared Key — A WEP key is needed to associate with the access point and to pass traffic through the access point of the network.
Step 7. From the Encryption drop-down list choose an encryption method for the WEP key.
• 10/64-bit(10 hex digits) — Provides a 40-bit key.
• 26/128-bit(26 hex digits) — Provides a 104-bit key. This is the more secure encryption.
Step 8. Enter a passphrase that is greater than eight characters in the Passphrase field.
Step 9. Click Generate to create keys in the Key 1, Key 2, Key 3, and Key 4 fields.
Note: You can also manually enter keys in the Key 1, Key 2, Key 3, and Key 4 fields.
Step 10. From the TX Key drop-down list choose the Key that users must enter to access the wireless network.
Step 11. (Optional) Check Unmask Password to reveal the character strings of the keys.
Step 12. Click Save.
Configure WPA-Personal Security
Wi-Fi Protected Access (WPA) is a security standard for wireless networks. WPA was created to replace WEP due to the security flaws in WEP. WPA-Personal is a version of WPA that is used for networks with only a few users. WPA-Personal provides a shared key that every user will use to access the wireless network. WPA was introduced with the key encryption methods Temporal Key Integrity Protocol (TKIP) and Advanced Encryption Standard (AES). More networking devices support TKIP, however AES is the stronger encryption method.
Step 1. Log in to the web configuration utility and choose Wireless > Basic Settings. The Basic Settings page opens.
Step 2. Check the box of the network you want to edit.
Step 3. Click Edit Security Mode to edit the security of the specified network. The Security Settings page opens:

Step 4. (Optional) From the Select SSID drop-down list choose the SSID that you want to configure the security for.
Step 5. From the Security Mode drop-down list choose WPA-Personal.
Step 6. From the Encryption drop-down list choose an encryption method for the WPA key.
• TKIP/AES — This option is chosen when not all devices connected to the wireless network support AES.
• AES — This option is preferable if all devices connected to the wireless devices support AES.
Step 7. Enter a security key in the Security Key field.
Step 8. (Optional) Check Unmask Password to reveal the character string of the key.
Step 9. Enter a time in the Key Renewal field. This is the amount of time the RV215W will use the key before it generates a new one.
Step 10. Click Save.
Configure WPA-Enterprise Security
Wi-Fi Protected Access (WPA) is a security standard for wireless networks. WPA was created to replace WEP due to the security flaws in WEP. WPA-Enterprise is a version of WPA that is recommended for a network with many users such as a business. Authentication used to gain access is controlled by a RADIUS server. This means that each connected user will be given a unique key to access the wireless network. WPA was introduced with the key encryption methods Temporal Key Integrity Protocol (TKIP) and Advanced Encryption Standard (AES). More networking devices support TKIP, however AES is the stronger encryption method.
Step 1. Log in to the web configuration utility and choose Wireless > Basic Settings. The Basic Settings page opens.
Step 2. Check the box of the network you want to edit.
Step 3. Click Edit Security Mode to edit the security of the specified network. The Security Settings page opens:

Step 4. (Optional) From the Select SSID drop-down list choose the SSID that you want to configure the security for.
Step 5. From the Security Mode drop-down list choose WPA-Enterprise.
Step 6. From the Encryption drop-down list choose an encryption method for the WPA key.
• TKIP/AES — This option is chosen when not all devices connected to the wireless network support AES.
• AES — This option is preferable if all devices connected to the wireless devices support AES.
Step 7. Enter the IP address of the RADIUS server in the RADIUS Server field.
Step 8. Enter the port number used to access the RADIUS server in the RADIUS Port field.
Step 9. Enter the pre-shared key for the wireless users in the Shared Key field. A pre-shared key is a key that is used for all users. The pre-shared key feature is an added security feature alongside RADIUS authentication.
Step 10. Enter a time in the Key Renewal field. This is the amount of time the RV215W will use the key before it generates a new one.
Step 11. Click Save.
Configure WPA2-Personal/WPA2-Personal Mixed Security
Wi-Fi Protected Access 2 (WPA2) is a security standard for wireless networks. WPA2 is an enhancement of WPA. WPA2 provides more security than WPA, however WPA2 requires more processing power. WPA2-Personal/WPA2-Personal Mixed are versions of WPA2 that are used for networks with few users. WPA2-Personal Mixed is designed for backward compatibility for older devices not capable of utilizing WPA2. If possible, do not use WPA2-Personal Mixed as it provides a less secure connection. WPA2-Personal provides a shared key that every user will use to access the wireless network. WPA2 uses the encryption methods Temporal Key Integrity Protocol (TKIP) and Advanced Encryption Standard (AES). More networking devices support TKIP, however AES is the stronger encryption method.
Step 1. Log in to the web configuration utility and choose Wireless > Basic Settings. The Basic Settings page opens.
Step 2. Check the box of the network you want to edit.
Step 3. Click Edit Security Mode to edit the security of the specified network. The Security Settings page opens:

Step 4. (Optional) From the Select SSID drop-down list choose the SSID that you want to configure the security for.
Step 5. From the Security Mode drop-down list choose WPA2-Personal or WPA2-Personal Mixed. WPA2-Personal is used when all devices on the wireless network support AES. WPA2-Personal Mixed is used when not all devices support AES.
Note: The type of encryption used by the security method is displayed in the Encryption field.
Step 6. Enter a security key in the Security Key field.
Step 7. (Optional) Check Unmask Password to reveal the character strings of the key.
Step 8. Enter a time in the Key Renewal field. This is the amount of time the RV215W will use the key before it generates a new one.
Step 9. Click Save.
Configure WPA2-Enterprise/WPA2-Enterprise Mixed Security
Wi-Fi Protected Access 2 (WPA2) is a security standard for wireless networks. WPA2 is an enhancement of WPA. WPA2 provides more security than WPA, however WPA2 requires more processing power. WPA2-Enterprise/WPA2-Enterprise Mixed are versions of WPA2 that are used for networks with many users such as a business. WPA2-Enterprise Mixed is designed for backward compatibility for older devices not capable of utilizing WPA2. If possible, do not use WPA2-Enterprise Mixed as it provides a less secure connection. The authentication to determine if a user gains access is controlled by a RADIUS server. This means that each connected user will be given a unique key to access the wireless network. WPA2 uses the encryption methods Temporal Key Integrity Protocol (TKIP) and Advanced Encryption Standard (AES). More networking devices support TKIP, however AES is the stronger encryption method.
Step 1. Log in to the web configuration utility and choose Wireless > Basic Settings. The Basic Settings page opens.
Step 2. Check the box of the network you want to edit.
Step 3. Click Edit Security Mode to edit the security of the specified network. The Security Settings page opens:
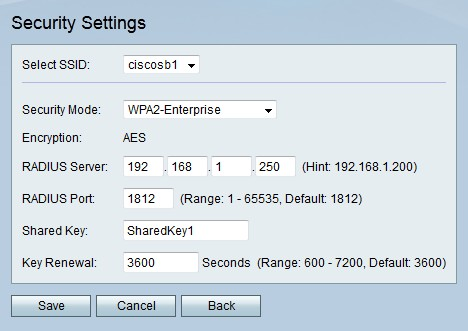
Step 4. (Optional) From the Select SSID drop-down list choose the SSID that you want to configure the security for.
Step 5. From the Security Mode drop-down list choose WPA2-Enterprise or WPA2-Enterprise Mixed. WPA2-Enterprise is used when all devices on the wireless network support AES. WPA2-Enterprise Mixed is used when not all devices support AES.
Note: The type of encryption used by the security method is displayed in the Encryption field.
Step 6. Enter the IP address of the RADIUS server in the RADIUS Server field.
Step 7. Enter the port used to access the RADIUS server in the RADIUS Port field.
Step 8. Enter the pre-shared key for the wireless users in the Shared Key field. A pre-shared key is a key that is used for all users. The pre-shared key feature is an added security feature alongside RADIUS authentication.
Step 9. Enter a time in the Key Renewal field. This is the amount of time the RV215W will use the key before it generates a new one.
Step 10. Click Save.
Edit MAC Filtering
MAC Filtering is used to permit or deny access to the wireless network based on the MAC address of the connecting device.
Step 1. Log in to the web configuration utility and choose Wireless > Basic Settings. The Basic Settings page opens:
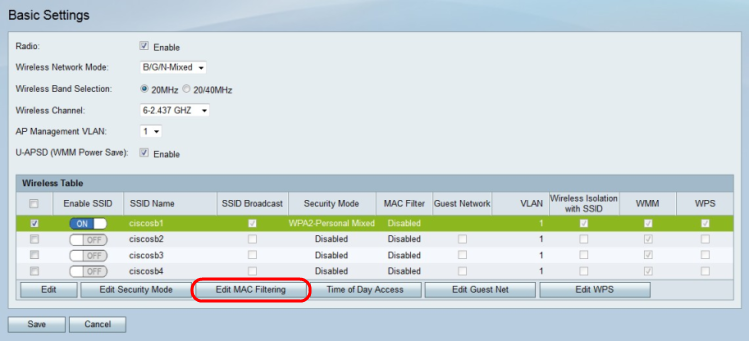
Step 2. Check the box of the network you want to edit.
Step 3. Click Edit MAC Filtering to create MAC access control list for the specified network. The Wireless MAC Filter page opens:

Step 4. Check Enable to enable MAC filtering on the network.
Step 5. Click the radio button that corresponds to the desired list type in the Connection Control field.
• Prevent PCs — Prevents PCs with the listed MAC addresses from entering the network.
• Permit PCs — Allows PCs with the listed MAC addresses to enter the network.
Step 6. Enter the desired MAC addresses in the MAC Address Table.
Step 7. Click Save.
Time of Day Access
The Time of Day Access feature is used to only allow access to users based on a configured schedule.
Step 1. Log in to the web configuration utility and choose Wireless > Basic Settings. The Basic Settings page opens:
Step 2. Check the box of the network you want to edit.
Step 3. Click Time of Day Access to configure when users can access the specified network. The Time of Day Access page opens:

Step 4. Check Enable in the Active Time field to enable time of day access for the network.
Step 5. Enter the time when the access of the network begins in the Start Time field.
Step 6. Enter the time when the access of the network ends in the Stop Time field.
Step 7. Click Save.
Edit Guest Network
A guest network is a small section of a network designed for temporary users. This is used to allow guests to use the network without the need to expose private Wi-Fi keys. A guest network can be configured to restrict the access time and bandwidth use of a user.
Step 1. Log in to the web configuration utility and choose Wireless > Basic Settings. The Basic Settings page opens:

Step 2. Click Edit Guest Network to configure the guest network. The Guest Net Settings page opens:

Step 3. Enter a password that the users will use to enter the guest network in the Guest Password field.
Step 4. Re-enter the password that the users will use to enter the guest network in the Confirm Guest Password field.
Step 5. Enter the time the users are allowed to stay connected to the guest network in the Guest Access Time.
Step 6. Check Enable Guest Bandwidth Restriction to restrict the amount of bandwidth the guest network receives.
Note: Bandwidth Management must be enabled on the Bandwidth Management page.
Step 7. Enter the percent of the bandwidth that is to be available to the guest network in the Available Bandwidth field.
Step 8. Click Save.
Configure WPS Method 1
Wi-Fi Protected Setup (WPS) is a feature that provides an easy and secure wireless network setup. In order to connect to WPS, the connecting device must support WPS and must be compatible with WPA security. The first configuration method is a simple method that requires the RV215W WPS button and client device button to be pressed. Once both buttons are pressed the client device is connected to the WPS network.
Step 1. Log in to the web configuration utility and choose Wireless > Basic Settings. The Basic Settings page opens:
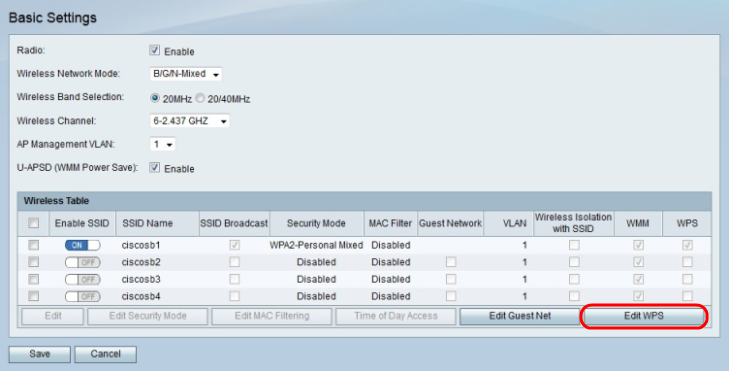
Step 2. Click Edit WPS to configure WPS. The WPS page opens:
Note: The WPS page can also be accessed through Wireless > WPS.

Step 3. Click Edit to choose the wireless network on which to enable WPS.

Step 4. Click the WPS button on the WPS page.
Step 5. Click the WPS button on the client device or on a utility screen of the client device to connect the client device to the WPS network.
The following fields display information of the WPS configuration.
• Wi-Fi Protected Setup Status — The status of the WPS configuration.
• Network Name (SSID) — The network name assigned to the WPS configuration by the RV215W.
• WPA2-Personal — The type of security the WPS configuration uses.
Configure WPS Method 2
Wi-Fi Protected Setup (WPS) is a feature that provides an easy and secure wireless network setup. In order to connect to WPS, the connecting device must support WPS and must be compatible with WPA security. The second method requires the PIN number of the client device. Once the PIN number is entered on the WPS page, the client device connects to the WPS network.
Step 1. Log in to the web configuration utility and choose Wireless > Basic Settings. The Basic Settings page opens:

Step 2. Click Edit WPS to configure WPS. The WPS page opens:
Note: The WPS page can also be accessed through Wireless > WPS.

Step 3. Click Edit to choose which wireless network on which to enable WPS.
Step 4. Enter the PIN number of the client device.
Step 5. Click Register to create the WPS network.
The following fields display information of the WPS configuration.
• Wi-Fi Protected Setup Status — The status of the WPS configuration.
• Network Name (SSID) — The network name assigned to the WPS configuration by the RV215W.
• WPA2-Personal — The type of security the WPS configuration uses.
Configure WPS Method 3
Wi-Fi Protected Setup (WPS) is a feature that provides an easy and secure wireless network setup. In order to connect to WPS, the connecting device must support WPS and must be compatible with WPA security. The third method requires the user to enter the PIN number of the RV215W on the WPS configuration page of the client device.
Step 1. Log in to the web configuration utility and choose Wireless > Basic Settings. The Basic Settings page opens:

Step 2. Click Edit WPS to configure WPS. The WPS page opens:
Note: The WPS page can also be accessed through Wireless > WPS.

Step 3. Click Edit to choose which wireless network on which to enable WPS.
Step 4. Click Generate to generate a PIN number for the RV215W.
Step 5. From the PIN Lifetime drop-down list choose the amount of time that passes before a new PIN is generated.
Step 6. Enter the given RV215W PIN number in the client device configuration. The client device connects to the WPS network.
The following fields display information of the WPS configuration.
• Wi-Fi Protected Setup Status — The status of the WPS configuration.
• Network Name (SSID) — The network name assigned to the WPS configuration by the RV215W.
• WPA2-Personal — The type of security the WPS configuration uses.
If you would like to see all other documentation on the RV215W router, click here.
 Feedback