Wide Area Network (WAN) Configuration on RV215W
Available Languages
Objective
A Wide Area Network (WAN) is a network that covers a broad area. The most popular WAN is the Internet. A user or network of users can connect to the Internet through an Internet Service Provider (ISP). ISPs offer multiple methods to set up a client with an internet connection. The RV215W supports automatic DHCP, static IP, PPPoE, PPTP, and L2TP for IPv4 addresses and automatic DHCPv6, static IP, and PPPoE for IPv6 addresses.
This article explains how to configure the WAN connection on the RV215W.
Applicable Devices | Firmware Version
- RV215W | 1.1.0.5 (Download latest)
WAN Configuration
Automatic Configuration DHCP IPv4
Dynamic Host Configuration Protocol (DHCP) is a network protocol that automatically assigns an IP address to a computer when it connects to the network. DHCP is used for devices that often change IP addresses. Due to automatic configuration, DHCP requires very little configuration.
Step 1. Log in to the web configuration utility and choose Networking > WAN > WAN Configuration. The Internet Setup page opens:
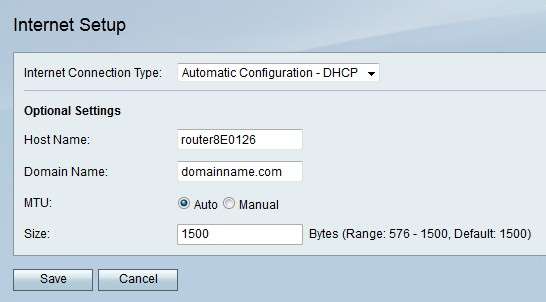
Step 2. From the Internet Connection Type drop-down list choose Automatic Configuration - DHCP.
Step 3. (Optional) Configure the following settings in the Optional Settings area.
• Host Name — Enter the host name of the RV215W. The host name provides identification to users that log onto the RV215W remotely.
• Domain Name — Enter the domain name of the RV215W.
• MTU — Click the radio button that corresponds to the desired method of configuration for the Maximum Transmit Unit (MTU). MTU is the size of the largest packet that can be sent over the network. The standard MTU for a DHCP connection is 1500 bytes.
– Auto — The RV215W configures the MTU size automatically.
– Manual — The user configures the MTU size manually.
• Size — If the manual radio button is clicked in the MTU field enter an MTU size. A lower MTU size may be beneficial to certain applications that send small bursts of data, but generally the default MTU size is sufficient.
Step 4. Click Save.
Static IP IPv4
A static IP address is an address that is assigned to a device for an extended period of time. Static IP addresses are mainly used for device services that do not change IP addresses such as website hosting or other services on the internet. The Internet Service Provider (ISP) provides a static IP address for the WAN connection of the RV215W.
Step 1. Log in to the web configuration utility and choose Networking > WAN > WAN Configuration. The Internet Setup page opens:
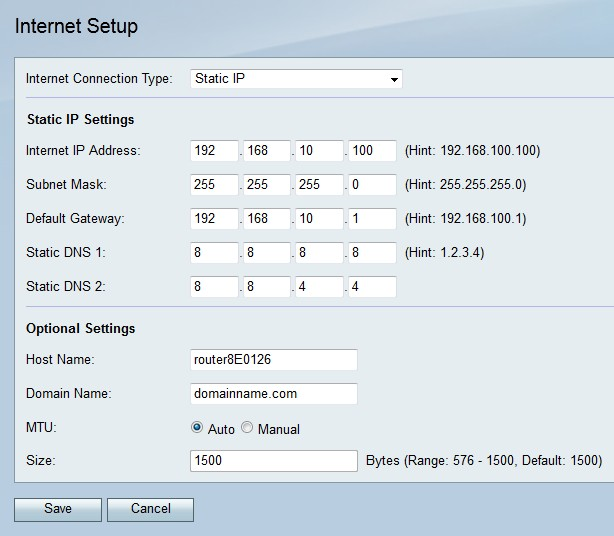
Step 2. From the Internet Connection Type drop-down list choose Static IP.
Step 3. Configure the following settings in the Static IP Settings area. All of these fields are provided by the ISP.
• Internet IP Address — Enter an IP address of the WAN port.
• Subnet Mask — Enter the subnet mask of the WAN port.
• Default Gateway — Enter the IP address of the default gateway.
• Static DNS 1 — Enter the IP address of the primary DNS server.
• Static DNS 2 — Enter the IP address of the secondary DNS server.
Step 4. (Optional) Configure the following settings in the Optional Settings area.
• Host Name — Enter the host name of the RV215W. The host name provides identification to users that log onto the RV215W remotely.
• Domain Name — Enter the domain name for the of the RV215W.
• MTU — Click the radio button that corresponds to the desired method of configuration for the Maximum Transmit Unit (MTU). MTU is the size of the largest packet that can be sent over the network. The standard MTU for a static IP connection is 1492 bytes.
– Auto — The RV215W configures the MTU size automatically.
– Manual — The user configures the MTU size manually.
• Size — If the manual radio button is clicked in the MTU field enter an MTU size. A lower MTU size may be beneficial to certain applications that send small bursts of data, but generally the default MTU size is sufficient.
Step 5. Click Save.
PPPoE IPv4
Point to Point Protocol Over Ethernet (PPPoE) is a network protocol that creates a virtual tunnel from end point to end point. PPPoE requires a login to create the connection between user and ISP. This provides extra security since the user is necessarily not always connected to the internet. The ISP provides the PPPoE parameters.
Step 1. Log in to the web configuration utility and choose Networking > WAN > WAN Configuration. The Internet Setup page opens:
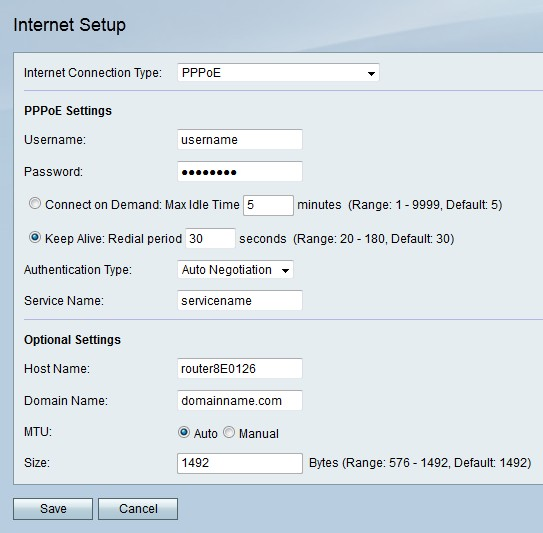
Step 2. From the Internet Connection Type drop-down list choose PPPoE.
Step 3. Enter the username that was provided by the ISP in the Username field.
Step 4. Enter the password that was provided by the ISP in the Password field.
Step 5. Click the radio button that corresponds to the desired connectivity option.
• Connect on Demand — The internet connection is only active when there is traffic present. Enter a maximum amount of time the connection can be idle before the internet connection is terminated in the Max Idle Time field. This option is selected if the ISP charges based on how long the connection is active.
• Keep Alive — The internet connection is always active. Enter the amount of time in the Redial Period field. This is the amount of time the RV215W waits before reconnecting after a loss of internet connection.
Step 6. From the Authentication Type drop-down list choose the type of authentication for the PPPoE connection that is provided by the ISP.
• Auto Negotiation — The RV215W queries the ISP server to determine what authentication method is to be used. The RV215W then sends the authentication credentials with the correct authentication type.
• PAP — Password Authentication Protocol (PAP) is an authentication protocol that transmits unencrypted ASCII passwords over the network. This is an insecure authentication method.
• CHAP — Challenge Handshake Authentication Protocol (CHAP) is an authentication protocol that verifies authentication through the use of a three way handshake. This handshake takes place at the time of initial connection and at random intervals after initial connection.
• MS-CHAP — MS -CHAP is the Microsoft version of CHAP. MS-CHAP is in a format designed for compatibility with Windows NT products.
• MS-CHAP2 — MS-CHAP2 is an extension of MS-CHAP. MS-CHAP 2 is a stronger authentication method than MS-CHAP due to a stronger encryption key.
Step 7. Enter a service name in the Service Name field. The service name is used by ISPs to define the type of access the RV215W has. The service name is provided by the ISP.
Step 8. (Optional) Configure the following settings in the Optional Settings area.
• Host Name — Enter the host name of the RV215W. The host name provides identification to users that log onto the RV215W remotely.
• Domain Name — Enter the domain name of the RV215W.
• MTU — Click the radio button that corresponds to the desired method of configuration for the Maximum Transmit Unit (MTU). MTU is the size of the largest packet that can be sent over the network. The standard MTU for a PPPoE connection is 1492 bytes.
– Auto — The RV215W configures the MTU size automatically.
– Manual — The user configures the MTU size manually.
• Size — If the manual radio button is clicked in the MTU field enter a MTU size. A lower MTU size may be beneficial to certain applications that send small bursts of data, but generally the default MTU size is sufficient.
Step 9. Click Save.
PPTP IPv4
Point to Point Tunneling Protocol (PPTP) is a network protocol that is used as part of the delivery of services by an ISP. PPTP does not provide encryption for data, but instead relies on the encryption protocol MPPE. PPTP uses Virtual Private Network (VPN) to provide a secure connection over an unsecure network, however VPN connections create more tunneling overhead than other connection options.
Step 1. Log in to the web configuration utility and choose Networking > WAN > WAN Configuration. The Internet Setup page opens:
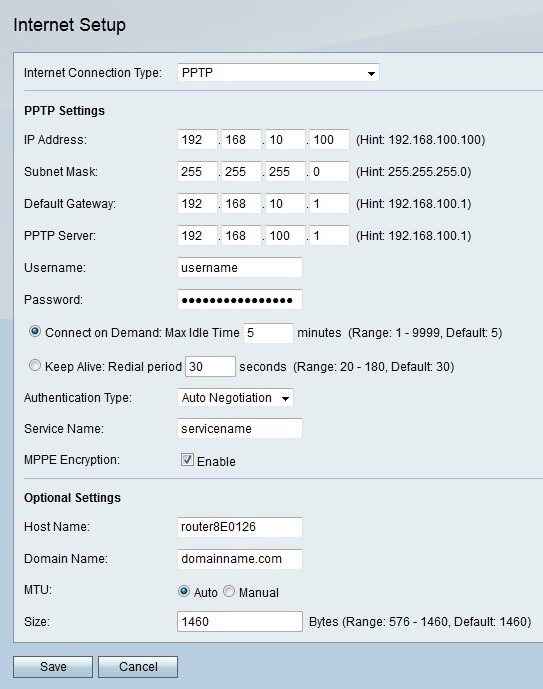
Step 2. From the Internet Connection Type drop-down list choose PPTP.
Step 3. Configure the following settings in the PPTP Settings area.
• IP Address — Enter the IP address of the WAN port.
• Subnet Mask — Enter the subnet mask of the WAN port.
• Default Gateway — Enter the IP address of the default gateway.
• PPTP Server — Enter the IP address of the PPTP server.
Step 4. Enter the username that was provided by the ISP in the Username field.
Step 5. Enter the password that was provided by the ISP in the Password field.
Step 6. Click the radio button that corresponds to the desired connectivity option.
• Connect on Demand — The internet connection is only active when there is traffic present. Enter a maximum amount of time the connection can be idle before the internet connection is terminated in the Max Idle Time field. This option is selected if the ISP charges based on how long the connection is active.
• Keep Alive — The internet connection is always active. Enter the amount of time in the Redial Period field. This is the amount of time the RV215W waits before reconnecting after a loss of internet connection.
Step 7. From the Authentication Type drop-down list choose the type of authentication for the PPTP connection that is provided by the ISP.
• Auto Negotiation — The RV215W queries the ISP server to determine what authentication method is to be used. The RV215W then sends the authentication credentials with the correct authentication type.
• PAP — Password Authentication Protocol (PAP) is an authentication protocol that transmits unencrypted ASCII passwords over the network. This is an insecure authentication method.
• CHAP — Challenge Handshake Authentication Protocol (CHAP) is an authentication protocol that verifies authentication through the use of a three way handshake. This handshake takes place at the time of initial connection and at random intervals after initial connection.
• MS-CHAP — MS -CHAP is the Microsoft version of CHAP. MS-CHAP is in a format designed for compatibility with Windows NT products.
• MS-CHAP2 — MS-CHAP2 is an extension of MS-CHAP. MS-CHAP 2 is a stronger authentication method than MS-CHAP due to a stronger encryption key.
Step 8. Enter a service name in the Service Name field. The service name is used by ISPs to define the type of access the RV215W has. The service name is provided by the ISP.
Step 9. Check Enable in the MPPE Encryption field to enable Microsoft Point-to-Point Encryption (MPPE). MPPE is a feature that encrypts data transferred across Virtual Private Networks (VPN) connections.
Step 10. (Optional) Configure the following settings in the Optional Settings area.
• Host Name — Enter the host name of the RV215W. The host name provides identification to users that log onto the RV215W remotely.
• Domain Name — Enter the domain name of the RV215W.
• MTU — Click the radio button that corresponds to the desired method of configuration for the Maximum Transmit Unit (MTU). MTU is the size of the largest packet that can be sent over the network. The standard MTU for a PPTP connection is 1460 bytes.
– Auto — The RV215W configures the MTU size automatically.
– Manual — The user configures the MTU size manually.
• Size — If the manual radio button is clicked in the MTU field enter a MTU size. A lower MTU size may be beneficial to certain applications that send small bursts of data, but generally the default MTU size is sufficient.
Step 11. Click Save.
L2TP IPv4
Layer 2 Tunneling Protocol is a tunneling protocol that is used as part of the delivery of services by an ISP. L2TP does not provide encryption for data, but instead relies on the encryption protocol MPPE. L2TP uses Virtual Private Network (VPN) to provide a secure connection over an unsecure network, however VPN connections create more tunneling overhead than other connection options.
Step 1. Log in to the web configuration utility and choose Networking > WAN > WAN Configuration. The Internet Setup page opens:
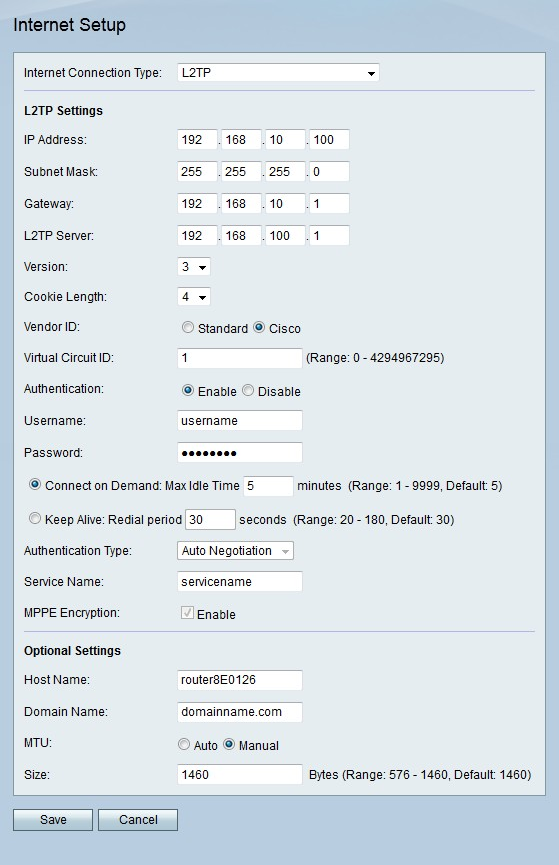
Step 2. From the Internet Connection Type drop-down list choose L2TP.
Step 3. Configure the following settings in the L2TP Settings area.
• IP Address — Enter the IP address of the WAN port.
• Subnet Mask — Enter the subnet mask of the WAN port.
• Gateway — Enter the default gateway address.
• L2TP Server — Enter the IP address of the L2TP server.
Step 4. From the version drop-down list choose a version of L2TP.
• Version 2 — The standard version of L2TP.
• Version 3 — The newer version of L2TP. L2TPv3 provides additional security features and improved encapsulation.
Step 5. From the cookie length drop-down list choose a cookie size. This cookie size defines the size of the locally unique cookies for each negotiated session.
Step 6. Click the radio button that corresponds to the desired vendor in the Vendor ID field. Vendor IDs give identification to L2TP connections.
• Standard — This option is used when the L2TP connection is from the RV215W to a non-Cisco device. This will be the case for most ISP connections.
• Cisco — This option is used when the L2TP connection is from the RV215W to a Cisco device. This is used to allow the user to implement its own L2TP IDs.
Step 7. If the vendor ID is Cisco, enter the ID of the L2TP connection in the Virtual Circuit ID field.
Step 8. Click the desired radio button to enable or disable authentication in the Authentication field.
Note: This option is only for L2TP version 3. L2TP version 2 requires authentication to be enabled.
Step 9. Enter the username that was provided by the ISP in the Username field.
Step 10. Enter the password that was provided by the ISP in the Password field.
Step 11. Click the radio button that corresponds to the desired connectivity option.
• Connect on Demand — The internet connection is only active when there is traffic present. Enter a maximum amount of time the connection can be idle before the internet connection is terminated in the Max Idle Time field. This option is selected if the ISP charges based on how long the connection is active.
• Keep Alive — The internet connection is always active. Enter the amount of time in the Redial Period field. This is the amount of time the RV215W waits before reconnecting after a loss of internet connection.
Step 12. From the Authentication Type drop-down list choose the type of authentication for the L2TP connection that is provided by the ISP.
• Auto Negotiation — The RV215W queries the ISP server to determine what authentication method is to be used. The RV215W then sends the authentication credentials with the correct authentication type.
• PAP — Password Authentication Protocol (PAP) is an authentication protocol that transmits unencrypted ASCII passwords over the network. This is an insecure authentication method.
• CHAP — Challenge Handshake Authentication Protocol (CHAP) is an authentication protocol that verifies authentication through the use of a three way handshake. This handshake takes place at the time of initial connection and at random intervals after initial connection.
• MS-CHAP — MS -CHAP is the Microsoft version of CHAP. MS-CHAP is in a format designed for compatibility with Windows NT products.
• MS-CHAP2 — MS-CHAP2 is an extension of MS-CHAP. MS-CHAP 2 is a stronger authentication method than MS-CHAP due to a stronger encryption key.
Step 13. Enter a service name in the Service Name field. The service name is used by ISPs to define the type of access the RV215W has. The service name is provided by the ISP.
Step 14. Check Enable in the MPPE Encryption field to enable Microsoft Point-to-Point Encryption (MPPE). MPPE is a feature that encrypts data transferred across Virtual Private Network (VPN) connections.
Step 15. (Optional) Configure the following settings in the Optional Settings area.
• Host Name — Enter the host name of the RV215W. The host name provides identification to users that log onto the RV215W remotely.
• Domain Name — Enter the domain of the RV215W.
• MTU — Click the radio button that corresponds to the desired method of configuration for the Maximum Transmit Unit (MTU). MTU is the size of the largest packet that can be sent over the network. The standard MTU for a L2TP connection is 1460 bytes.
– Auto — The RV215W configures the MTU size automatically.
– Manual — The user configures the MTU size manually.
• Size — If the manual radio button is clicked in the MTU field enter a MTU size. A lower MTU size may be beneficial to certain applications that send small bursts of data, but generally the default MTU size is sufficient.
Step 16. Click Save.
Automatic Configuration DHCPv6
Dynamic Host Configuration Protocol version 6 (DHCPv6) is a network protocol that automatically assigns an IP address to a computer when it connects to the network. DHCPv6 is used for devices that often change IP addresses. Due to automatic configuration, DHCPv6 requires little to no configuration.
Step 1. Log in to the web configuration utility and choose Networking > IPv6 > IPv6 WAN Configuration. The IPv6 WAN Configuration page opens:
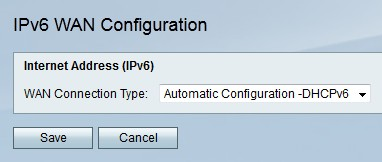
Step 2. From the WAN Connection Type drop-down list choose Automatic Configuration -DHCPv6.
Step 3. Click Save.
Static IPv6
A static IP address is an address that is assigned to a device for an extended period of time. Static IP addresses are mainly used for device services that do not change IP addresses such as website hosting or other services on the internet. The Internet Service Provider (ISP) provides a static IP address for the WAN connection of the RV215W.
Step 1. Log in to the web configuration utility and choose Networking > IPv6 > IPv6 WAN Configuration. The IPv6 WAN Configuration page opens:
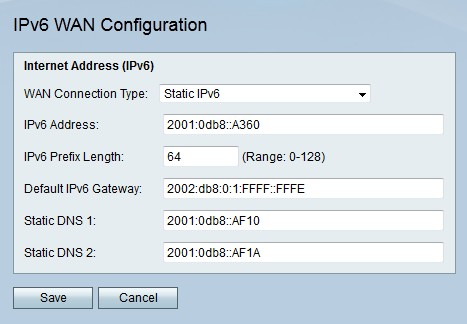
Step 2. From the WAN Connection Type drop-down list choose Static IPv6.
Step 3. Enter the IPv6 Address of the WAN port in the IPv6 Address field provided by the ISP.
Step 4. Enter the prefix length of the WAN port defined by the ISP.
Step 5. Enter the IPv6 address of the default gateway in the Gateway field provided by the ISP.
Step 6. Enter the IPv6 address of the primary DNS server on the ISP IPv6 network in the Static DNS 1 field provided by the ISP.
Step 7. Enter the IPv6 address of the secondary DNS server on the ISP IPv6 network in the Static DNS 2 field provided by the ISP.
Step 8. Click Save.
PPPoE IPv6
Point to Point Protocol Over Ethernet (PPPoE) is network protocol that creates a virtual tunnel from end point to end point. PPPoE is used due to the ease of user configuration. The ISP provides the PPPoE parameters.
Step 1. Log in to the web configuration utility and choose Networking > IPv6 > IPv6 WAN Configuration. The IPv6 WAN Configuration page opens:

Step 2. From the WAN Connection Type drop-down list choose PPPoE IPv6.
Note: The PPPoE Settings are defined based on the IPv4 PPPoE configuration on the Internet Setup page.
Step 3. Click the radio button that corresponds to the desired mode in the address mode field.
• Dynamic — The IPv6 address of the WAN port is automatically assigned.
• Static — The IPv6 address of the WAN port is user configured. Configure the following settings in the IP Settings area.
– IPv6 Address — Enter the IPv6 Address of the WAN port in the IPv6 Address field provided by the ISP.
– IPv6 Prefix Length — Enter the prefix length of the WAN port defined by the ISP.
– Default IPv6 Gateway — Enter the IPv6 address of the default gateway in the Gateway field.
– Static DNS 1 — Enter the IPv6 address of the primary DNS server on the ISP IPv6 network in the Static DNS 1 field.
– Static DNS 2 — Enter the IPv6 address of the secondary DNS server on the ISP IPv6 network in the Static DNS 2 field.
Step 4. Click Save.
 Feedback