Internet Access Policy Configuration on RV215W and RV130W
Available Languages
Objective
The RV215W and RV130W allow for the configuration of Internet Access Policies. These internet access policies are used to allow or block internet access to either a group of PCs or specific PCs.
This article explains how to configure an internet access policy on the RV215W and RV130W.
Applicable Devices | Software Version
• RV215W - 1.1.0.5
• RV130W - 1.0.3.55
Internet Access Policy
Step 1. Log in to the web configuration utility and choose Firewall > Internet Access Policy. The Internet Access Policy page opens:

Note: The default outbound policy status is displayed in the Current Default Outbound Policy field. The default outbound policy determines if outbound traffic is allowed or denied. It is used whenever there are no access rules or internet access policies configured to an IP address of a user. Click Edit to configure the outbound policy on the Access Rules page.
Step 2. Click Add Row to add a new access policy. The Add/Edit Internet Access Policy page opens:
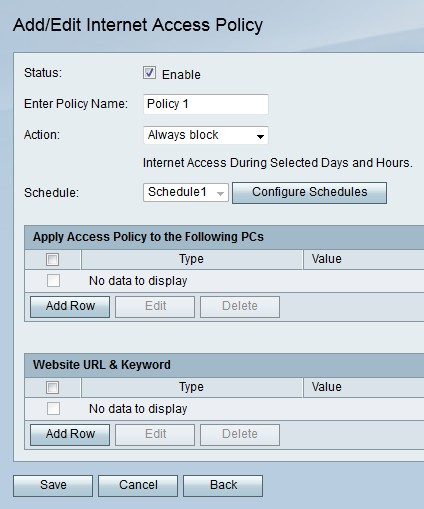
Step 3. Check Enable in the Status field to enable the access policy.
Step 4. Enter a name for the policy in the Enter Policy Name field.
Step 5. From the Action drop-down list choose an action that will apply to the policy.
• Always Block — Always block Internet traffic to and from all endpoints.
• Always Allow — Always allow internet traffic to and from all endpoints.
• Block by Schedule — Block internet schedule based on a specified schedule.
• Allow by Schedule — Allow internet schedule based on a specified schedule.
Step 6. From the Schedule drop-down list choose a schedule that will apply to the policy.
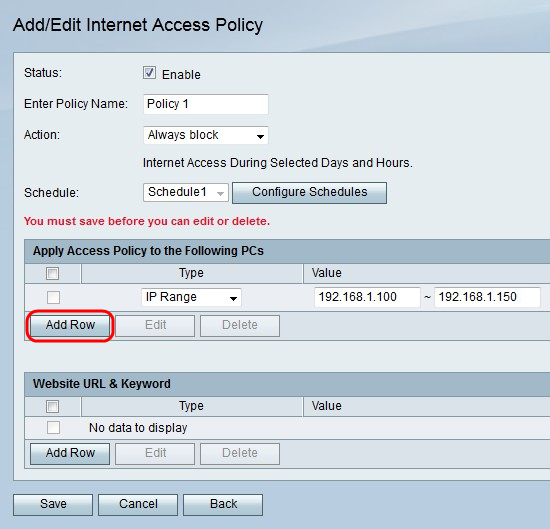
Step 7. Click Add Row to apply the access policy to a specific PC.
Step 8. From the Type drop-down list choose a type of address.
• MAC Address — Enter the MAC address of the PC you want to apply the policy to in the Value field.
• IP Address — Enter the IP address of the PC you want to apply the policy to in the Value field.
• IP Range — Enter the IP address range of the PCs you want to apply the policy to in the Value fields.
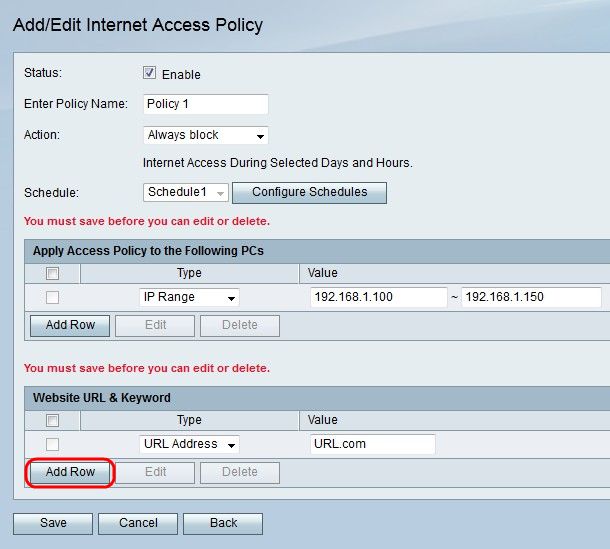
Step 9. (Optional) Click Add Row to apply the policy to a website or keyword.
Step 10. From the Type drop-down list choose a feature to apply to the policy.
• URL Address — Enter the URL of the website that is to apply the policy to in the Value field.
• Keyword — Enter the keyword that is to apply to the policy in the Value field. This will block or allow any URLs that contain the specified keyword.
Step 11. Click Save.
Schedule Management Configuration
Schedule Management is a feature of the RV215W that allows for internet access policies and access rules to become active at certain points of time. Schedules are applied on the Internet Access Policy and Access Rules pages.
Step 1. Log in to the web configuration utility and choose Firewall > Schedule Management. The Schedule Management page opens:
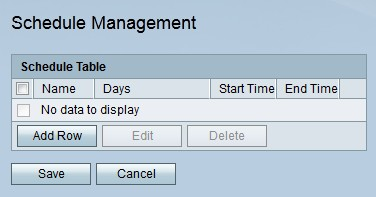
Step 2. Click Add Row to add a new schedule. The Add/Edit Schedules page opens:
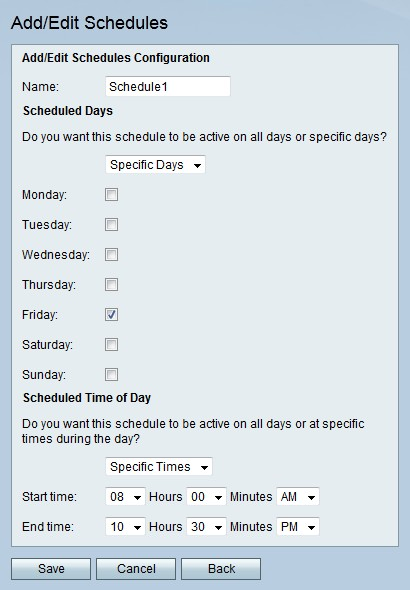
Step 3. Enter a name for the schedule in the Name field.
Step 4. From the Scheduled Days drop-down list choose the days the schedule is active.
• All Days — The schedule is active for every day of the week.
• Specific Days — Check the check boxes of the days for the schedule to be active.
Step 5. From the Scheduled Time of Day drop-down list choose the time the schedule is active.
• All Times — The schedule is active at all times of the day.
• Specific Times — From the Start Time and End Time drop-down list choose the time the schedule starts and the time the schedule ends.
Step 6. Click Save.
 Feedback