Routing Configuration on RV215W
Available Languages
Objective
The RV215W can operate as either a gateway or a router. Gateway mode is used if the device connects the network to the internet. Router mode is used if the device is on a network with other routers. The RV215W can perform dynamic routing through Routing Information Protocol (RIP). RIP is an Interior Gateway Protocol (IGP) that allows routers to exchange routing information automatically with other routers. It also allows routers to adjust routing tables and adapt to network changes. RIPv2 is an enhancement of RIPv1. RIPv2 is a classless protocol while RIPv1 is a classful protocol. RIPv2 has password authentication while RIPv1 does not have password authentication. RIPv2 uses multicast for its routing updates while RIPv1 uses broadcast.
This article explains how to configure routing parameters on the RV215W.
Applicable Devices
• RV215W
Software Version
• 1.1.0.5
Routing Configuration
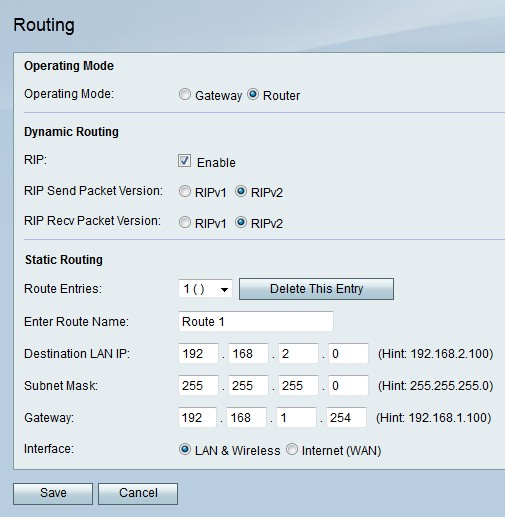
Step 1. Log in to the web configuration utility and choose Networking > Routing. The Routing page opens:

Operating Mode

Step 1. Click the radio button that corresponds to the desired operating mode in the Operating Mode field.
• Gateway — Sets the device to act like a gateway.
• Router — Sets the device to act like a router.
Step 2. Click Save.
Dynamic Routing

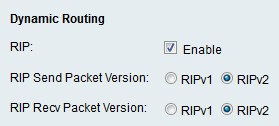
Step 1. Check Enable in the RIP field to enable RIP on the device.
Step 2. Click the radio button that corresponds to the desired RIP packet version that is to be sent from the device in the RIP Send Packet Version field. The version of RIP used to send routing updates to other routers depends on the configuration of the other routers.
Step 3. Click the radio button that corresponds to the desired RIP packet version that is to be received on the device in the RIP Recv Packet Version field.
Note: RIPv2 is backwards compatible with RIPv1.
Step 4. Click Save.
Static Routing

Step 1. From the Route Entries drop-down list choose a route to configure.
Step 2. Enter a name for the route in the Enter Route Name field.
Step 3. Enter the IP address of the destination LAN in the Destination LAN IP field.
Step 4. Enter the subnet mask of the destination network in the Subnet Mask field.
Step 5. Enter the IP address of the gateway used for the specified route in the Gateway field.
Step 6. Click the radio button that corresponds to the desired interface to which packets for this route are sent.
• LAN & Wireless — Directs packets to the LAN and wireless networks.
• Internet (WAN) — Directs packets to the internet (WAN).
Step 7. Click Save.
 Feedback