Allow or Block Service Traffic in IPv6 on RV0xx
Available Languages
Objective
This document explains how to allow or block any service traffic based on the specific schedule if the request originates from a specific machine. The article explains that users can be denied on the basis of IP Addresses.The schedules can be made on the basis of any day or time. The IP addresses allowed or denied can be a specific range, or any specific IP address.
Applicable Devices
• RV016
• RV082
• RV042
• RV042G
Steps to Allow or Block Service Traffic
Steps to Configure Services
Step 1. Log in to the Router Configuration Utility and choose Firewall > Access Rules. The Access Rules page opens:

Step 2. Click Add to create a service traffic schedule. The Access Rules page opens:

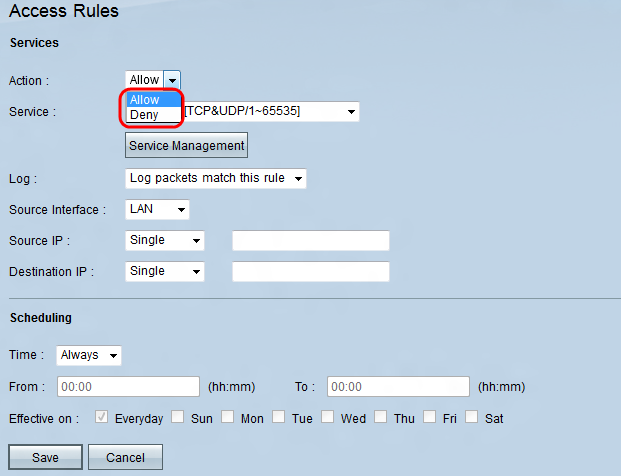
Step 3. In the Action drop-down list, choose Allow to allow the traffic to follow or choose Deny to block the traffic.

Step 4. Choose a service from the Service drop-down list.
Note: Click Service Management if a particular service is not mentioned in the Service drop-down list.

Step 5. Choose an option from the Log drop-down list.
• Log packets match this rule — to log the incoming packets that match the access rule.
• Not Log — Not to log incoming packets that match the access rule.

Step 6. Choose an interface from the Source Interface drop-down list. Source interface is the interface from which the traffic is initiated.
• LAN — The local area network. It connects computers in close proximity on a network such as an office building or school.
• WAN1 — The wide area network. This connects computers in a large area on a network. This could be any network that connects a region or even a country. It is used by businesses and the government to connect to other locations.
• WAN2 — The same as WAN1 except that it is a second network.
• DMZ — Allows outside traffic to access a computer on the network without exposing the LAN.
• ANY — Allows any interface to be used.

Step 7. Choose an option to specify the source IP address from the Source IP drop-down list.
• Any — Any IP address will be used to forward traffic. There will not be any fields to the right of the drop-down list available.
• Single — A single IP address will be used to forward traffic. Enter the desired IP address in the field to the right of the drop-down list.
• Range — A range IP address will be used to forward traffic. Enter the desired IP addresses range in the fields to the right of the drop-down list.

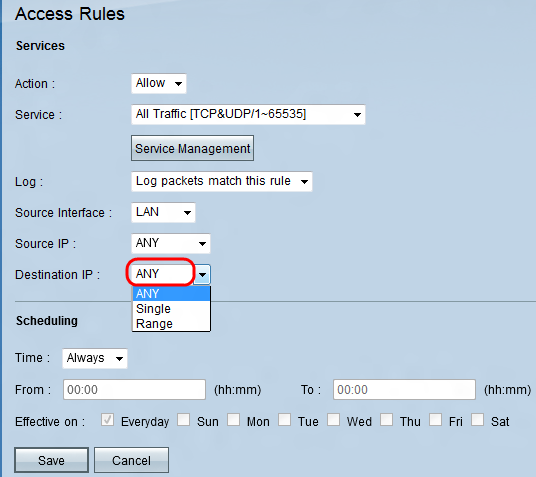
Step 8. Choose an option to specify the destination IP address from the Destination IP drop-down list.
• Any — Any IP address will be used to forward traffic. There will not be any fields to the right of the drop-down list available.
• Single — A single IP address will be used to forward traffic. Enter the desired IP address in the field to the right of the drop-down list.
• Range — A range IP address will be used to forward traffic. Enter the desired IP addresses range in the fields to the right of the drop-down list.
Steps to Configure Scheduling

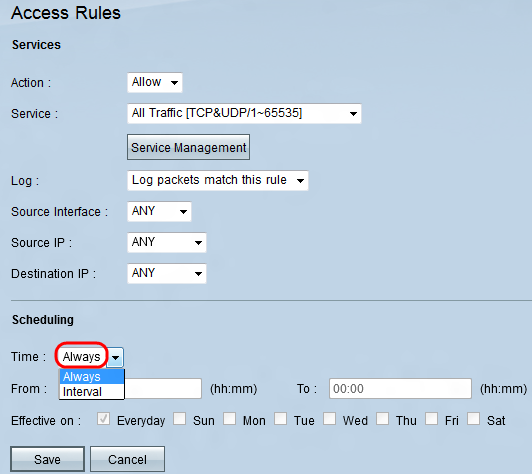
Step 1. Choose a time option from the Time drop-down list.
• Always —This option will allow or block your service traffic throughout the whole week.
• Interval —This option will allow or block your service traffic on a particular day or days on a specific time.

Step 2. Enter a specific time in the From field and To field to specify a time that will allow or block your service traffic.

Step 3. Leave the Everyday check box checked by default to allow or block the service traffic everyday on the particular time or uncheck the Everyday check box to check the days you want to allow or block the service traffic.
Step 4. Click Save to save the configured Access Rule.
Revision History
| Revision | Publish Date | Comments |
|---|---|---|
1.0 |
11-Dec-2018 |
Initial Release |
 Feedback