Block HTTPS Access for a Particular Site on RV016, RV042, RV042G and RV082 VPN Routers
Available Languages
Objective
Hyper Text Transfer Protocol Secure (HTTPS) is a combination of Hyper Text Transfer Protocol (HTTP) with SSL/TLS protocol to provide encrypted communication or secure communication.
This document explains how to block users from accessing desired https websites or URLs. This will help the user to block unwanted or known malicious sites for security and other reasons like parental controls.
Applicable Devices
• RV016
• RV042
• RV042G
• RV082
Software Version
• 4.2.2.08
Block HTTPS Access
You need to find the IP address of the particular website that you wish to block. To do that, please follow the below Steps 1 and 2.
Step 1. On your PC, open the command prompt by Start > Run. Then, type cmd in the Open field. (In Windows 8, just type cmd in the Start screen.)
Step 2. In the Command Prompt window, enter nslookup <space> URL. The URL is the website you want to block. For instance, if you wanted to block the website "www.example.com" you would enter:
nslookup www.example.com.

The following fields will be displayed:
• Server — Displays the name of the DNS server which provides information to the router.
• Address — Displays the IP address of the DNS server which provides information to the router.
• Name — Displays the name of the server which hosts the website that you entered in Step 2.
• Address — Displays the IP address of the server which hosts the website that you entered in Step 2.
• Aliases — Displays the Fully Qualified Domain Name (FQDN) of the server which hosts the website that you entered in Step 2.
The server address of the website is what we need.
Step 3. Log into the Router Configuration Utility to choose Firewall > Access Rules. The Access Rule page opens:

Step 4. Click Add to add a new rule. The Access Rules window appears:

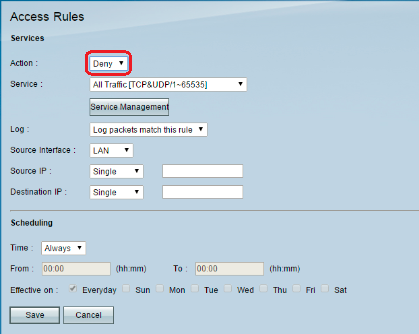
Step 5. Choose Deny from the Action drop-down list to block the desired website.

Step 6. Choose HTTPS [TCP/443~443] from the Service drop-down list as we are blocking an HTTPS URL.

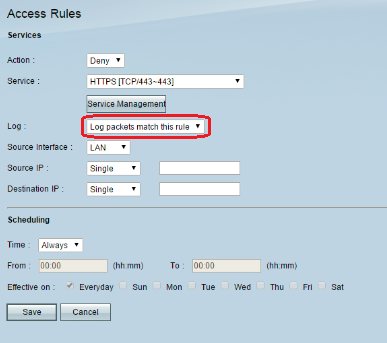
Step 7. Choose the desired option for the Log Management from the Log drop-down list.

• Log packets match this rule — Will log the packets which are blocked.
• Not log — Will not log any packets.
Step 8. Choose LAN from the Source Interface drop-down list as we have to block the URL request which will come from the routers LAN interface.

Step 9. Choose the desired option from the Source IP drop-down list. Then enter the IP address(es) of the machine(s) that are not allowed to access the website:

• Single — The rule blocks packets from a single IP address in the LAN interface.
• Range — The rule blocks packets from a range of IP addresses (IPv4 only) in the LAN interface. Enter the first IP address of the range in the first field and then enter the final IP address in the second field.
• ANY — The rule applies to all IP address in the LAN interface.
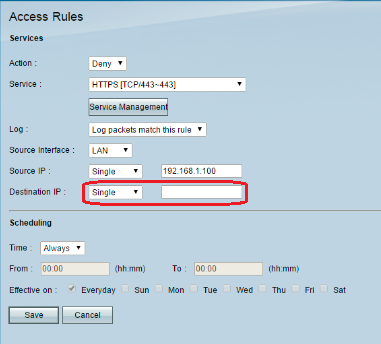
Step 10. Choose the desired option from the Destination IP drop-down list. Then enter the IP address of the URL that you wish to block. Refer to Step 1 and Step 2 to help you find this information.

• Single — The rule blocks packets from a single IP address in the LAN interface.
• Range — The rule blocks packets from a range of IP addresses (IPv4 only) in the LAN interface. Enter the first IP address of the range in the first field and then enter the final IP address in the second field. Typically, this option is not used as it will be inaccurate sometimes and will block other websites.
Step 11. Choose the desired scheduling option in the Scheduling section.

• Always — This rule blocks the website all the time.
• Interval — This rule blocks the website only at a particular time or day of the week.
Step 12. If you select Interval at Step 11, enter the desired start and end time in the From and To fields.

Step 13. If you select Interval at Step 11, check the desired day(s) on which you want to block the website or check the Everyday checkbox to block the website on each and every day.

Step 14. Click Save to save the settings. The specified website will be blocked.

Redo Step 1 to Step 15 to block more URLs.
Revision History
| Revision | Publish Date | Comments |
|---|---|---|
1.0 |
12-Dec-2018 |
Initial Release |
 Feedback