Configuration of DeMilitarized Zone Port with Subnet Mask on RV016, RV042, RV042G and RV082 VPN Routers
Available Languages
Objective
A De-Militarized Zone (DMZ) is a portion of an internal network of an organization which is made available to an untrusted network such as the Internet. A DMZ helps to improve security in an organization's internal network. Instead of all internal resources being available from the Internet, only certain hosts such as web servers are available.
When an Access Control List (ACL) is bound to an interface, Access Control Element (ACE) rules are applied to packets that arrive at that interface. Packets that do not match any of the ACEs in the ACL are matched to a default rule whose action is to drop unmatched packets. This article shows how to configure the DMZ port and and allow traffic from the DMZ to specific destination IP addresses.
Applicable Devices
• RV016
• RV042
• RV042G
• RV082
Software Version
• v4.2.2.08
DMZ Configuration with Subnet
Step 1. Log into the Router Configuration Utility page and choose Setup > Network. The Network page opens:

Step 2. To configure DMZ on IPv4 or IPv6 address click the corresponding tab located at the LAN Setting field.
Note: Dual-Stack IP in the IP Mode area must be enabled if you want to configure IPv6.
Step 3. Scroll down to the DMZ Setting field and click the Enable DMZ radio button to enable DMZ.

Step 4. Click on the DMZ configuration icon to configure the subnet. Configuration can be done for both IPv4 and IPv6 in the following way:
IPv4 Configuration

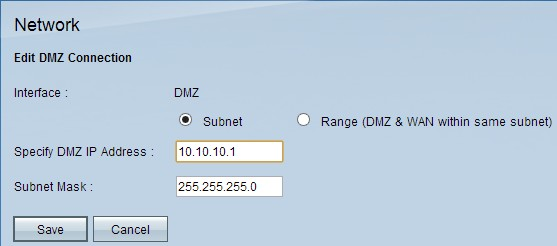
Step 5. Click the Subnet radio button to configure DMZ to another subnet than that of the WAN. For Subnet IP the following should be configured
• Specify DMZ IP Address — Enter the DMZ IP address in the Specify DMZ IP Address field.
• Subnet Mask — Enter the subnet mask in the Subnet Mask field.
Warning: Hosts with an IP address in the DMZ are not as secure as hosts inside of your internal LAN.
Step 6. Click Range to configure the DMZ to be on the same subnet as the WAN. Range of the IP addresses is to be entered in the IP Range for DMZ port field.
IPv6 Configuration

Note: For IPv6 Configuration the following options are available:
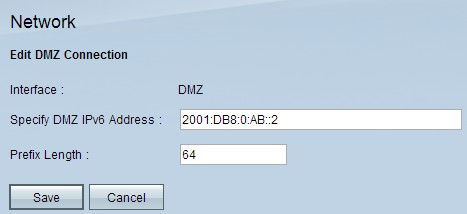
Step 7. Specify DMZ IPv6 Address — Enter the IPv6 address.
Step 8. Prefix Length — The Prefix length of the DMZ IP address domain mentioned above is to be entered.
Step 9. Click Save to save the configuration.
Access Rules Configuration
This configuration is done to define the access lists for the IPs configured on the multiple subnet masks.
Step 1. Log into the Router Configuration Utility page and choose Firewall > Access Rules. The Access Rules page opens:

Note: The default access rules cannot be edited.
Step 2. Click the Add button to add a new access rule. The Access Rules page changes to show the Services and the Scheduling areas.
Note: This configuration can be done for both IPv4 and IPv6 by selecting those respective tabs on the Access Rules page. The configuration steps specific to IPv4 and IPv6 are mentioned in the following steps.

Step 3. Choose Allow from the Action drop-down list to allow the the service.
Step 4. Choose All Traffic [TCP&UDP/1~65535] from the Service drop-down list to enable all services for the DMZ.
Step 5. Choose Log packets that match this rule from the Log drop-down list to choose only logs that match the access rule.
Step 6. Choose DMZ from the Source Interface drop-down list which is the source for the access rules.
Step 7. Choose Any from the Source IP drop-down list.
Step 8. Choose any of the following available options from the Destination IP drop-down list.
• Single — Choose single to apply this rule to a single IP address.
• Range — Choose range to apply this rule to a range of IP addresses. Enter the first and last IP address of the range. This option is available only in IPv4.
• Subnet — Choose Subnet to apply this rules to a subnetwork. Enter the IP address and CIDR notation number which is used for allocating IP addresses and routing internet protocol packets for the subnet. This option is available only in IPv6.
• Any — Choose Any to apply the rule to any of the IP address.
Timesaver: Skip to Step 10 if you are configuring IPv6 access rules.
Step 9. Choose a method to define when the rules are active from the Time drop-down list. They are:
• Always — If you choose Always from the Time drop down list, the access rules will always be applied to traffic.
• Interval — You can choose a specific time interval at which the access rules are active if you select Interval from the Time drop down list. After you specify the time interval, choose the days when you want the access rules to be active from the Effective on check boxes.
Step 10. Click Save to save your settings.

Step 11. Click the Edit icon to edit the created access rule.
Step 12. Click the Delete icon to delete the created access rule.
Revision History
| Revision | Publish Date | Comments |
|---|---|---|
1.0 |
11-Dec-2018 |
Initial Release |
 Feedback