Configuration of Multiple Public IPs in DeMilitarized Zone (DMZ) on RV042, RV042G and RV082 VPN Routers
Available Languages
Objective
The Demilitarized Zone (DMZ) is an internal network of an organization, which is made available to an untrusted network. As per security, the DMZ falls between trusted and untrusted networks. Maintenance of the DMZ helps to improve security ofto an organization's internal network. When an Access Control List (ACL) is bound to an interface, its Access Control Element (ACE) rules are applied to packets that arrive at that interface. Packets that do not match any of the ACEs in the Access Control List are matched to a default rule whose action is to drop unmatched packets.
The objective of this document is to show you how to configure the DMZ port to allow Multiple Public IP addresses and define the Access Control List (ACL) for IPs on the router device.
Applicable Devices
• RV042
• RV042G
• RV082
Software Version
• v4.2.2.08
DMZ Configuration
Step 1. Log into the Web Configuration Utility page and choose Setup > Network. The Network page opens:

Step 2. In the IP Mode Field, click the Dual-Stack IP radio button to enable the configuration of IPv6 addresses.

Step 3. Click the IPv6 tab located in the LAN Setting field to be able to configure DMZ on IPv6 address.

Step 4.Scroll down to the DMZ Setting area and click the DMZ checkbox to enable DMZ

Step 5. In the WAN Setting field click on the Edit button to edit the IP Static of the WAN1 settings.

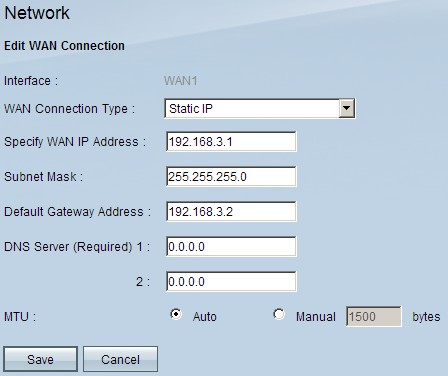
The Network page opens:

Step 6. Choose Static IP from the WAN Connection Type drop-down list.
Step 7. Enter the WAN IP address that is displayed on the System Summary page in the Specify WAN IP Address field.
Step 8. Enter the subnet mask address in the Subnet Mask field.
Step 9. Enter the default gateway address in the Default Gateway Address field.
Step 10. Enter the DNS Server address that is displayed on the System Summary page in the DNS Server (Required) 1 field.
Note: The DNS Server address 2 is optional.
Step 11. Choose the Maximum Transmission Unit (MTU) to be either Auto or Manual. If you choose manual enter the bytes for the Manual MTU.
Step 12. Click the Save tab to save your settings.
ACL Definition
Step 1. Log into the Web Configuration Utility page and choose Firewall > Access Rules. The Access Rules page opens:

Note: When you enter the Access Rules page the default access rules can not be edited.
Step 2. Click the Add button to add a new access rule.

The Access Rules page will now show options for the Service and Scheduling areas.

Step 3. Choose Allow from the Action drop-down list to allow the service.
Step 4. Choose All Traffic [TCP&UDP/1~65535] from the Service drop-down list to enable all services for the DMZ.
Step 5. Choose Log packets match this rule from the Log drop-down list to choose only logs that match the access rule.
Step 6. Choose DMZ from the Source Interface drop-down list. This is the source for the access rules.
Step 7. Choose Any from the Source IP drop-down list.
Step 8. Choose Single from the Destination IP drop-down list.
Step 9. Enter the IP addresses of the destination to be allowed the access rules in the Destination IP field.
Step 10. In the Scheduling area choose Always from the Time drop-down list to make the access rule active all the time.
Note: If you choose Always from the Time drop-down list, the access rule will be set by default to Everyday in the Effective on field.
Note: You can choose a specific time interval (for which the access rules are active) by selecting Interval from the Time drop-down list. Then, you can choose the days which you want the access rules to be active from the Effective on check boxes.
Step 11. Click Save to save your settings.
Note: If a popup windows appears press 'Ok' to add another access rule, or press 'Cancel' to return to the page of Access Rules.
The Access Rule you created in the previous step is now displayed

Step 12. Click the Edit icon to edit the created access rule.
Step 13. Click the Delete icon to delete the created access rule.
Revision History
| Revision | Publish Date | Comments |
|---|---|---|
1.0 |
11-Dec-2018 |
Initial Release |
 Feedback