Configure Static Dynamic Host Configuration Protocol (DHCP) on an RV Series Router
Available Languages
Objective
Static Dynamic Host Configuration Protocol (DHCP) or DHCP Reservation, lets the DHCP server of the router assign the same Internet Protocol (IP) address to a host in your Local Area Network (LAN). This is done by associating one IP address to one Media Access Control (MAC) address. Although it requires additional configuration, employing static DHCP makes it easy to troubleshoot the network. Static DHCP also helps devices on a LAN connect to each other easier. A classic example of using static DHCP is when setting up a web server that is accessible outside the network.
This article aims to show you how to configure static DHCP settings on an RV Series Router.
Applicable Devices
- RV Series
Software Version
- 1.2.1.7 — RV110W
- 1.0.3.16 — RV130, RV130W
- 1.0.0.17 — RV132W
- 1.0.0.21 — RV134W
Configure Static DHCP
Step 1. Log in to the web-based utility and choose Networking > LAN > Static DHCP.
Note: The images on this article are taken from the RV132W Router. Menu options may vary per model.

Step 2. On the VLAN drop-down list, choose the Virtual Local Area Network (VLAN) to work on. In this example, VLAN 10 is chosen.

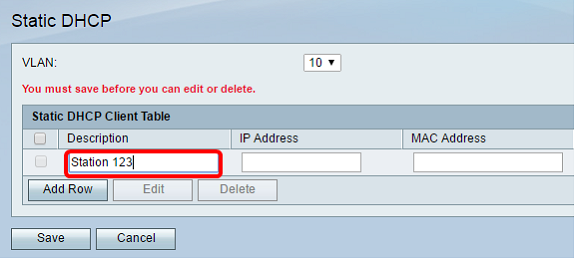
Step 3. In the Static DHCP Client Table, click Add Row.
Note: If you need to edit an existing item, check the check box that corresponds to the item you want to edit and then click Edit.

Step 4. In the Description field, enter a name for the client. This briefly describes the host. In this example, Station 123 is entered.

Step 5. In the IP Address field, enter the IP address that you need to link to a MAC address.
Note: In this example, the IP Address used is 10.10.10.123.

Step 6. In the MAC Address field, enter the MAC address of the host that you want to link to the IP address in Step 5. In this example, XX:XX:XX:XX:XX:XX is used. This step associates the MAC address of the host in Station 123 to the IP address 10.10.10.123 that will be assigned by the DHCP server.

Step 7. Click Save.

You should now have successfully configured static DHCP on your RV Series Router.
Revision History
| Revision | Publish Date | Comments |
|---|---|---|
1.0 |
11-Dec-2018 |
Initial Release |
 Feedback