Dynamic DNS Settings on RV110W
Available Languages
Objective
Dynamic Domain Name System (Dynamic DNS) is an Internet service that connects routers with varying IP addresses to Internet domain names. To utilize Dynamic DNS, an account must be created with a Dynamic DNS provider such as DynDNS.com, TZO.com, 3322.org, or noip.com. This article explains how to configure Dynamic DNS on the RV110W.
Applicable Devices
- RV110W
Steps of Procedure
Step 1. Use the web configuration utility to choose Networking > Dynamic DNS.
Disable Dynamic DNS

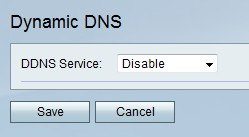
Step 1. From the Dynamic DNS drop-down menu, choose disable.
Step 2. Click Save to save changes or Cancel to discard them.
TZO.com Settings

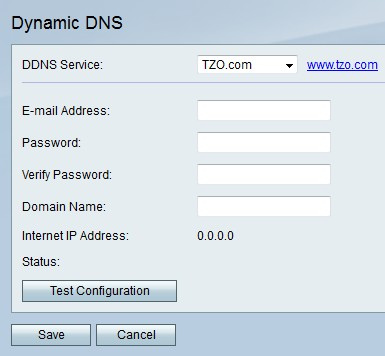
Step 1. From the Dynamic DNS drop-down menu, choose TZO.com.
Step 2. In the E-mail Address field, enter the email address for the TZO.com account.
Step 3. In the Password field, enter the password for the TZO.com account.
Step 4. In the Verify Password field, enter the password again to verify it.
Step 5. In the Domain Name field, enter the domain name for the TZO.com account.

Step 6. (Optional) Click Test Configuration to test settings.
Step 7. Click Save to save changes or Cancel to discard them.
DynDNS.com Settings

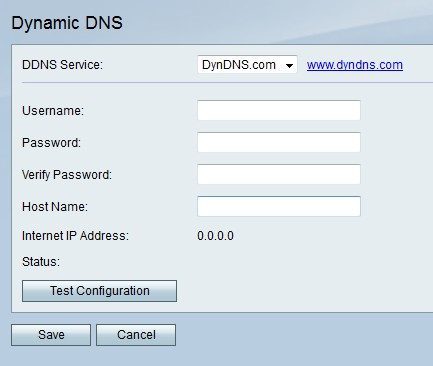
Step 1. From the Dynamic DNS drop-down menu, choose DynDNS.com.
Step 2. In the E-mail Address field, enter the email address for the DynDNS.com account.
Step 3. In the Password field, enter the password for the DynDNS.com account.
Step 4. In the Verify Password field, enter the password again to verify it.
Step 5. In the Host Name field, enter the domain name for the DynDNS.com account.
Step 6. (Optional) Click Test Configuration to test settings.
Step 7. Click Save to save changes or Cancel to discard them.
3322.org Settings

Step 1. From the Dynamic DNS drop-down menu, choose 3322.org.
Step 2. In the Username field, enter the username for the 3322.org account.
Step 3. In the Password field, enter the password for the 3322.org account.
Step 4. In the Host Name field, enter the domain name for the 3322.org account.
Step 5. (Optional) Click Test Configuration to test settings.
Step 6. Click Save to save changes or Cancel to discard them.
noip.com Settings

Step 1. From the Dynamic DNS drop-down menu, choose noip.com.
Step 2. In the E-mail Address field, enter the email address for the noip.com account.
Step 3. In the Password field, enter the password for the noip.com account.
Step 4. In the Verify Password field, enter the password again to verify it.
Step 5. In the Host Name field, enter the domain name for the noip.com account.
Step 6. (Optional) Click Test Configuration to test settings.
Step 7. Click Save to save changes or Cancel to discard them.
 Feedback