Log Email Settings on RV110W
Available Languages
Objective
The RV110W has the ability to send system information logs to an email account. This feature allows an administrator to stay up to date on the condition of the router. This article explains how to configure email log settings on the RV110W.
Applicable Devices
- RV110W
Steps of Procedure
Log E-mail Configuration
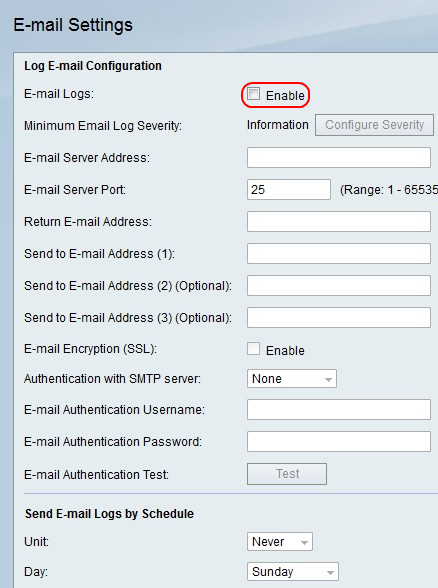
Step 1. Use the router configuration utility to choose Administration > Logging > Email Settings. The E-mail Settings page opens.

Step 2. To the right of E-mail Logs, check the Enable box to send logs via email.

Step 3. Click Configure Severity to go to Administration > Logging > Log Settings to configure which logs to email.
Note: This action redirects you to another page and cancels any changes that you are making.
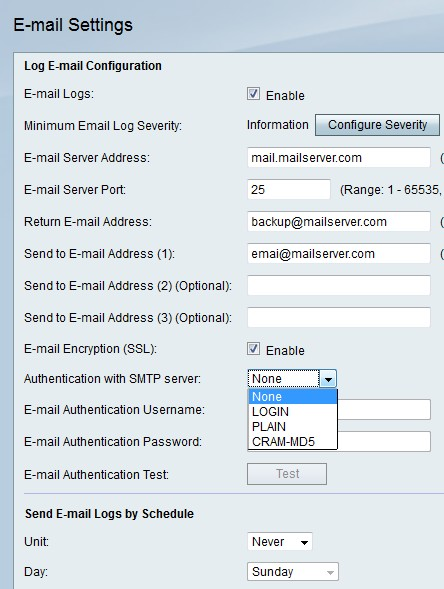
Step 4. In the E-mail Server Address field, enter an email server address that is associated with the recipient email addresses.
Step 5. In the E-mail Server Port field, enter the port number for the email service provider.
Note: If the email service provider does not require a special port number, leave the default (25) in the field.
Step 6. In the Return E-mail Address field, enter an email address that receives log emails when the primary email addresses are inactive.
Step 7. In the Send to E-mail Address (1) field, enter the first email address that receives the log email.
Step 8. In the Send to E-mail Address (2) (Optional) field, enter the second email address that receives the log email if you wish.
Step 9. In the Send to E-mail Address (3) (Optional) field, enter the third email address that receives the log email if you wish.

Step 10. To the right of E-mail Encryption (SSL), check the Enable box to encrypt emails.

Step 11. From the Authentication with SMTP server drop-down menu, choose the type of authentication that the email server uses.
Step 12. If you choose None, skip to step 12. If you choose another option, enter the username for the email account in the E-mail Authentication Username field and the password for the account in the E-mail Authentication Password field.

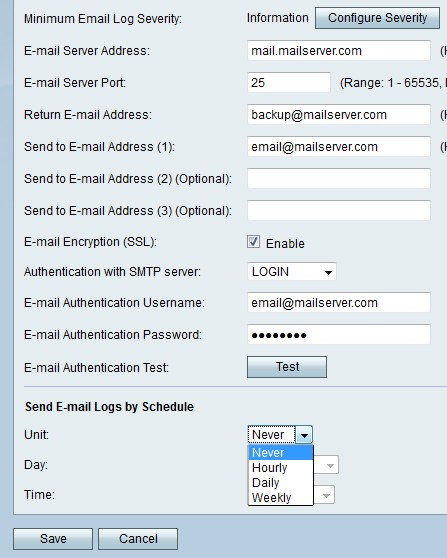
Step 13. Click Test to immediately test email connection.

Step 14. Click Save to save changes or Cancel to discard them.
Send E-mail Logs by Schedule

Step 1. From the Unit drop-down menu, choose how often you would like to receive the log emails.
Note: If you choose Never, log emails are never sent.

Step 2. If you choose weekly, choose a day of the week to receive the emails from-the Day drop-down menu.

Step 3. If you choose weekly or daily, choose a time of the day to receive the emails from the Time drop-down menus.
Step 4. Click Save to save changes or Cancel to discard them.
 Feedback