Configure PPPoE on RV110W
Available Languages
Objective
Point-to-Point Protocol over Ethernet (PPPoE) is a network protocol that encloses the Point-to-point protocol within the Ethernet frame. PPPoE makes it so that packets can be transported across the connection securely and the user can virtually dial from one device to another over ethernet.
The objective of this document is to show you how to configure the PPPoE settings on the RV110W.
Applicable Devices
• RV110W
Configuring PPPoE
Step 1. Login to the web configuration utility and choose Networking > WAN.

Step 2. From the Internet Connection Type drop-down list, choose PPPoE.

Step 3. Enter the username provided by your ISP in the Username field.

Step 4. Enter the password provided by your ISP in the Password field.

Step 5. Click either Connect on Demand or Keep Alive.

The available options are defined as follows:
• Connect on Demand — Select this option if your ISP charges based on the amount of time that you are connected. When selecting this option, the Internet connection is on only when traffic is present. If the connection is idle and no traffic is flowing then the connection is closed. Enter the number of minutes after which the connection shuts off in the Max Idle Time field.
• Keep Alive — In the Redial Period field, enter the number of seconds after which the RV110W attempts to reconnect if it is disconnected.
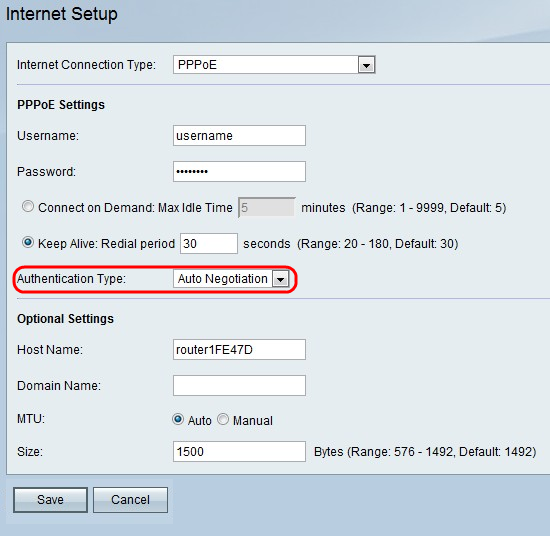
Step 6. Choose the authentication type from the Authentication Type drop-down list.

The available options are defined as follows:
• Auto Negotiation Type — Server sends a configuration request specifying the security algorithm set on it. Then, the RV110W sends back authentication credentials with the security type sent earlier by the server.
• PAP Type — Uses the Password Authentication Protocol (PAP) to connect to the ISP.
• CHAP — Uses the Challenge Handshake Authentication Protocol (CHAP) when connecting with the ISP.
• MS-CHAP or MS-CHAPv2 — Uses Microsoft Challenge Handshake Authentication Protocol when connecting with the ISP.
Step 7. (Optional) Enter the host name of the RV110W in the Host Name field.
Note: If you do not wish configure any of the optional settings, then skip to Step 11.

Step 8. Enter the domain name of your network in the Domain Name field.

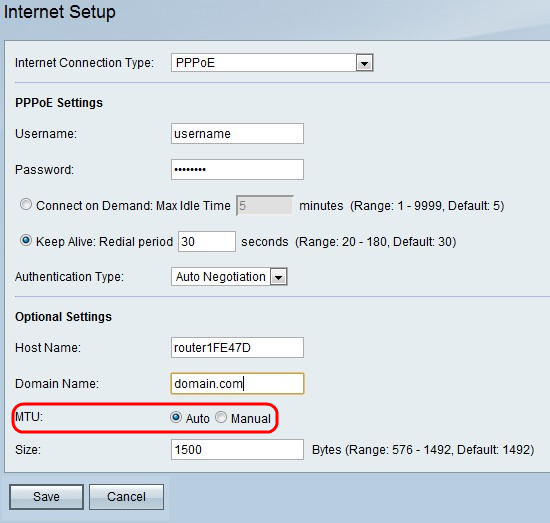
Step 9. Click Auto to set the size of the MTU to have the size automatically adjust, or click Manual to specify the size of the MTU.

Step 10. If you click Manual, enter the size of the MTU in the Size field.
Step 11. Click Save to save the configuration changes, or Cancel to discard the changes.
 Feedback