Configuration of Access Rule through Wizard on RV016, RV082, RV042 and RV042G VPN Routers
Available Languages
Objective
Access rule is used to determine whether the traffic is allowed to enter in the network through the firewall of the router or not to ensure security in the network. An access rule is configured based on various criteria in order to allow or deny access to the network. Access rule is scheduled according to the time when the access rules need to be applied to the router.
This article explains how to configure access rules through a wizard on the RV016, RV082, RV042 and RV042G VPN routers.
Note: You can configure access rule through Firewall. To know more on how to configure access rule through Firewall refer to Configuration of an IPv4 Access Rule on RV016, RV082, RV042 and RV042G VPN Routers for IPv4 access rule and Configuration of an IPv6 Access Rule on RV042, RV016 and RV042G VPN Routers for IPv6 access rule. You can schedule the access rule also through Firewall. To know more on how to schedule the access rule through Firewall refer to Schedule Access Rule on RV016, RV082, RV042 and RV042G.
Applicable Devices
• RV042
• RV042G
• RV082
• RV016
Software Version
• v4.2.1.02
Access Rule Setup
Step 1. Use the Router Configuration Utility to choose Wizard. The Wizard page opens:

Step 2. Click Launch Now of the Access Rule Setup section to configure the Access Rule Installation Wizard. The page explains about the access rules and default rules of the router.The Welcome to the Access Rules Installation Wizard window opens:

Step 3. Click Next to continue with the setup.
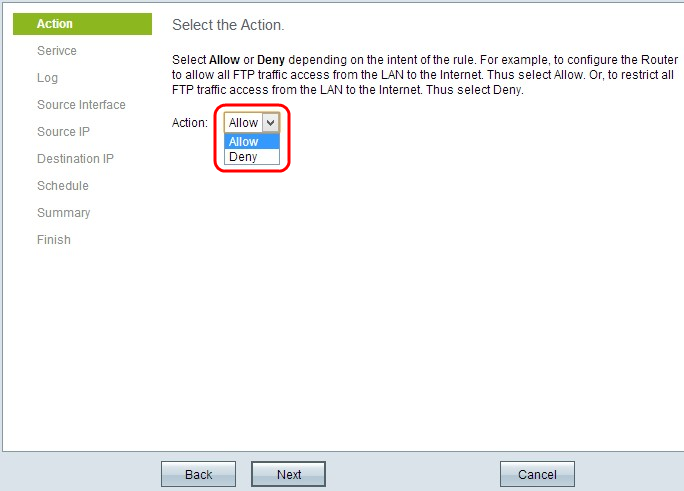
Step 4. Choose the appropriate radio button from the Action drop-down list to allow or restrict the FTP traffic from the LAN / WAN to the internet.
• Allow — It allows all the FTP traffic to access in the internet from the LAN / WAN.
• Deny — It restricts all the FTP traffic to access in the internet from the LAN / WAN.
Step 5. Click Next to continue with the setup.
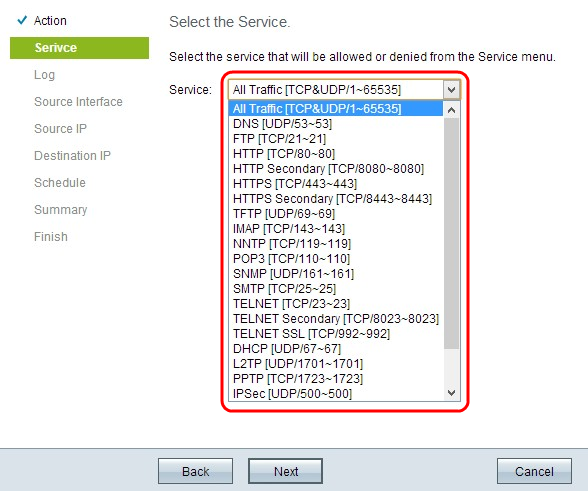
Step 6. Choose the appropriate service which you need to be allowed or denied from the Service drop-down list.
Step 7. Click Next to continue with the setup.

Step 8. Choose the appropriate Log option from the Log drop-down list.
• Log packets match this access rule — Enables the router to keep log tracking for the service which has been selected.
• Not Log — Disables the router to keep log tracking.
Step 9. Click Next to continue.
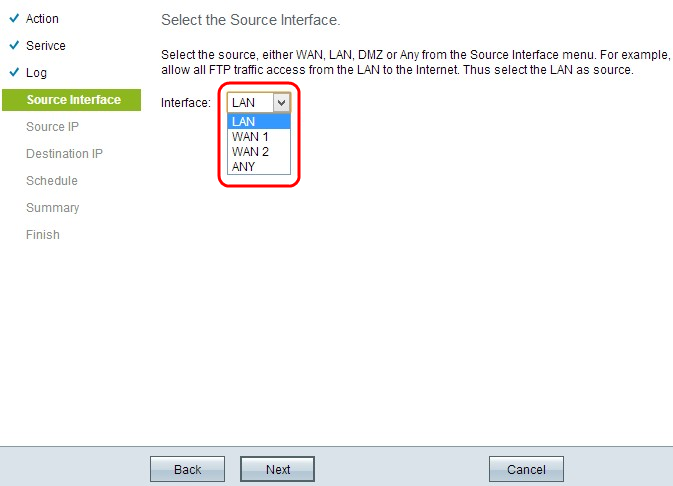
Step 10. Choose the appropriate source interface from the Interface drop-down list.
• LAN — The source interface is Local Area Network. The access rule affects only to the LAN traffic.
• WAN 1 — The source interface is Wide Area Network 1. The access rule affects only to the WAN 1 traffic.
• WAN 2 — The source interface is Wide Area Network 2. The access rule affects only to the WAN 2 traffic.
• Any — Source interface can be any network. The access rule affects any traffic.
Step 11. Click Next to continue.

Step 12. Choose the appropriate source IP address or a range of IP addresses to which the access rule is applied from the Source IP drop-down list.
• Any — Any user with any IP address can access to the internet.
• Single — Only the single user with the single IP address can access to the internet. If you choose Single, you need to enter the specific IP address.
• Range — Only the users with the range of IP address can access to the internet. If you choose Range, you need to enter the starting and ending IP addresses.
Step 13. Scroll down and click Next to continue with the setup.
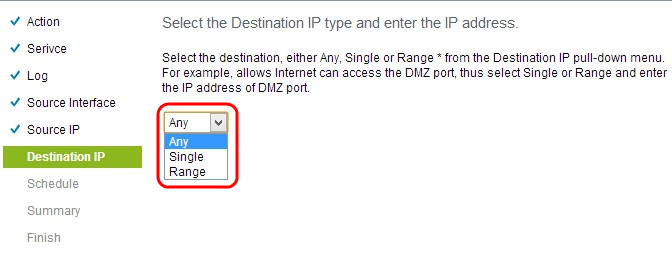
Step 14. Choose the appropriate destination IP address or range of IP addresses for the Access rule from the Destination IP drop-down list.
• Any — Destination interface can have any IP address.
• Single — Destination interface can be the specific single IP address. If you choose Single, you need to enter the specific single IP address.
• Range — Destination interface can be any of the IP address of the given range. If you choose Range, you need to enter the starting and ending IP addresses.
Step 15. Scroll down and click Next to continue with the setup.

Step 16. Click the appropriate radio button to choose the time when you want to apply the access rule on the router.
• Always — Access rules always apply on the router. If you choose this option, skip Step 17 to Step 19. The default is Always.
• Interval — Access rules are applied for some specific times according to the time it is set. If you choose this option you need to enter the time interval for the access rule to be enforced.

Step 17. Enter the time from when you want to apply schedule for the access list in the From field. The format for the time is hh: mm.
Step 18. Enter the time till when you want to apply the schedule for the access list in the To field. The format for the time is hh: mm.
Step 19. Check the specific check box when you want to apply the schedule for the access list.
Step 20. Scroll down and click Next to continue with the setup. The Summery window with detail information of the access rule opens:
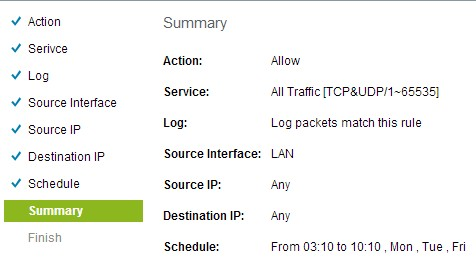
Step 21. Scroll down and click Install to install the setup.
Step 22. Click OK to save the settings and return to the Wizard page.
Revision History
| Revision | Publish Date | Comments |
|---|---|---|
1.0 |
10-Dec-2018 |
Initial Release |
 Feedback