WAN Configuration on RV160x and RV260x Devices
Available Languages
Objective
A wide area network or WAN is the larger network outside of your local network and consists of various geographically distributed telecommunications. A WAN may be either privately owned or rented and can allow for a business to carry out daily workflow regardless of location. This article provides instruction on how to configure WAN features on the RV160x and RV260x routers. These WAN features provide methods to enhance security, increase bandwidth efficiency, as well as failover protection.
Applicable Devices
- RV160x
- RV260x
Software Version
- 1.0.00.13
Configure WAN Settings
The RV160x and RV260x routers each have two physical WAN and associated VLAN interfaces that can be configured. To configure the WAN settings, follow the steps provided below.
From the navigation pane on the left side of the configuration utility, select WAN > WAN Settings.
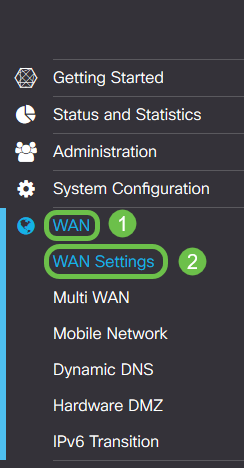
The WAN Settings page appears. From here you may select tabs to configure IPv4, IPv6, and Advanced settings.
IPv4/IPv6 Settings
First select the type of connection your router has with the WAN from the Connection Type field.

The selectable connection types are explained in the table below.
| Connection Type | Description |
| DHCP | Dynamic Host Configuration Protocol provides an IP address from a range set by your service provider. This address is allotted dynamically when a new connection is created. |
| Static IP | A connection in which the router is visible from the WAN on a set, unchanging IP address. |
| PPPoE | Point-to-Point Protocol over Ethernet is used to encapsulate packets and manage IP allocations. With this protocol, a username and password is required to receive an IP address from the service provider. |
| PPTP | Point-to-Point Tunneling Protocol is a method of implementing virtual private networks (VPNs) for encrypted connection between locations over public networks. |
| L2TP | Layer 2 Tunneling Protocol is another protocol commonly used by service providers to support VPNs. |
| SLAAC (IPv6 Only) | Stateless Address Autoconfiguration allows a host to configure themselves automatically when connecting to an IPv6 network without a DHCPv6 server. |
| Disabled (IPv6 Only) | This allows you to disable IPv6 and only permit IPv4 addressing on the router. |
With each selectable connection type, there are associated settings that will appear. Each list of settings is explained below in order of their appearance in the connection type list.
DHCP Settings
Step 1. If the connection type is using a DHCP address, select the Use DHCP Provided DNS Server radio button if the address is to be provided by an outside source.

Step 2. If the DHCP address is to be provided by a DNS server on a static address, select the Use DNS as Below radio button and then enter the DNS server address(es) in the fields below.

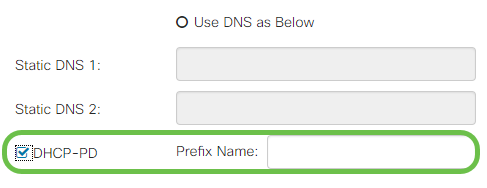
Step 3 (IPv6 Only). If your DHCPv6 server has a specified prefix delegation, check the DHCP-PD checkbox and enter the prefix in the Prefix Name field.
Static IP Settings
Step 1. If a static IP address is required, enter the address into the IP Address field followed by the subnet mask bit length.
Note: If a bit length is specified, the Netmask field will be automatically filled accordingly.
Step 2. If a bit length is not specified in Step 1, enter the subnet mask IP into the Netmask field.
Step 3. Enter a gateway address for the router into the Default Gateway field.
Step 4. Specify an address for a DNS server in the Static DNS fields below. If more than one address is entered, this may be used in a failover situation for greater reliability.

PPPoE Settings
Step 1. Enter the username and password required to log in by your ISP into the Username and Password fields respectively.

Note: You may check the checkbox Show Password to make the password visible on the screen during entry.
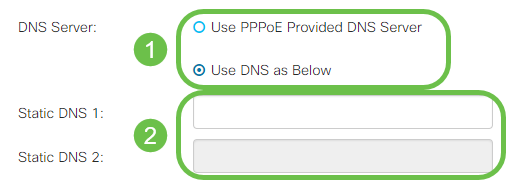
Step 2. Select from the DNS Server field whether to use a DNS server provided by the PPPoE connection or to use a specified DNS server on a static IP. If Use DNS as Below is selected, you will need to specify the static DNS IP(s) in the Static DNS fields below.
Step 3. If you would like to have the WAN connection disconnected after a specified period of inactivity, select the Connect on Demand radio button and then enter a time in minutes before the connection is dropped in the Max Idle Time field. This feature is useful when your ISP charges fees based on connection duration. If you would like the connection to remain regardless of activity level, select the Keep Alive radio button.

Step 4. Select from the Authentication Type drop-down list the authentication method required by your ISP.

Step 5. Enter the name of the PPPoE service into the Service Name field.

PPTP Settings
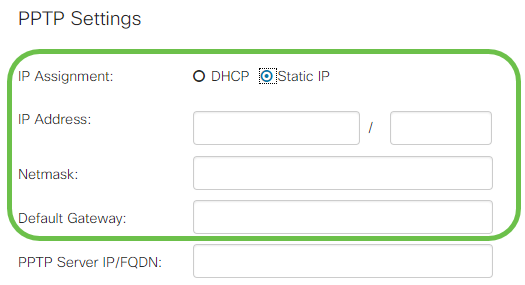
Step 1. Select from the IP Assignment field whether a DHCP or a static address will be used. If you choose to use a static IP, you will also need to provide the subnet mask IP and the default gateway IP addresses.
Step 2. Enter the name or address of the PPTP server in the PPTP Server IP/FQDN field, followed by your ISP provided username and password in the Username and Password fields respectively.

Note: You may check the checkbox Show Password to make the password visible on the screen during entry.
Step 3. Select from the DNS Server field whether to use a DNS server provided by the PPTP connection or to use a specified DNS server on a static IP. If Use DNS as Below is selected, you will need to specify the static DNS IP(s) in the Static DNS fields below.

Step 4. If you would like to have the WAN connection disconnected after a specified period of inactivity, select the Connect on Demand radio button. Then enter a time in minutes before the connection is dropped in the Max Idle Time field. This feature is useful when your ISP charges fees based on connection duration. If you would like the connection to remain regardless of activity level, select the Keep Alive radio button.

Step 5. Select from the Authentication Type drop-down list the authentication method required by your ISP.
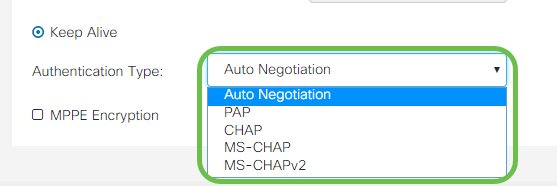
Step 6. If you would like to enable Microsoft Point-to-Point Encryption on your connection, click the MPPE Encryption checkbox.

L2TP Settings
Step 1. Select from the IP Assignment field whether a DHCP or a static address will be used. If you choose to use a static IP, you will also need to provide the subnet mask IP and the default gateway IP addresses.
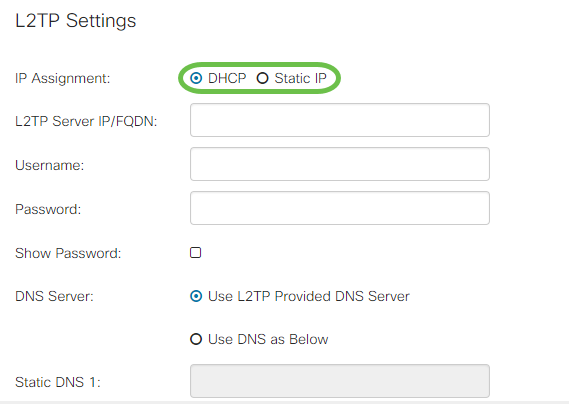
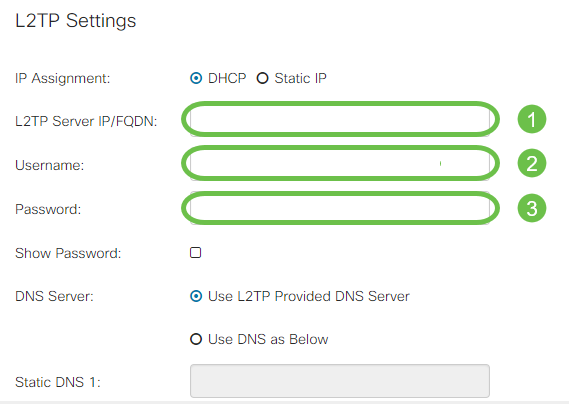
Step 2. Enter the name or address of the L2TP server in the L2TP Server IP/FQDN field, followed by your ISP provided username and password in the Username and Password fields respectively.
Step 3. Select from the DNS Server field whether to use a DNS server provided by the L2TP connection or to use a specified DNS server on a static IP. If Use DNS as Below is selected, you will need to specify the static DNS IP(s) in the Static DNS fields below.

Step 4. If you would like to have the WAN connection disconnected after a specified period of inactivity, select the Connect on Demand radio button and then enter a time in minutes before the connection is dropped in the Max Idle Time field. This feature is useful when your ISP charges fees based on connection duration. If you would like the connection to remain regardless of activity level, select the Keep Alive radio button.

Step 5. Select from the Authentication Type drop-down list the authentication method required by your ISP.

SLAAC Settings
Step 1. Enter the IP address(es) of the DNS servers you wish to use in the Static DNS fields.

Step 2. If your DHCPv6 server has a specified prefix delegation, check the DHCP-PD checkbox and enter the prefix in the Prefix Name field.

Advanced Settings
Step 1. If you would like to tag the WAN link to receive VLAN traffic from an outside network, check the WAN VLAN Tag checkbox and enter the VLAN ID in the field below. This is useful if your router is meant to route traffic from a larger internal network, rather than being connected directly to the public Internet.

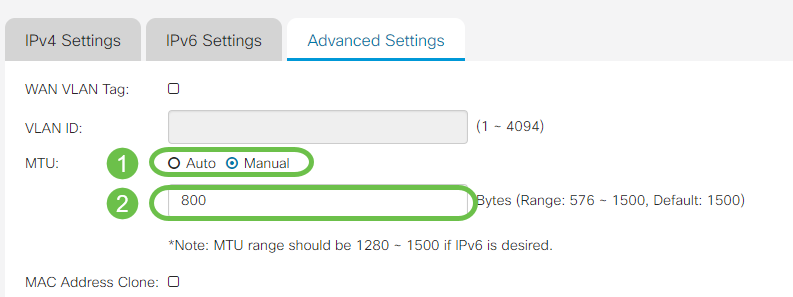
Step 2. Maximum Transmission Unit (MTU) defines the largest data unit in bytes that the network layer will be allowed to transport. Depending on the needs of your network, you can fine-tune this. Larger MTU will require less overhead as less packets are sent, however a smaller MTU will cause less delays on a link for subsequent packets. Select Auto if you would like the router to define the MTU automatically or select Manual and enter the number in bytes that the MTU should be within the defined range.
Step 3. If you would like to clone the MAC address of your PC to the router check the MAC Address Clone checkbox. Then enter the address in the MAC Address field. Click Clone My PC’s MAC Address when you are ready. This feature is useful in the instance that an ISP restricts internet access to a specific registered MAC address. Allowing the router to “pretend” to be the registered device grants it access to the Internet .

Conclusion
You should now have all the configurations required for your router’s wired WAN port connection.
 Feedback