Configure Quality of Service on RV160 and RV260 routers
Available Languages
Table of Contents
- Objective
- Applicable Devices
- Software Version
- Traffic Classes
- WAN Queuing
- WAN Policing
- WAN Bandwidth Management
- Switch Classification
- Switch Queuing
Objective
Quality of Service (QoS) is used to optimize network traffic management in order to improve the user's experience. QoS is a defined measure of performance in a communication network. It prioritizes one type of transmission over another. QoS increases the network's ability to achieve bandwidth and deal with other network performance elements such as latency, error rate, and uptime. QoS also involves controlling and managing network resources by setting priorities for specific types of data (video, audio, files) on the network. It is exclusively applied to network traffic generated for video on demand, Internet protocol television (IPTV), Voice over Internet Protocol (VoIP), streaming media, video conferencing, and on-line gaming.
The objective of this article is to describe the QoS features and provide instructions to configure them on the RV160/RV260 routers.
Applicable Devices
- RV160
- RV260
Software Version
- 1.0.00.13
QoS Features
The QoS feature of RV160/RV260 includes Traffic Classes, Wide Area Network (WAN) Queuing, WAN Policing, WAN Bandwidth Management, Switch Classification, and Switch Queuing. Each feature will be discussed in detail in the following sections of the article.
Traffic Classes
Traffic classes allow you to classify the traffic to a desired queue based on the service. The service can be Layer 4 Transmission control protocol (TCP) or User Datagram Protocol (UDP) port application, Source or Destination IP Address, Differentiated Services Code Point (DSCP), Receive interface, OS, and Device type. You can also rewrite the DSCP value of the incoming packets. By default, all network traffic matches the default traffic class.
To configure the Traffic Classes, follow these steps:
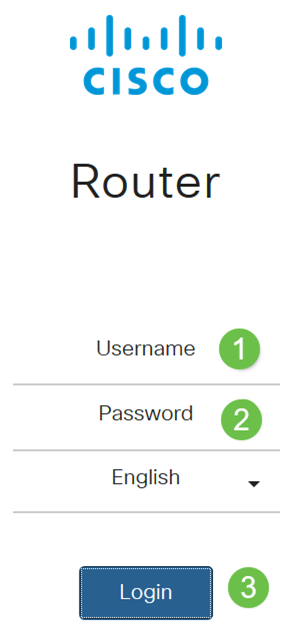
Step 1. Log in to the web configuration utility. Enter the username and password for the router and click Login. The default username and password is cisco.

Note: In this article, we will be using the RV260 to configure QoS. The configuration may vary depending on the model you use.
Step 2. Click QoS > Traffic Classes.

Step 3. In the Traffic Table, click Add (or select the row and click Edit) and enter the following:
- Class Name - Enter the name of the class
- Description - Enter the description of the class
- In Use - Traffic class record is being used by a queuing policy

In this example, Class Name is SIP_Voice, Description is Voice Traffic and In Use is NO.

Step 4. In the Service Table, click Add (or select the row and click Edit) and enter the following information:
|
Service Name |
Name of the service to apply the traffic classification. Enter the name of the service. |
|
Receive Interface |
The interface that receives traffic to apply the classification records. Select one of the interfaces from the drop-down list. • Any VLAN or Specific VLAN – Traffic is outbound (egress). • USB or WAN – Traffic is inbound (ingress). |
|
IP Version |
IP version of the traffic. Select IPv4, IPv6, or Either (if you do not know the version of the traffic). |
|
Source IP |
Enter the source IP address of the traffic. |
|
Destination IP |
Enter the destination IP address of the traffic. |
|
Service |
Select the transport protocol to apply on the traffic record. Provide the source and destination ports. |
|
Match DSCP |
The value to be matched with the DSCP value in the incoming packets. |
|
Rewrite DSCP |
The DSCP value to be replaced with, in incoming packets. |

Step 5. Click Apply.

WAN Queuing
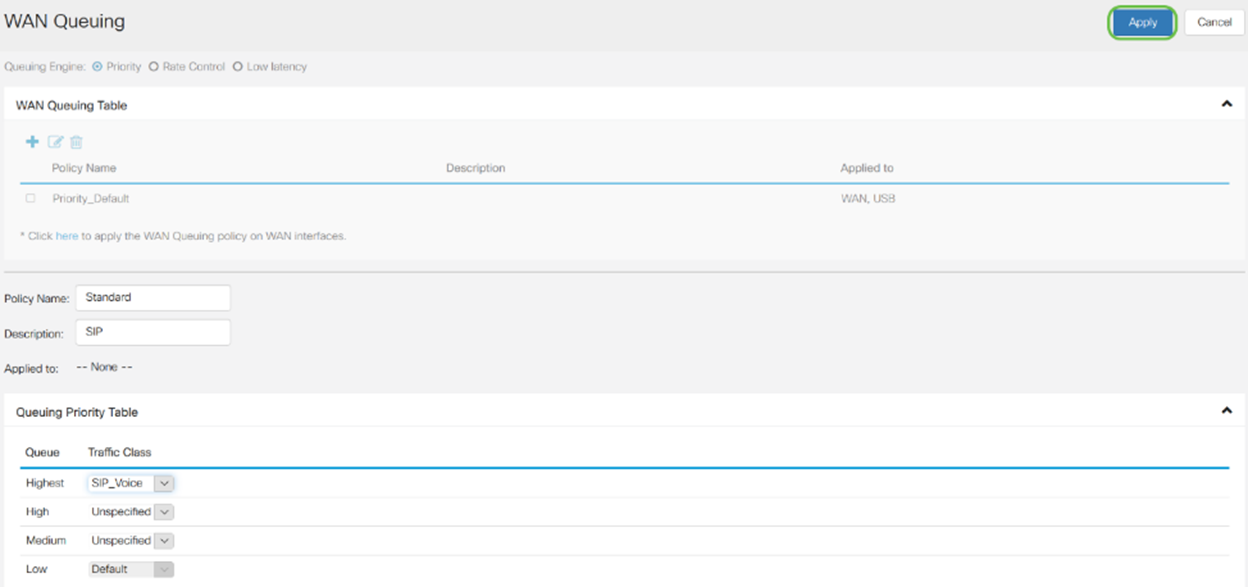
Congestion management is one of the QoS techniques that offers better service by prioritizing selected traffic sent out of an interface. Congestion management uses queuing to accommodate temporary congestion. Packets are assigned to those queues based on their classification and scheduled for transmission until bandwidth becomes available. The configuration of queues ensures that the higher priority traffic gets serviced in times of congestion. Thus, the LAN-to-WAN traffic, can be managed in three modes (Rate Control, Priority, and Low Latency), which are mutually exclusive. To configure the WAN Queuing, follow these steps:
Step 1. Log in to the web configuration utility. Enter the username and password for the router and click Login. The default username and password are cisco.

Note: In this article, we will be using the RV260 to configure WAN queuing. The configuration may vary depending on the model you use.
Step 2. Click QoS > WAN Queuing.

Step 3. Select the desired queuing engine and provide the following information.
|
Priority |
Used when all queues need a minimum guarantee bandwidth. In this mode queue bandwidth is served in ratio 4:3:2:1(high to low) of interface bandwidth configured. • Check Priority. • Click Add and enter a name for the policy and provide the description. • Next, in the Queuing Priority Table, select the traffic class to be attached to each queue. |
|
Rate Control |
Packets are served with their maximum allowed bandwidth from each queue. However, when congestion occurs with the help of minimum rate for each queue configured are applied on the network traffic. The sum of minimum rates of all queues should not exceed 100% and maximum rate for each queue should not exceed 100%. • Check Rate Control. • Click Add and enter a name for the policy and provide the description. • Next, in the Queuing Priority Table, select the traffic class to be attached to each queue. Configure minimum and maximum rate in percentage for each queue. Note: The traffic without any traffic classification record attached to it is treated as default queue. |
|
Low latency |
Used to provide low latency for critical network traffic (High priority), such as voice or streaming media. Packets in high priority queue are always scheduled first and lower queues are served (in ratio configured), when there is no traffic in high priority. • Check Low latency. • Click Add and enter a name for the policy and provide the description. • Next, in the Queuing Priority Table, select the traffic class to be attached to each queue. Configure the bandwidth share value for each queue. Note: The traffic without any traffic classification record attached to it is treated as default queue. |


Step 4. Click Apply.

WAN Policing
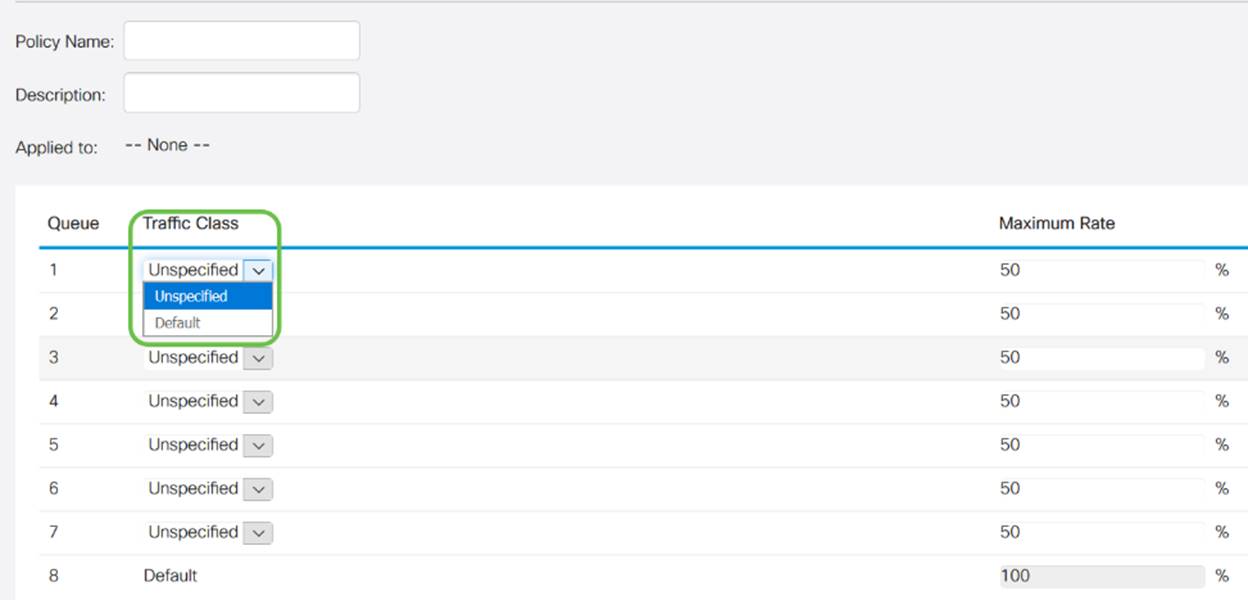
In WAN Policing, the rate-control mode supports eight queues. Each queue can be configured with a maximum rate.
To configure the WAN Policing, follow these steps:
Step 1. Log in to the web configuration utility. Enter the username and password for the router and click Login. The default username and password are cisco.

Note: In this article, we will be using the RV260 to configure WAN queuing. The configuration may vary depending on the model you use.
Step 2. Click QoS > WAN Policing .

Step 3. Check Enable policing of traffic received on WAN interfaces .

Step 4. In the WAN Policing Table, click Add to add a new policy.

Step 5. Next, enter a Policy Name and Description in the designated fields.

Step 6. In the table, select a Traffic Class (Unspecified or Default) from the drop-down list, to be applied on the queue. Traffic classes allow for classification of traffic to the desired queue based on the service. By default, all traffic matches to the Default traffic class.

Step 7. In the Maximum Rate field, enter the queue's maximum rate of bandwidth in percentages to limit the incoming traffic from WAN to LAN.

Step 8. Click Apply.

WAN Bandwidth Management
The WAN interfaces can be configured with the maximum bandwidth provided by the ISP. When the value (transfer rate in KBP/S) is configured, the traffic entering the interface is set at a defined rate.
To configure the WAN Bandwidth Management, follow these steps:
Step 1. Log in to the web configuration utility. Enter the username and password for the router and click Login. The default username and password are cisco.

Note: In this article, we will be using the RV260 to configure WAN queuing. The configuration may vary depending on the model you use.
Step 2. Click QoS > WAN Bandwidth Management.

Step 3. In the WAN Bandwidth Management table, select the interface and configure the following:
|
Upstream (kb/s) |
Enter the upstream traffic rate in kb/s. |
|
Downstream (kb/s) |
Enter the downstream traffic rate in kb/s.* You will need to enable WAN policing for Downstream Bandwidth, otherwise the downstream bandwidth will not take effect. |
|
Outbound Queuing Policy |
Select the outbound queuing policy to be applied to the WAN interface. |
|
Inbound Policing |
Select the inbound policing from the drop-down list. |

Step 4. Click Apply.

Switch Classification
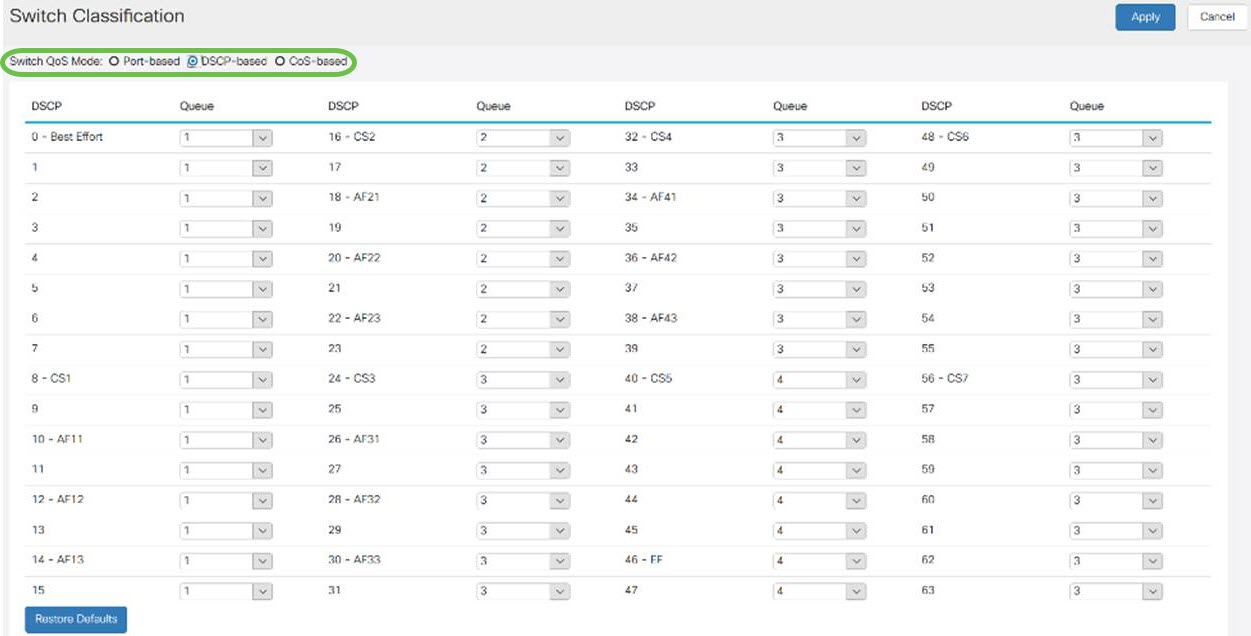
In QoS modes such as Port-based, DSCP-based, and CoS-based, the packets are sent out.
To configure QoS Switch Classification,
Step 1. Log in to the web configuration utility. Enter the username and password for the router and click Login. The default username and password are cisco.

Step 2. Click on QoS > Switch Classification.

Step 3. Select the desired Switch QoS Mode (Port-based, DSCP-based, or CoS-based).
|
Port-based |
The incoming packets on each LAN port which are mapped to specific queues, based on the mappings. • Queue-Select the queue to map the traffic coming on the individual LAN ports. • Link Aggregate Group (LAG) Port Queue – When LAG is enabled, all traffic entering this LAG interface is mapped using a configured queue. |
|
DSCP-based |
For IPv6 traffic, the DSCP matches the traffic class value in the IPv6 header and places it in different queues. The traffic class value is 4 times the DSCP value. For example, if the user configures the DSCP as 10 mapping to Queue1, then the IPv6 flows with traffic class value 40 are put into Queue1. The switch must use the DSCP field of the incoming packets and schedule the packet for prioritization into a particular queue using the mapping table. • Based on the DSCP value of the incoming packet, select a queue from the drop-down list to map the traffic. |
|
CoS-based |
The switch uses the incoming packet priority class of service (CoS); bits and classifies the packet to the user configured queue. • Based on the CoS value of the incoming packet, select a queue from the drop-down list to map the traffic. |


Step 4. Click Apply.

Switch Queuing
In Switch Queuing, the queue weight for the four queues per port, can be configured by assigning weights to each queue. The range of weights can be from 1 to 100. When LAG is enabled, you can define the queue weights for each of the four queues.
Note: If the weight is 0, the queue is in the highest priority queue.
To configure Switch Queuing,
Step 1. Log in to the web configuration utility. Enter the username and password for the router and click Login. The default username and password are cisco.

Step 2. Click on QoS > Switch Queuing.

Step 3. In Switch Queuing, select the appropriate weight for each of the queues.

Step 4. Click Apply.

Step 5. Click Restore Defaults to restore system default settings.

Conclusion
In this document, the different QoS features of RV160/RV260 routers has been described and the instructions to configure them has been provided.
 Feedback