Configure IPv6 transition on RV160 and RV260 Routers
Available Languages
Objective
The objective of this article is to show you how to configure IPv6 transition on the RV160x and RV260x routers using 6in4 or 6rd.
Introduction
Internet Protocol version 6 (IPv6) offers many additional benefits to Internet Protocol Version 4 (IPv4). IPv6 provides a larger address space, easier address aggregation, and integrated security. IPv6 transition helps hosts that belong to IPv6 networks communicate across an IPv4 network link.
For migrating from IPv4 to IPv6, you can use an Internet transition mechanism called 6in4. The 6in4 uses tunneling in which the IPv6 packets are encapsulated in IPv4 headers with the IP protocol number set to 41. Protocol number is the value of the “protocol” field in an IPv4 header or the “Next header” field in IPv6. Protocol 41 is the routing protocol that embeds IPv6 packets inside IPv4 packets. The packets are then sent through an IPv4 Internet or network. The 6in4 is a commonly used transition mechanism.
An alternate way to achieve IPv6 transition is the IPv6 Rapid Deployment (6rd). 6rd is also a tunneling mechanism which allows an Internet Service Provider (ISP) to rapidly deploy IPv6 in a lightweight and secure manner without requiring upgrades to existing IPv4 access network infrastructure. In this method, each ISP uses a unique IPv6 prefix.
Applicable Devices
- RV160
- RV260
Software Version
- 1.0.00.15
Configure IPv6 Transition
To configure IPv6 transition on the RV160x/RV260x, follow these steps.
Step 1. Log in to the web configuration page of your router.

Note: In this article, we will be using the RV260W to configure IPv6 transition. The configuration may vary depending on the model you are using.
Step 2. Select WAN > IPv6 Transition.

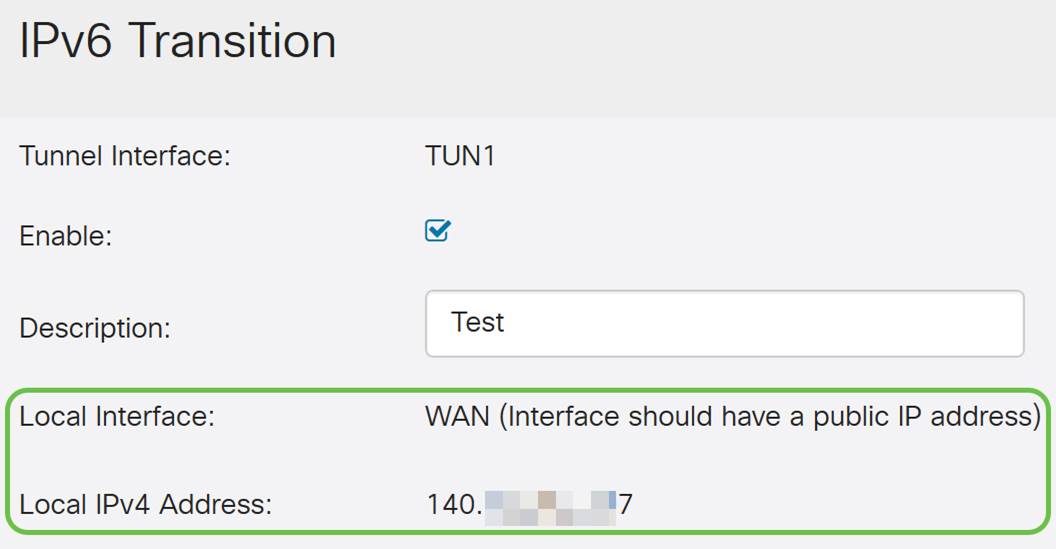
Step 3. Check Enable to enable the tunnel interface.

Step 4. Enter the description.

Step 5. The Local Interface and Local IPv4 Address display the selected interface.

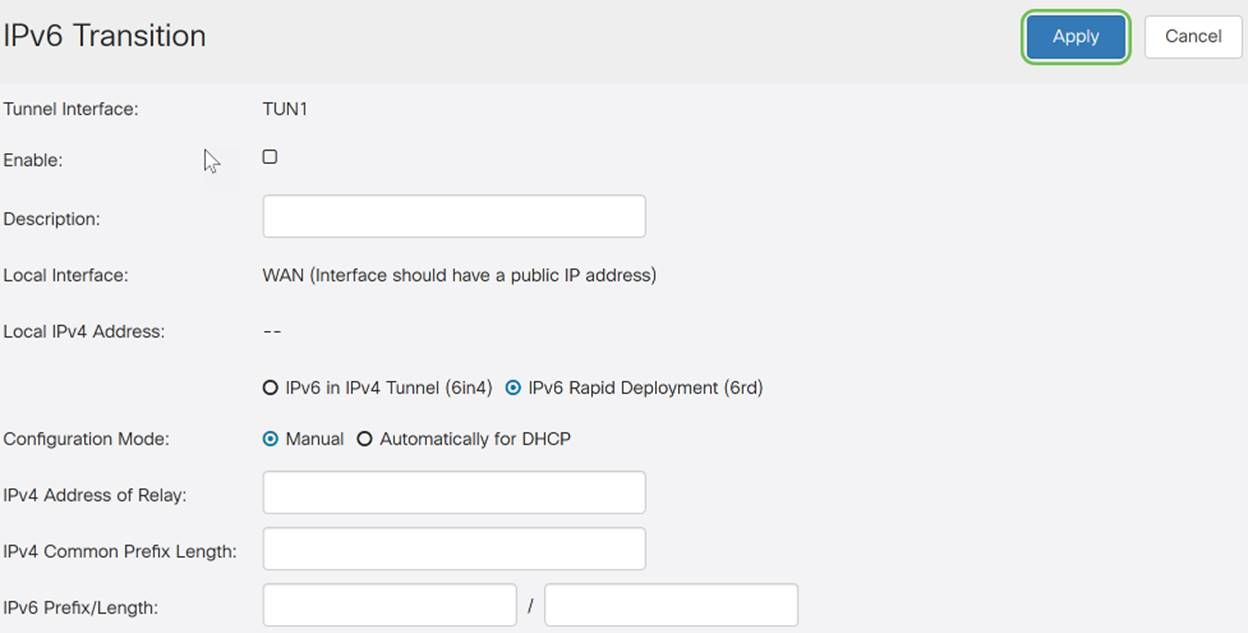
Step 6. Click Apply.

IPv6 in IPv4 Tunnel (6in4)
To add IPv4 Tunnel (6in4), enter the following information:
Step 1. Select the IPv6 in IPv4 Tunnel (6in4) radio button.

Step 2. Enter the remote IPv4 address.

Step 3. Enter the local IPv6 address and length.

Step 4. Enter the remote IPv6 address and length.

Step 5. Click Apply.

Step 6.You will need to copy your running configuration to the startup configuration if you want to keep your configuration between reboots. To do this, click the Save icon at the top of the page.

Step 7. In the Configuration Management, scroll down to the Copy/Save Configuration section. Ensure that the Source is Running Configuration and the Destination is Startup Configuration. Click Apply.

IPv6 Rapid Deployment (6rd)
In IPv6 Rapid Deployment (6rd), each ISP uses one of its own IPv6 prefixes. Hence, a provider is guaranteed for its 6rd hosts availability from all native IPv6 hosts that can reach their IPv6 network.
Step1. Select the IPv6 Rapid Deployment (6rd) radio button.

Step 2. In the Configuration Mode section, click Automatically from DHCP to use the DHCP (option 212) to obtain a 6rd Prefix, Relay IPv4 Address, and IPv4 Mask Length.

Step 3. If you prefer, select Manual and set the following 6rd parameters.
- Enter the IPv4 Address of Relay.
- Enter the IPv4 Common Prefix Length.
- Enter the IPv6 Prefix / Length. The IPv6 network (subnetwork) is identified by the prefix. All hosts in the network have the identical initial bits for their IPv6 address. Enter the number of common initial bits in the network addresses. Default is 64.
Note: The above mentioned parameters need to be defined by the ISP.

Step 4. Click Apply.

Note: Remember to click the Save icon at the top of the page to navigate to the Configuration Management section to copy your running configuration file to the startup configuration file.
You should now have successfully configured IPv6 transition on your RV160x/ RV260x router.
 Feedback