Manage Device Groups on FindIT Network Probe
Available Languages
Objective
The FindIT Network Probe can group multiple devices of different device types together so they can be configured all at once in just a single action. A device group can consist of routers, Wireless Access Points (WAPs), and switches. When a configuration is applied to a device group, that configuration will apply to those devices in the group that support that feature. For example, if you want to update the wireless Service Set Identifier (SSID) on a device group that contains wired routers, WAPs, and switches, then the configuration will just be applied only to WAPs.
This document aims to show you how to create, modify, delete and manage device groups.
Manage Device Groups
Create a New Device Group
Step 1. Log in to the FindIT Network Probe Administrator GUI and choose Administration > Device Groups.

Note: In the Device Group Management Work pane, you will see the SSID of your network as the default device group along with its connected devices.

Step 2. On the top left portion of the Work pane, click the + (plus) icon to create or add a new group.

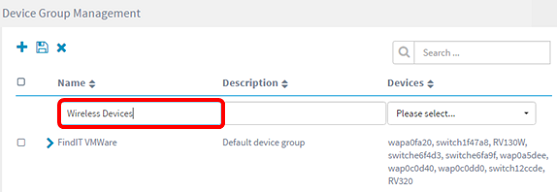
Step 3. Enter a name for the group in the Name field.
Note: For this example, Wireless Devices is used.

Step 4. Enter a description for the device group in the Description field.
Note: For this example, Cisco HQ is used.

Step 5. From the Devices drop-down list, select one or more devices you want to add to the device group. You can only select one device at a time.
Note: In this example, all WAP devices will be added. Each device can only be a member of one group. If a selected device was previously a member of a different group, which in this case is the default device group, it will be removed from that group.

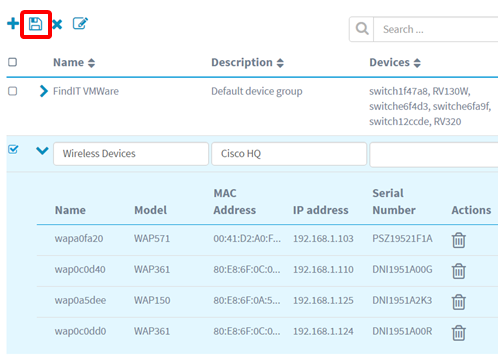
Note: As each device is added, a table below the row of the added device group will populate the name, model, MAC address, IP address, serial number, and actions for each device. The WAP devices from the existing default group are now moved to the Wireless Devices group.

Step 6. Click Save (floppy disk icon) to save.

Note: The image below shows the newly created Device Group.

You should now have successfully created a Device Group.
Modify a Device Group
Step 1. In the Device Group Management area, check the check box of the group you want to modify.
Note: For this example, the Wireless Devices device group is chosen.

Step 2. Click Edit (scribe icon) to make the entry fields modifiable.

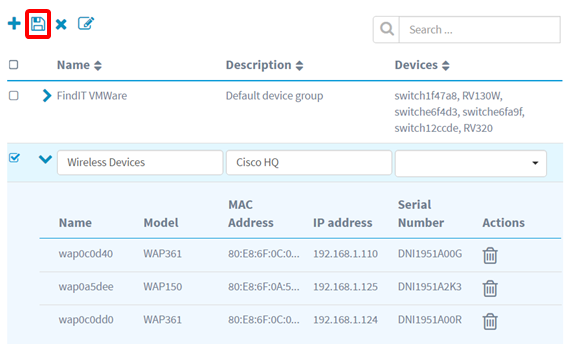
Step 3. Make the changes as required. You can change the name, description, add, or remove devices from the group. In this example, a device group member will be removed. Click the trash can icon of the corresponding member under the Actions column.
Note: The deleted device will be moved to the default group. For this example, wapa0fa20 is deleted.

Step 4. Click the Save icon to save your changes.

You have successfully modified a device group.
Delete a Device Group
Step 1. In the Device Group Management area, check the check box of the group you want to delete.
Note: The default device group cannot be deleted.

Step 2. Click Delete (trash can icon) to delete the device group.

Note: A confirmation message similar to the one below will appear.

You should now have successfully deleted a device group.
Contact Cisco
- Open a Support Case

- (Requires a Cisco Service Contract)
 Feedback