Introduction
This document describes how to configure boot from Storage Area Network (SAN) in servers managed by Unified Computing System Manager (UCSM).
Prerequisites
Requirements
Cisco recommends that you have knowledge of these topics:
- SAN topologies
- UCSM
- UCS Service Profiles
Components Used
- Cisco UCS 6454 Fabric Interconnect; firmware version 4.2.3h
- Cisco UCS B200 M5; firmware version 4.2.3h
The information in this document was created from the devices in a specific lab environment. All of the devices used in this document started with a cleared (default) configuration. If your network is live, ensure that you understand the potential impact of any command.
Background Information
Boot from SAN is a feature that allows servers to boot an operating system (OS) installed on external SAN-based storage, rather than a local disk, and it is currently, a very common solution.
If you boot from the SAN when you move a service profile from one server to another, the new server boots from the exact same operating system image.
Ensure that you have these requirements before you attempt this configuration:
- Virtual Storage Area Network (VSAN) ID
- World Wide Port Name (WWPN) from initiators and targets
- Logical Unit Number (LUN) ID
Configure
Create Boot Order Policy
Step 1. Navigate to Servers > Policies > Boot Policies and click Add to create a new Boot policy.
Step 2. Name your policy and select the checkboxes according to your requirements.
Step 3. Extend vHBAs and select Add SAN Boot option.
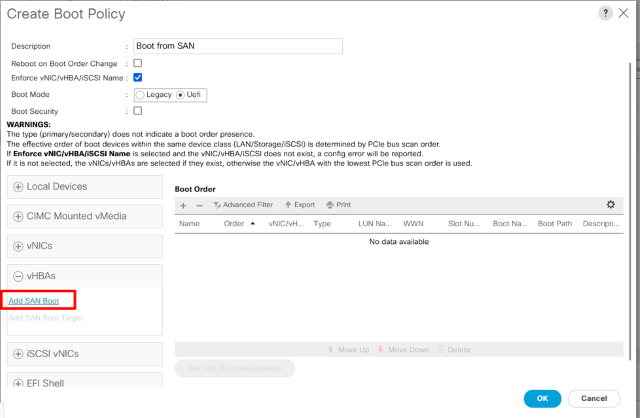
Note: If desired, check the Enforce vNIC/vHBA/iSCSI Name check box.
- If checked, Cisco UCS Manager displays a configuration error and reports whether one or more of the vNICs, vHBAs, or iSCSI vNICs listed in the Boot Order table match the server configuration in the service profile.
- If not checked, Cisco UCS Manager uses the vNICs, vHBAs, or iSCSI vNICs (as appropriate for the boot option) from the server configuration in the service profile. It does not report whether the vNICs, vHBAs, or iSCSI vNICs specified in the boot policy match the server configuration in the service profile.
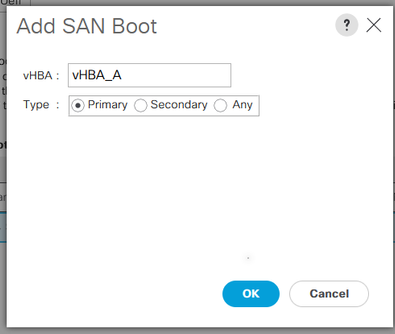
Step 4. Name your vHBA and select if it goes for Primary, Secondary or Any. Click Ok.
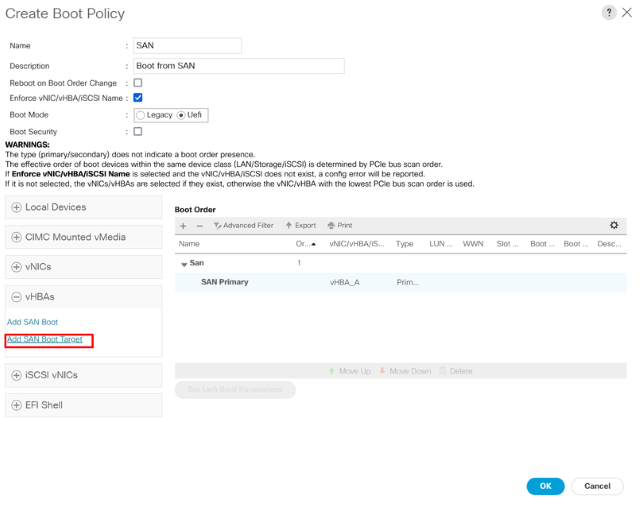
Step 5. Select Add SAN Boot Target.
Step 6. It displays a window with the Boot target LUN ID and WWPN. Ensure you enter the WWPN for the Storage and proper LUN ID.
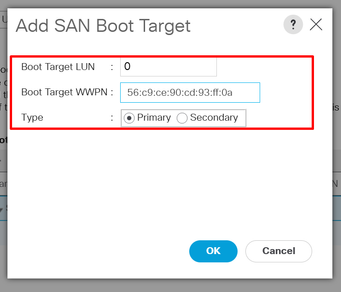
Step 7 (Optional). Add a second SAN Boot and repeat procedure.
Step 8 (Optional). Add CD/DVD option to install the ISO through the virtual KVM.
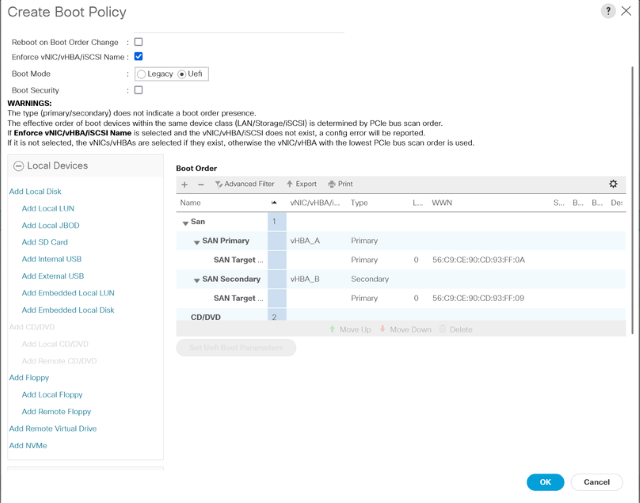
Step 9. Click Ok to save your policy.
Service Profile - vHBAs
Step 1. Navigate to your Service Profile > Storage > vHBAs. Add a World Wide Node Name (WWNN) either static or from a pool.
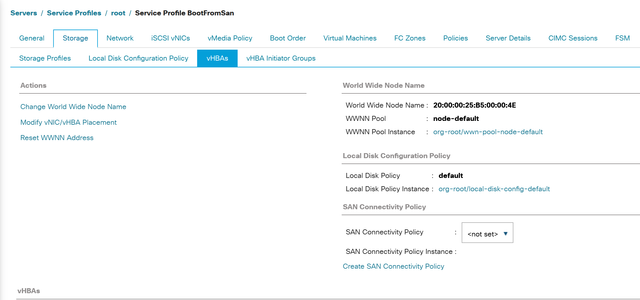
Step 2. Add vHBA, name it, and assign a World Wide Port Name (static or from pool).
Caution: Ensure that the vHBA is written in the same way as configured in the boot order when using the Enforce vNIC/vHBA/iSCSI Name option.
Step 3. Use your vHBA Template or manually configure your vHBA with Fabric ID, vSAN, and so on, according to your requirements. Click Ok to save.
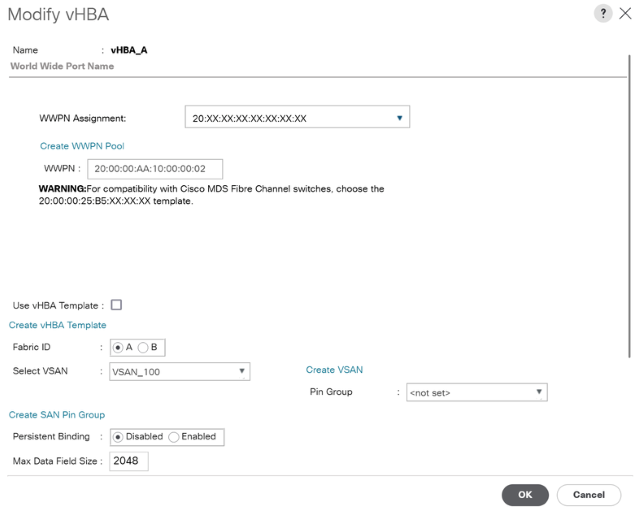
Step 4 (Optional). Add more vHBAs as needed or as configured in the boot policy.
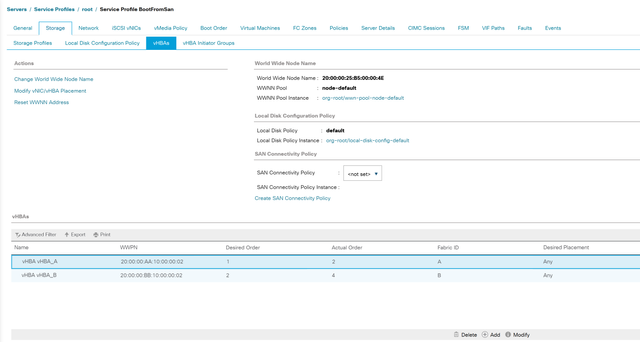
Verify
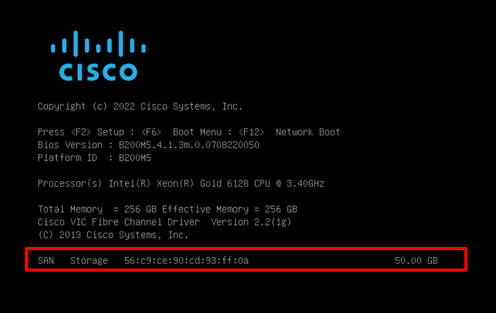
A legend with the WWPN of the destination appears on the screen when the server boots. If this happens, it means that the configuration you have made is correct.
Troubleshoot
Step 1. Reboot the server and press F6 to access to the Boot Menu. This interrupts the initialization and allows you to connect to adapter and type commands to check connectivity.
Step 2. Open an SSH session to any of the fabric interconnects IP addresses, and execute the next commands.
#connect adapter x/y/z   >>>where x=chassis, y=server, z=adapter
#connect
#attach-fls
#lunlist

For example:
FI-A#connect adapter 1/5/1
adapter 1/5/1 # connect
adapter 1/5/1 (top):1# attach-fls
adapter 1/5/1 (fls):2# lunlist
vnic : 13 lifid: 3
• FLOGI State : flogi est (fc_id 0x161907)
• PLOGI Sessions
• WWNN 56:c9:ce:90:cd:93:ff:0a WWPN 56:c9:ce:90:cd:93:ff:0a fc_id 0x000000
• LUN's configured (SCSI Type, Version, Vendor, Serial No.)
LUN ID : 0x0000000000000000 access failure
• REPORT LUNs Query Response
• WWNN 556:c9:ce:90:cd:93:ff:0a WWPN 56:c9:ce:90:cd:93:ff:0a fc_id 0x000000
• LUN's configured (SCSI Type, Version, Vendor, Serial No.)
LUN ID : 0x0000000000000000 access failure
• REPORT LUNs Query Response
• Nameserver Query Response
vnic : 15 lifid: 5
• FLOGI State : flogi est (fc_id 0x741107)
• PLOGI Sessions
• WWNN 58:cc:f0:90:49:63:0b:fa WWPN 58:cc:f0:90:49:63:0b:fa fc_id 0x000000
• LUN's configured (SCSI Type, Version, Vendor, Serial No.)
LUN ID : 0x0000000000000000 access failure
• REPORT LUNs Query Response
• WWNN 56:c9:ce:90:cd:93:ff:09 WWPN 56:c9:ce:90:cd:93:ff:09 fc_id 0x000000
• LUN's configured (SCSI Type, Version, Vendor, Serial No.)
LUN ID : 0x0000000000000000 access failure
• REPORT LUNs Query Response
• Nameserver Query Response
If fc_id is 0x0000, as in this example, check the zoning configuration in the Fibre Switch and LUN masking in the storage array.
Ensure that the initiators' WWPNs are configured correctly.
After correction and verification, the result is as follows:
adapter 1/5/1 (fls):2# lunlist
vnic : 13 lifid: 3
  - FLOGI State : flogi est (fc_id 0x161907)
  - PLOGI Sessions
     - WWNN 56:c9:ce:90:cd:93:ff:0a WWPN 56:c9:ce:90:cd:93:ff:0a fc_id 0x160400
       - LUN's configured (SCSI Type, Version, Vendor, Serial No.)
           LUN ID : 0x0000000000000000 (0x0, 0x5, Nimble  , 6fed4da9ceb4a3796c9ce9007f78ec52)
       - REPORT LUNs Query Response
           LUN ID : 0x0000000000000000
  - Nameserver Query Response
     - WWPN : 56:c9:ce:90:cd:93:ff:05
     - WWPN : 56:c9:ce:90:cd:93:ff:0a

vnic : 15 lifid: 5
  - FLOGI State : flogi est (fc_id 0x741107)
  - PLOGI Sessions
     - WWNN 56:c9:ce:90:cd:93:ff:09 WWPN 56:c9:ce:90:cd:93:ff:09 fc_id 0x740200
       - LUN's configured (SCSI Type, Version, Vendor, Serial No.)
           LUN ID : 0x0000000000000000 (0x0, 0x5, Nimble  , 6fed4da9ceb4a3796c9ce9007f78ec52)
       - REPORT LUNs Query Response
           LUN ID : 0x0000000000000000
  - Nameserver Query Response
     - WWPN : 56:c9:ce:90:cd:93:ff:09
     - WWPN : 56:c9:ce:90:cd:93:ff:06
If you see this output and your server is still unable to boot, it is most likely that nothing is installed on your storage and you must map the ISO and install the operating system.
Windows Installation
Take into account these points when you install Windows for the first time.
- Ensure you use the correct driver version to see the storage where the Operating System is installed.
You can possibly encounter this error when you install Windows:
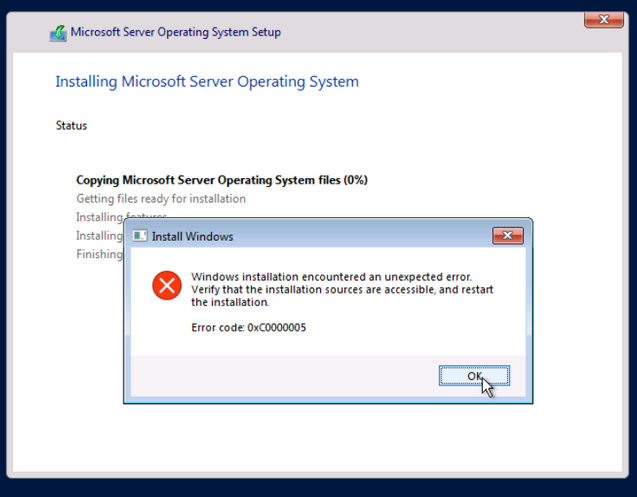
This error can possibly occur when you configured multiple SAN Boot Targets.
- Disable multipath in your server. Leave only one path to reach the remote storage.
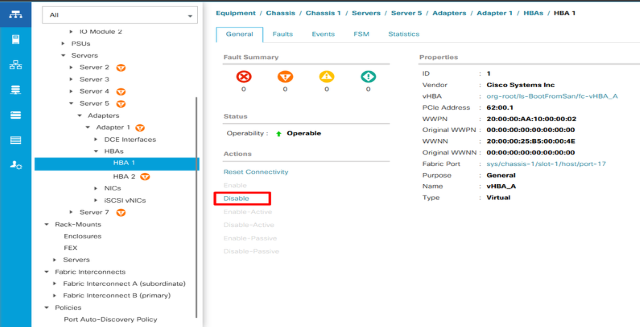
- Navigate to your server under Equipment tab. Expand it and look for your HBAs.
- Disable your HBAs to leave only one active. Click Disable button located in the Actions menu.
- Verify that the zoning is properly configured and does not point to multiple targets.
- If issue persists, modify your zoning to leave only one SAN target.
Note: Once the installation is complete, re-enable your HBAs and configure zoning accordingly.
Verify that your server boots from SAN as expected.
Related Information


 Feedback