Introduction
This document describes how to configure the modern Cisco Unified Computing System (UCS) server’s Cisco Integrated Management Controller (CIMC) port via DHCP.
Prerequisites
Requirements
There are no specific requirements for this document.
Components Used
The information in this document is based on these software and hardware versions:
- Cisco UCS C220 M5 server
- Cisco router running IOS XE image configured as the DHCP server.
- Optional - Layer 2 Switch. In this document, L2 switch is connected to the router and UCS server. However, it's not a requirement.
The information in this document was created from the devices in a specific lab environment. All of the devices used in this document started with a cleared (default) configuration. If your network is live, ensure that you understand the potential impact of any command.
Configure
Configurations
The usual practice to configure the CIMC is via the Monitor and Keyboard. By connecting to the console, you can assign static IP addresses to the CIMC port. But in some cases, you may not get your hands on a spare monitor or keyboard.
The good part is, the CIMC port is DHCP enabled by default. So, you can learn an IP address via the DHCP server, and once you know of that address, you could log in via your laptop browser to the server using HTTPS://DHCP-IP.
If you don’t have a DHCP server configured on the network, then you can use 2 other ways to create a DHCP server.
1. Create the DHCP server on a Windows laptop - This link points to how you can configure your Win laptop to act as a DHCP server.
https://www.cisco.com/c/en/us/support/docs/servers-unified-computing/ucs-c-series-rack-servers/210529-Assigning-Cisco-Integrated-Management-Co.html
Unfortunately, this method did not work for me, due to Corporate restrictions on my laptop.
2. Create the DHCP server on a Cisco router or L3 switch: The router or switch should support DHCP server configuration. The DHCP server is enabled by default on most routers.
- Router – Acting as the DHCP server. Also the L3 gateway in my network.
- Layer2 switch – A regular layer 2 switch.
Step 1. Configure the DHCP pool.
On the L3 device, configure the DHCP pool. which are configured with the basic parameters.
Step 2. Configure the Gateway (default-router) that is used in the DHCP pool.
The Gateway is configured as an L3 Switched Virtual Interface (SVI). Hence, you also need to configure the corresponding L2 Vlan for that SVI. Vlan 10 is used for simplicity.
This image shows Cisco UCS C220 M5 Server Rear Panel.

Step 3. Verify the reachability from the UCS to the DHCP server.
By default, the CIMC ports 2, 3, and 5 are DHCP enabled by default. So when the CIMC server boots up, these ports broadcast the Discover message to reach the DHCP server. Hence it is important that there is L2 reachability all the way from the UCS to the DHCP server.
Step 4. Create Connections.
Use a LAN network cable, to connect the UCS to the DHCP server. Connect one end of the cable, to Any of the ports (2, 3, OR 5) on the UCS side. The other end of that cable should either terminate directly on the L3 device hosting the DHCP server. OR, you can use an L2 switch like it is done here (see the image).
Step 5. Power On the CIMC server.
Step 6. Verify the DHCP statistics on the DHCP Server.
After a couple of minutes after the UCS is completely booted up, the connect port should be assigned with an IP address. In order to verify this, log on to the DHCP server and verify if any IP address has been leased out. In this topology, the router acts as the DHCP server. These are the verification steps to verify the IP address that has been leased out. Look for the Leased Addresses counter and the DHCP binding.


(Here the router is rebooted before the images are taken. Hence there is no output seen.)
Step 7. Log in to the CIMC IP via the web browser.
Once you have verified that the CIMC port has been assigned an IP address, ping that IP from the Gateway device. Once connectivity is established, log in to the GUI using a web browser.
The default username/password for the UCS C220 M5 is admin/password
Step 8. Change the CIMC IP.
Once you successfully log in to the GUI of the UCS, change the management IP to something of your choice. Click on the Navigation icon as depicted in the blue box.
Navigate to Admin > Networking, as shown in this image.

Under NIC Properties, choose Dedicated for NIC Mode and None for NIC Redundancy.

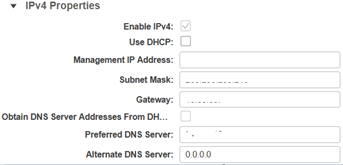
Under IPv4 Properties, uncheck Use DHCP, and check Enable IPv4. Then change the IP address, Mask, and Gateway, and Save your changes.

Verify
Open your web browser. Using the IP address configured in the previous steps, log into the graphical interface (GUI) of the CIMC.
Troubleshoot
There is currently no specific troubleshooting information available for this configuration.
