Introduction
This document describes various ways to configure the drive state from Just a Bunch Of Disks (JBOD) to Unconfigured Good (UG).
Prerequisites
Requirements
Cisco recommends that you have knowledge of these topics:
- Unified Computing System Manager (UCSM)
- Unified Computing System Central (UCSC)
- Cisco Integrated Management Controller (CIMC)
- Cisco Intersight
- General Knowledge of Hard Disk Drives (HDD) and Redundant Array of Independent Disks (RAID)
Components Used
This document is not restricted to specific software and hardware versions.
The information in this document was created from the devices in a specific lab environment. All of the devices used in this document started with a cleared (default) configuration. If your network is live, ensure that you understand the potential impact of any command.
Background Information
- This document depicts configuration of the drive state from JBOD to UG in UCSM, UCSC, CIMC, Intersight, MegaRAID, WebBIOS, and StorCLI.
- This document also highlights some features in UCSM, CIMC, and Intersight that can assist you with automatic disk state configurations.
- It is common for a Return Material Authorization (RMA) or disks out of the box to be in a JBOD drive state. Sometimes drives that are JBOD need to be changed to a UG drive state to be usable in RAID configurations. Another common reason to change JBOD to UG is when a disk that is part of a fault-tolerant RAID has failed. In this scenario, if the RMA disk is in a JBOD drive state, the change to UG can help to trigger the rebuild process.
- Some UCS policies allow RAID creation from JBOD disks, but this must be explicitly chosen.
- It can be necessary to change the drive to other states besides UG as many applications leverage JBOD over RAID. While this document highlights the change from JBOD to UG, the same steps can be taken to set any drive state, such as UG to JBOD.
Configure the Disk State from JBOD to UG
Caution: Before any configuration changes are committed, ensure you know which RAID controller manages the disks and which disk slots need to be configured.
UCSM
Navigate to the appropriate server and select Inventory > Storage > Disks. Select the disk that needs to be changed and choose Set JBOD to Unconfigured Good > Yes as shown in the image.
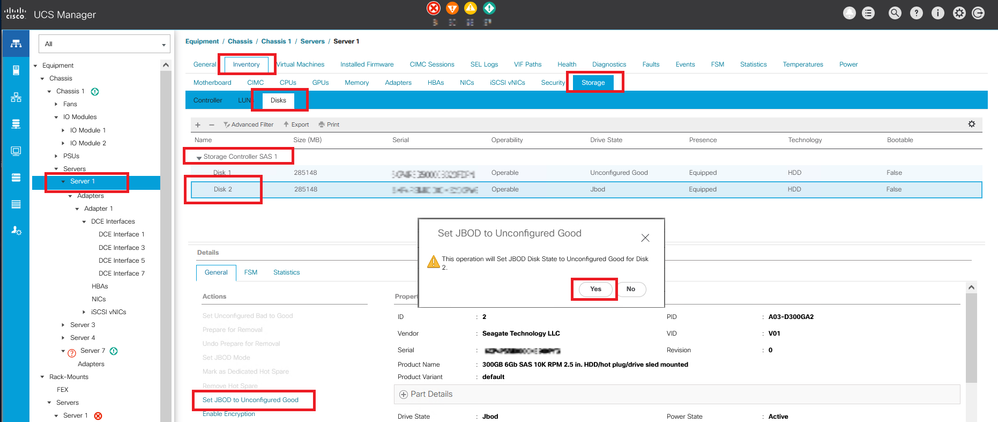
Note: Once disk state changes are committed, view the Finite State Machine (FSM) tab to see the disk configuration progress.
UCSM CLI:
UCS-NYEST-A# scope server 1
UCS-NYEST-A /server# show raid-controller <-- Run this command to determine the RAID Controller Type and ID.
RAID Controller:
ID TYPE PCI Addr
-- ---- --------
1 SAS 07:00.0 <-- This example shows the RAID Controller TYPE is SAS and the ID is 1.
7 PCH 00:31.2
UCS-NYEST-A /server# scope raid-controller 1 sas
UCS-NYEST-A /server/raid-controller# scope local-disk 1 <-- In this example physical disk in slot 1 is scoped to.
UCS-NYEST-A /server/raid-controller/local-disk# set admin-state unconfigured-good
UCS-NYEST-A /server/raid-controller/local-disk*# commit-buffer
UCS Central
Navigate to the appropriate server and select Storage, then choose the disk that needs to be changed. Select the Tools Icon > Set JBOD to Unconfigured Good as shown in the image.

CIMC
Navigate to Storage and select the appropriate RAID Controller. Select Physical Drives and choose the disk that needs to be changed, then click Set State as Unconfigured Good as shown in the image.

CIMC CLI:
C220-NYEST-1# scope chassis
C220-NYEST-1 /chassis# show storageadapter <-- Run this command to determine the RAID Controller PCI Slot.
----------------------------------------------------------------------------------------------------------
PCI Slot Health Controller Status R O C Temperature Product Name Serial Number
Firmware Package Build Product ID Battery Status Cache Memory Size Boot Drive Boot Drive is PD
Product PID
----------------------------------------------------------------------------------------------------------
MRAID Good Optimal 62 Degrees C Cisco 12G Modular Raid Controller
51.10.0-36 12 LSI Logic Optimal 0 MB 3 true UCSC-RAID-M5
C220-NYEST-1 /chassis# scope storageadapter MRAID <-- Use the previous PCI Slot here.
C220-NYEST-1 /chassis/storageadapter# scope physical-drive 1 <-- In this example physical disk in slot 1 has been scoped to.
C220-NYEST-1 /chassis/storageadapter/physical-drive# make-unconfigured-good
Intersight
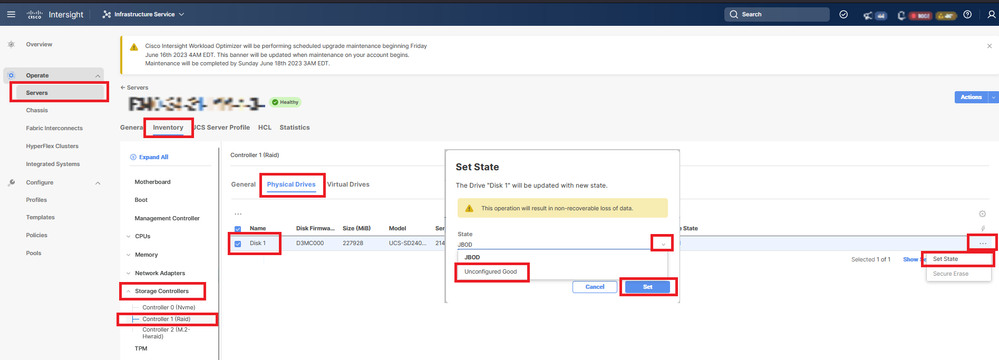
Navigate to the appropriate server and select Inventory > Storage Controllers. Navigate to the proper RAID Controller and select Physical Drives and choose the disk that needs to be changed. Select the Ellipsis on the top right and then Set State > Unconfigured Good > Set as shown in the image.
MegaRAID
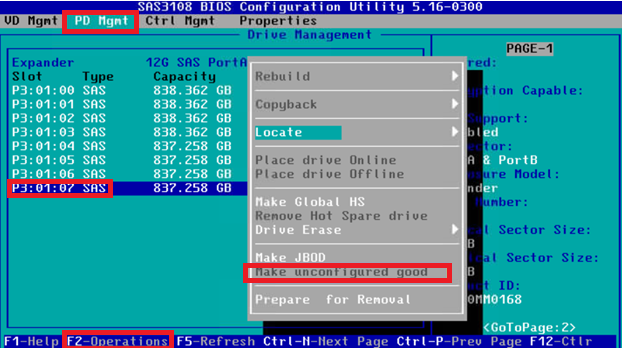
Launch the Keyboard Video Monitor (KVM) and power cycle the server. Press Ctrl - R when MegaRAID is displayed on the screen. Press Ctrl - N until you are on the PD Mgmt tab. Navigate to F2-Operations > Make Unconfigured Good > Enter as shown in the image.
WebBIOS
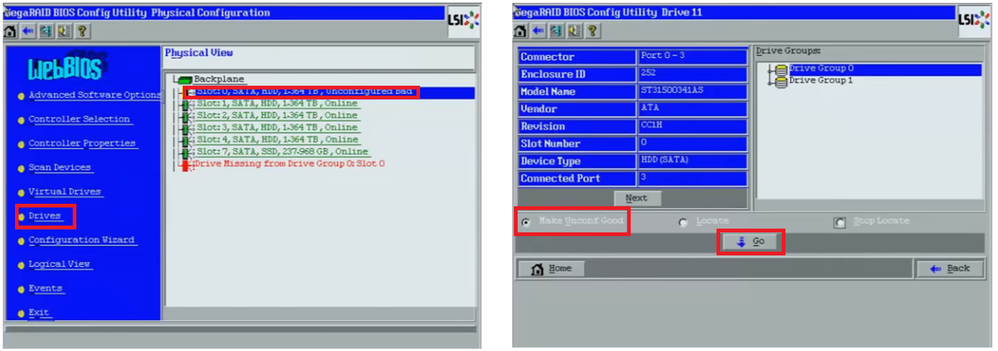
Launch the KVM and power cycle the server. Press Ctrl - H when WebBIOS is displayed, then select Drives and choose the appropriate disk. Navigate to Make Unconf Good > Go as shown in the image.
StorCLI
storcli /c0 /eall /sall show <-- Run this command to determine the Enclosure ID and Disk slot.
Controller = 0
Status = Success
Description = Show Drive Information Succeeded.

Drive Information :
=====================

-----------------------------------------------------------------------------------------------
EID:Slt  DID  State  DG     Size  Intf  Med  SED  PI  SeSz  Model                          SP
-----------------------------------------------------------------------------------------------
252:1    6    UBad   0   462.25   GB   SATA   HDD   N   N   512B   WDC   WD5003ABYX-01WERA1  U <-- In this example the Enclosure ID is 252 and the Disk slot is 1. The drive also shows UBad.
-----------------------------------------------------------------------------------------------

storcli /c0 /e252 /s1 set good <-- Use the Enclosure ID and Slot ID above.
Controller = 0
Status = Success
Description = Show Drive information Succeeded.

Drive Information :
=====================

-----------------------------------------------------------------------------------------------
EID:Slt   DID    State    DG    Size    Intf    Med    SED    PI    SeSz    Model           SP
-----------------------------------------------------------------------------------------------
252:1    6    UGood    0    462.25   GB   SATA   HDD   N N   512B   WDC  WD5003ABYX-01WERA1  U <-- The Drive state is now UGood.
-----------------------------------------------------------------------------------------------
Auto-Configuration for Disks
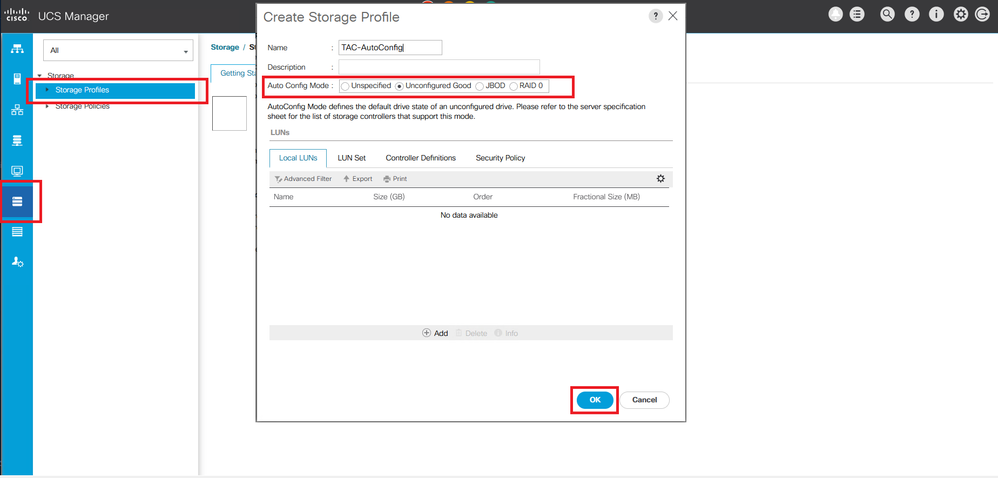
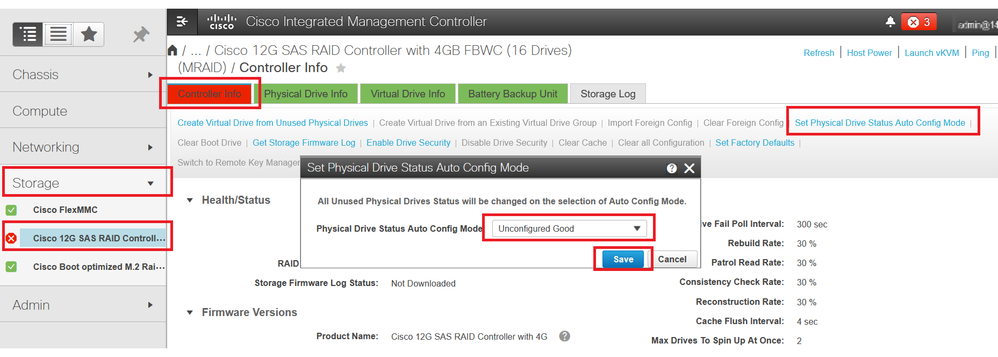
In UCSM and CIMC, specific RAID Controllers and firmware versions support an Auto-Configuration mode. Auto-Configuration automatically sets the state of newly inserted disks to whichever disk state is chosen. In UCSM, Auto-Configuration is deployed by a Storage Profile attached to the Service Profile associated with the server. Standalone C-Series servers allow Auto-Configuration to be directly set on the RAID Controller.
UCSM
Navigate to Storage > Storage Profiles > Create Storage Profile or edit a current one. Within the Auto Config Mode box, select Unconfigured Good > Ok as shown in the image.
CIMC
Navigate to Storage and select the appropriate RAID Controller. Navigate to Set Physical Drive Status Auto Config Mode > Unconfigured Good > Save as shown in the image.
Default Drive Mode for Disks
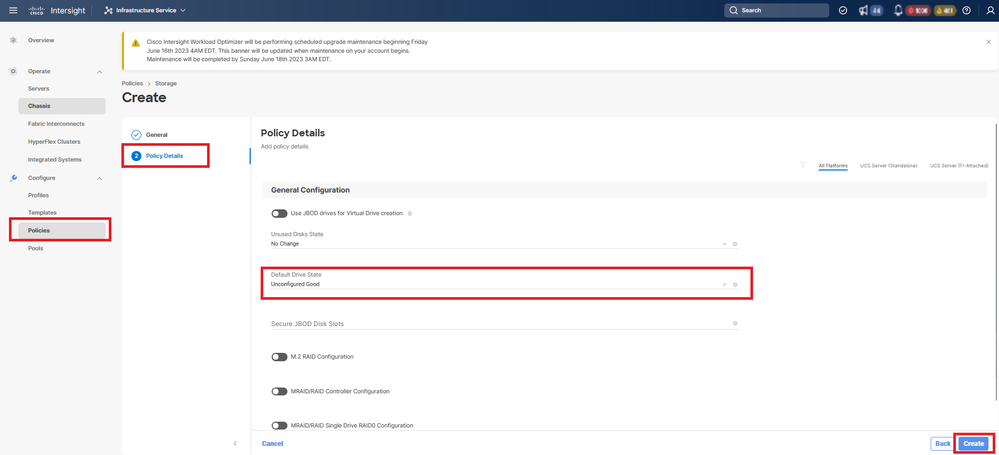
Cisco Intersight allows you to set the Default Drive Mode on certain RAID Controllers and firmware versions with a Storage Policy. The Default Drive Mode is defined in the Storage Policy and attached to a Server Profile. Whichever disk state is chosen in the Storage Policy is automatically set on newly inserted disks for that server.
Intersight
Navigate to Policies > Create Policy or edit a current one. Then navigate to Storage Policy > Policy Details > Default Drive State > Unconfigured Good > Create as shown in the image.
Related Information


 Feedback