Introduction
This document describes how to determine the correct certificate(s) for secure Lightweight Directory Access Protocol (LDAP).
Prerequisites
Requirements
There are no specific requirements for this document.
Components Used
This document is not restricted to specific software and hardware versions.
The information in this document was created from the devices in a specific lab environment. All of the devices used in this document started with a cleared (default) configuration. If your network is live, make sure that you understand the potential impact of any command.
Background Information
Secure LDAP requires that the Unified Computing System (UCS) domain have the correct certificate or certificate chain installed as a Trusted Point.
If an incorrect certificate (or chain) is set up, or if none exists, authentication fails.
To determine if there may be an issue with the certificate(s).
If you have problems with Secure LDAP, use LDAP debugging to check if the certificates are correct.
[username]
[password]
connect nxos      *(make sure we are on the primary)
debug ldap all
term mon
Next, open a second session and attempt to log in with your Secure LDAP credentials.
The session with debugging enabled logs the attempted login. On the logging session run the undebug command to halt further output.
undebug all
To determine if there is a potential issue with the certificate, look at the debugging output for these lines.
2018 Sep 25 10:10:29.144549 ldap: ldap_do_process_tls_resp: (user f-ucsapac-01) - ldap start TLS sent succesfully;         Calling ldap_install_tls
2018 Sep 25 10:10:29.666311 ldap: ldap_do_process_tls_resp: (user f-ucsapac-01) - TLS START failed
If TLS failed, a secure connection was unable to establish and authentication fails.
To determine which certificate/chain you should use.
Once you have determined that there was a failure to establish the secure connection, determine what the correct certificate(s) should be.
Use ethanlyzer to capture the communication and then extract the certificate (or chain) from the file.
In your debugging session run the command:
ethanalyzer local interface mgmt capture-filter "host <address of controller/load balancer>" limit-captured-frames 100 write volatile:ldap.pcap
Next, attempt another log in via with your credentials.
Once you no longer see any new output in the debugging session, kill the capture. Use (ctrl + c).
Transfer the packet capture from the Fabric Interconnect (FI) wth this command:
copy volatile:ldap.pcap tftp:
Once you have the ldap.pcap file, open the file in Wireshark and look for a packet that starts to initialize the TLS connection.
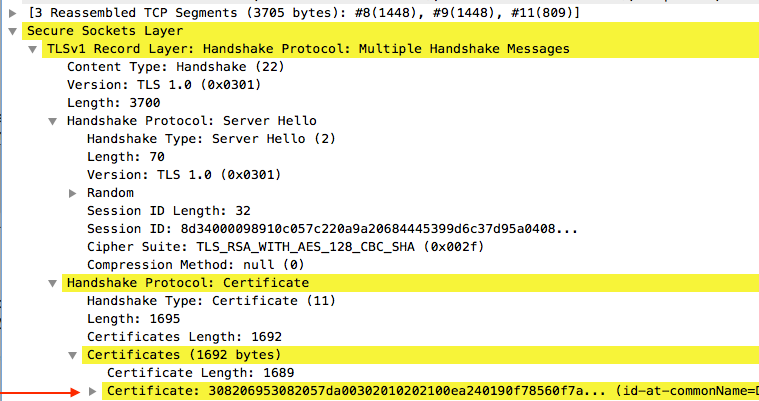
You can see a similar message in the Info section for the packet, as shown in the image:
Server Hello, Certificate, Certificate Request, Server Hello Done

Select this packet and expand it:
Secure Sockets Layer
-->TLSv? Record Layer: Handshake Protocol: Multiple Handshake Messages
---->Handshake Protocol: Certificate
------>Certificates (xxxx bytes)

Select the line titled Certificate.
Right click this line and select Export Packet Bytes and save the file as a .der file.
Open the certificate in Windows and navigate to Certificate Path tab.
This shows you the full path from Root certificate to the leaf (end host). Do the following for all of the nodes listed except for the leaf.
Select the node
-->Select 'View Certificate'
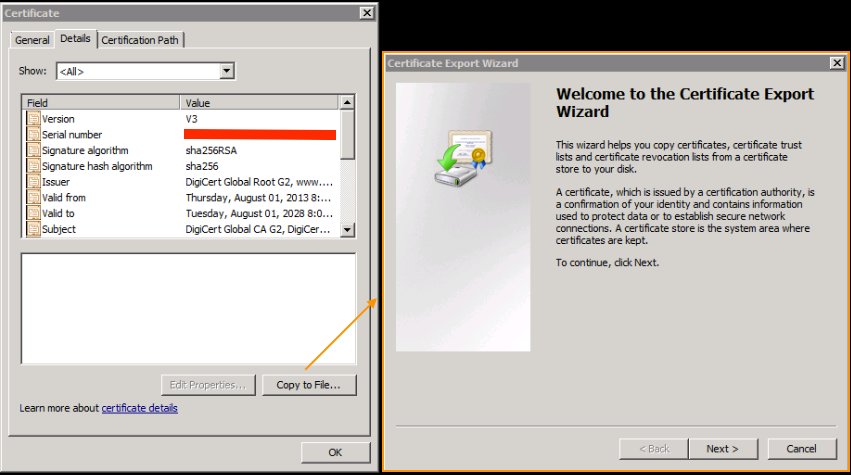
---->Select the 'Details' tab

Select the Copy to File option and follow the Certificate Export Wizard (ensure to use the Base-64 encoded format).
This generates a .cer file for each of the nodes in the list as you complete them.


Open these files in Notepad, Notepad++, Sublime, etc. to view the hashed certificate.
To generate the chain (if there is one), open a new document and paste in the last node's hashed certificate.
Work your way up the list pasting each hashed certificate, ending with the Root CA.
Paste either the Root CA (if there is no chain) or the entire chain that you have generated into the Trusted Point.
