Configure Virtual Machine on UCS Blade Server as SPAN Destination
Available Languages
Download Options
Bias-Free Language
The documentation set for this product strives to use bias-free language. For the purposes of this documentation set, bias-free is defined as language that does not imply discrimination based on age, disability, gender, racial identity, ethnic identity, sexual orientation, socioeconomic status, and intersectionality. Exceptions may be present in the documentation due to language that is hardcoded in the user interfaces of the product software, language used based on RFP documentation, or language that is used by a referenced third-party product. Learn more about how Cisco is using Inclusive Language.
Contents
Introduction
This document describes the steps to capture a traffic flow that is completely outside the Cisco Unified Computing System (UCS) and direct it to a Virtual Machine (VM) running a sniffer tool inside the UCS. The source and destination of the traffic being captured is outside the UCS. The capture can be initiated on a physical switch that is directly attached to the UCS or it could be a few hops away.
Prerequisites
Requirements
Cisco recommends that you have knowledge of these topics:
- UCS
- VMware ESX version 4.1 or later
- Encapsulated Remote Switch Port Analyzer (ERSPAN)
Components Used
The information in this document is based on these software and hardware versions:
- Cisco Catalyst 6503 running 12.2(18)ZYA3c
- Cisco UCS B series running 2.2(3e)
- VMWare ESXi 5.5 build 1331820
The information in this document was created from the devices in a specific lab environment. All of the devices used in this document started with a cleared (default) configuration. If your network is live, make sure that you understand the potential impact of any command.
Background Information
UCS does not have the Remote SPAN (RSPAN) feature to receive SPAN traffic from a connected switch and direct it to a local port. So the only way to accomplish this in a UCS environment is by using the Encapsulated RSPAN (ERSPAN) feature on a physical switch and sending the captured traffic to the VM using IP. In certain implementations, the VM running the sniffer tool cannot have an IP address. This document explains the configuration required when the sniffer VM has an IP address as well as the scenario without an IP address. The only limitation here is that the sniffer VM needs to be able to read the GRE/ERSPAN encapsulation from the traffic that's sent to it.
Configure
Network Diagram
This topology has been considered in this document:

PC attached to GigabitEthernet1/1 of the Catalyst 6500 is being monitored. The traffic on GigabitEthernet1/1 is captured and sent to the sniffer VM that runs inside the Cisco UCS on server 1. ERSPAN feature on the 6500 switch captures the traffic, encapsulates it using GRE and send it to the sniffer VM's IP address.
Sniffer VM with IP Address
Note: The steps described in this section can be also used in the scenario where the sniffer runs in a bare-metal server on a UCS blade instead of running on a VM.
These steps are required when the sniffer VM can have an IP address:
- Configure the sniffer VM inside the UCS environment with an IP address that is reachable from the 6500
- Run the sniffer tool inside the VM
- Configure an ERSPAN source session on the 6500 and send the captured traffic directly to the VM's IP address
The configuration steps on the 6500 switch:
CAT6K-01(config)#monitor session 1 type erspan-source
CAT6K-01(config-mon-erspan-src)#source interface gi1/1
CAT6K-01(config-mon-erspan-src)#destination
CAT6K-01(config-mon-erspan-src-dst)#ip address 192.0.2.2
CAT6K-01(config-mon-erspan-src-dst)#origin ip address 192.0.2.1
CAT6K-01(config-mon-erspan-src-dst)#erspan-id 1
CAT6K-01(config-mon-erspan-src-dst)#exit
CAT6K-01(config-mon-erspan-src)#no shut
CAT6K-01(config-mon-erspan-src)#end
In this example, the IP address of the sniffer VM is 192.0.2.2
Sniffer VM without IP Address
These steps are required when the sniffer VM cannot have an IP address:
- Configure the sniffer VM inside the UCS environment
- Run the sniffer tool inside the VM
- Create a second VM that can have an IP address in the same host and configure it with an IP address that is reachable from the 6500
- Configure the port-group on the VMWare vSwitch to be in the promiscuous mode
- Configure an ERSPAN source session on the 6500 and send the captured traffic to the IP address of the second VM
These steps show the configuration required on the VMWare ESX: Go to Step 2 directly if you already have a port-group configured.
1. Create a Virtual machine port-group and assign the two virtual machines to it
- Navigate to the Networking tab and click Add Networking under vSphere Standard Switch

- Create a port-group of type Virtual Machine
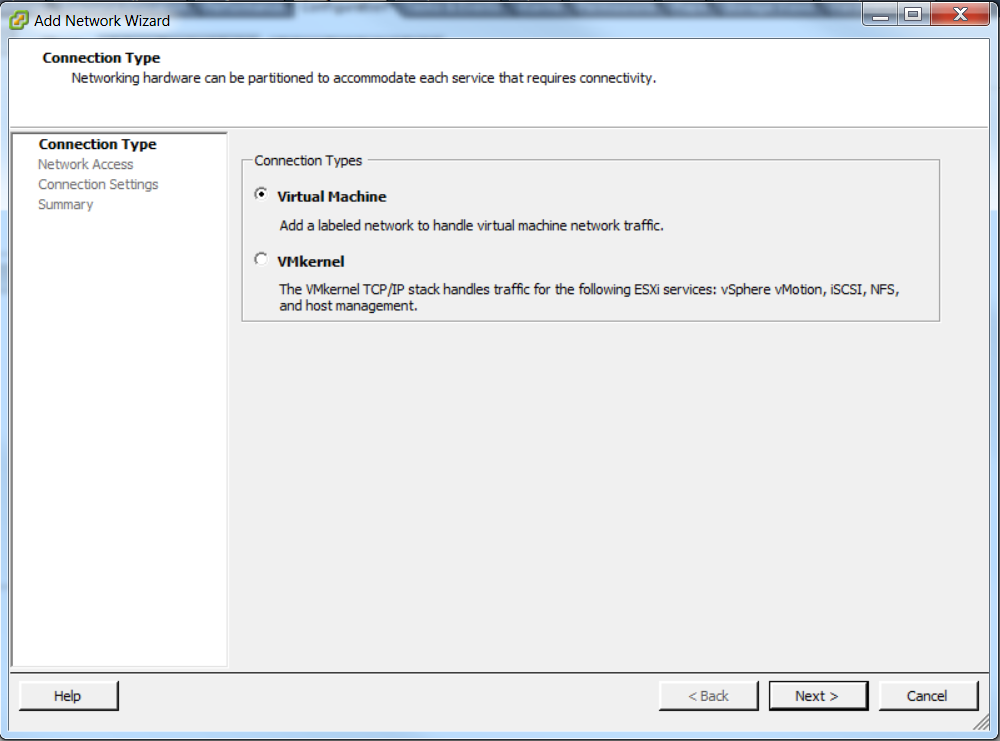
- Assign a physical interface (vmnic) to the port-group as shown in this image.
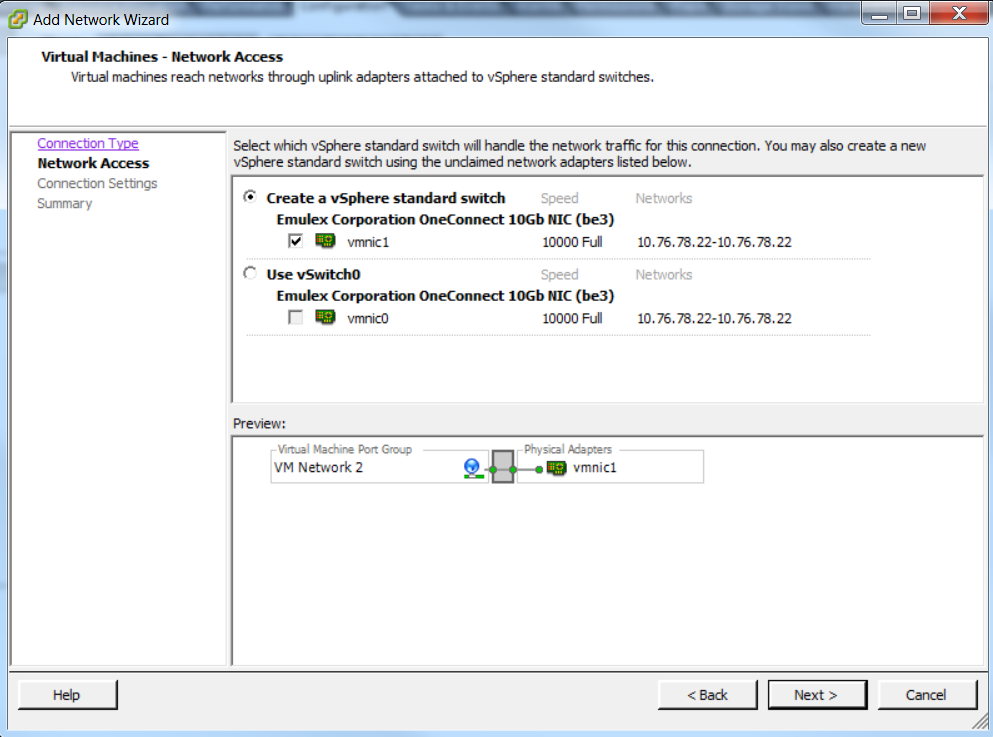
- Configure a name for the port-group and the add the relevant VLAN as shown in the image.
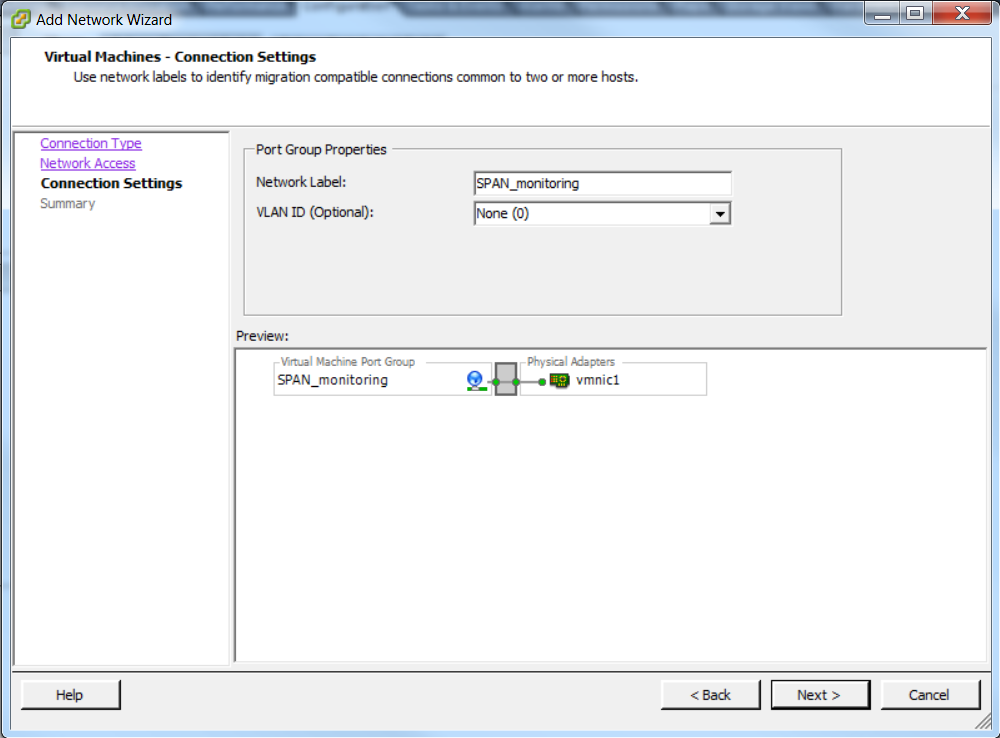
- Verify the configuration and click Finish as shown in the image.
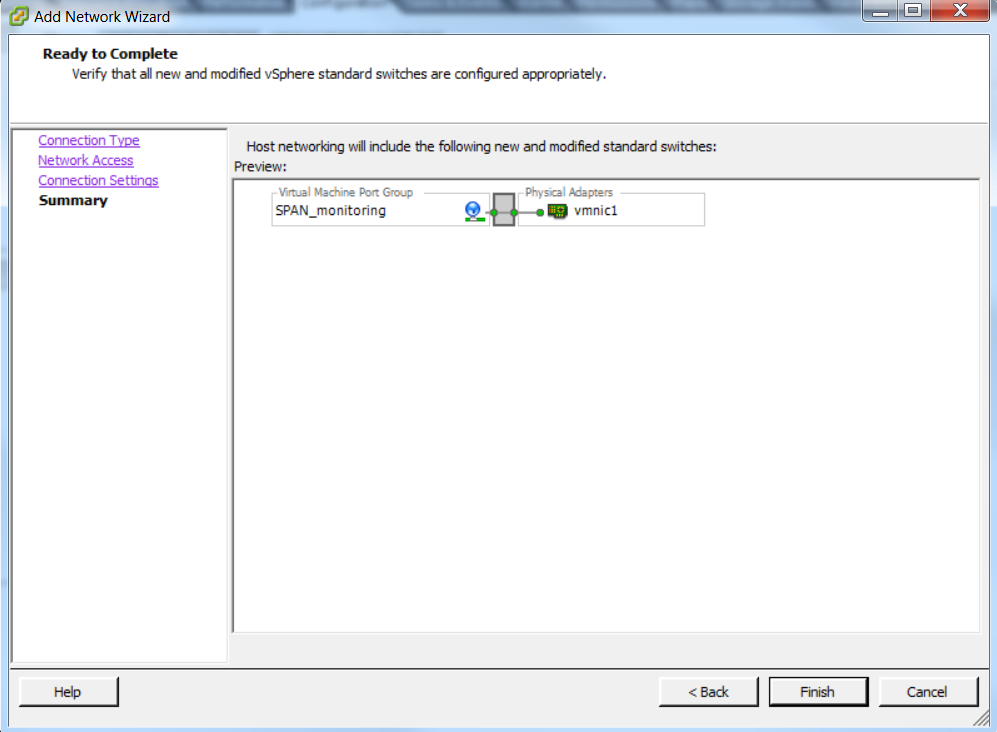
2. Configure the port-group to be in the promiscuous mode as shown in the image.
- The port-group must appear under the Networking tab now
- Click Properties

- Select the port-group and click Edit
- Go to the Security tab and change the Promiscuous mode setting to Accept as shown in this image

3. Assign the two virtual machines to the port-group from the virtual machine settings section.

4. The two virtual machines must appear in the port group under the Networking tab now.

In this example, VM with IP is the second VM that has an IP address and Sniffer VM is the VM with the sniffer tool without an IP address.
5. This shows the configuration steps on the 6500 switch:
CAT6K-01(config)#monitor session 1 type erspan-source
CAT6K-01(config-mon-erspan-src)#source interface gi1/1
CAT6K-01(config-mon-erspan-src)#destination
CAT6K-01(config-mon-erspan-src-dst)#ip address 192.0.2.3
CAT6K-01(config-mon-erspan-src-dst)#origin ip address 192.0.2.1
CAT6K-01(config-mon-erspan-src-dst)#erspan-id 1
CAT6K-01(config-mon-erspan-src-dst)#exit
CAT6K-01(config-mon-erspan-src)#no shut
CAT6K-01(config-mon-erspan-src)#end
In this example, the IP address of the second VM (VM with IP) is 192.0.2.3.
With this configuration, the 6500 encapsulates the captured packets and send it to the VM with the IP address. Promiscuous mode on the VMWare vSwitch enables the sniffer VM to see these packets as well.
Failure Scenario
This section describes a common failure scenario when using the Local SPAN feature on a physical switch instead of the ERSPAN feature. This topology is considered here:
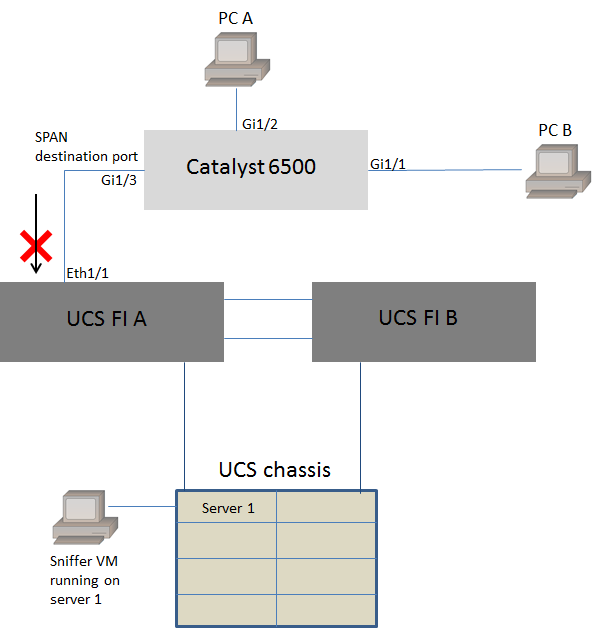
Traffic from PC A to PC B is monitored using the local SPAN feature. The destination of the SPAN traffic is directed to the port connected to the UCS Fabric Interconnect (FI).
The virtual machine with the sniffer tool runs inside the UCS on server 1.
This is the configuration on the 6500 switch:
CAT6K-01(config)#monitor session 1 source interface gigabitEthernet 1/1, gigabitEthernet 1/2
CAT6K-01(config)#monitor session 1 destination interface gigabitEthernet 1/3
All traffic flowing on ports Gig1/1 and Gig1/2 will be replicated on to port Gig1/3. The source and destination mac-addresses of these packets will be unknown to the UCS FI.
In the UCS Ethernet end host mode, the FI drops these unknown unicast packets.
In the UCS Ethernet switching mode, the FI learns the source MAC address on the port connected to the 6500 (Eth1/1) and then flood the packets downstream to the servers. This sequence of events happen:
- For ease of understanding, consider traffic going only between PC A (with mac-address aaaa.aaaa.aaaa) and PC B (with mac-address bbbb.bbbb.bbbb) on interfaces Gig1/1 and Gig1/2
- The first packet is from PC A to PC B and this is seen on the UCS FI Eth1/1
- The FI learns mac-address aaaa.aaaa.aaaa on Eth1/1
- The FI does not know the destination mac-address bbbb.bbbb.bbbb and floods the packet to all ports in the same VLAN
- The sniffer VM, in the same VLAN, also see this packet
- The next packet is from PC B to PC A
- When this hits Eth1/1, mac-address bbbb.bbbb.bbbb is learnt on Eth1/1
- The destination of the packet is for mac-address aaaa.aaaa.aaaa
- The FI drops this packet as mac-address aaaa.aaaa.aaaa is learnt on Eth1/1 and the packet was received on Eth1/1 itself
- Subsequent packets, either destined for mac-address aaaa.aaaa.aaaa or mac-address bbbb.bbbb.bbbb are dropped for the same reason
Verify
There is currently no verification procedure available for this configuration.
Troubleshoot
There is currently no specific troubleshooting information available for this configuration.
Related Information
Contributed by Cisco Engineers
- Shankar Prasath RCisco TAC Engineer
Contact Cisco
- Open a Support Case

- (Requires a Cisco Service Contract)
 Feedback