VM-FEX Configuration Example
Available Languages
Contents
Introduction
This document describes how to configure Virtual Machine Fabric Extender (VM-FEX) with the use of a method to extend the network fabric down to the Virtual Machines (VMs).
Prerequisites
Requirements
There are no specific requirements for this document.
Components Used
The information in this document is based on these software and hardware versions:
- PALO or Vasona Virtual Interface Card (VIC) (M81KR/M82KR, 1280, P81E if integrated with Unified Computing System Manager (UCSM))
- 2 Fabric Interconnects (FIs), 6100 or 6200 Series
- vCenter server
The information in this document was created from the devices in a specific lab environment. All of the devices used in this document started with a cleared (default) configuration. If your network is live, make sure that you understand the potential impact of any command.
Background Information
What is VM-FEX? VM-FEX (previously known as VN-link) is a method to extend the network fabric completely down to the VMs. With VM-FEX, the Fabric Interconnects handle switching for the ESXi host's VMs. UCSM utilizes the vCenter dVS Application Programming Interfaces (API) to this end. Therefore, VM-FEX shows as a dVS in the ESXi host.
There are many benefits to VM-FEX:
- Reduced CPU overhead on the ESX host
- Faster performance
- VMware DirectPath I/O with vMotion support
- Network management moved up to the FIs rather than on the ESXi host
- Visibility into vSphere with UCSM
Configure
- Integrate vCenter and UCSM.
Export the vCenter extension from UCSM and import it into vCenter.
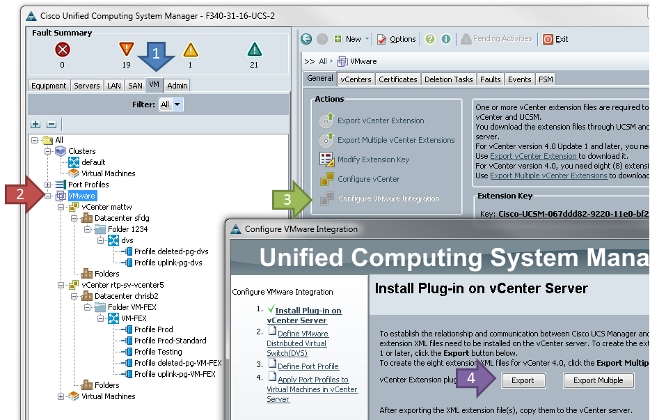
This creates the file cisco_nexus_1000v_extension.xml. This is the same name as the vCenter extension for the Nexus 1000V. In order to import it, complete the same steps.
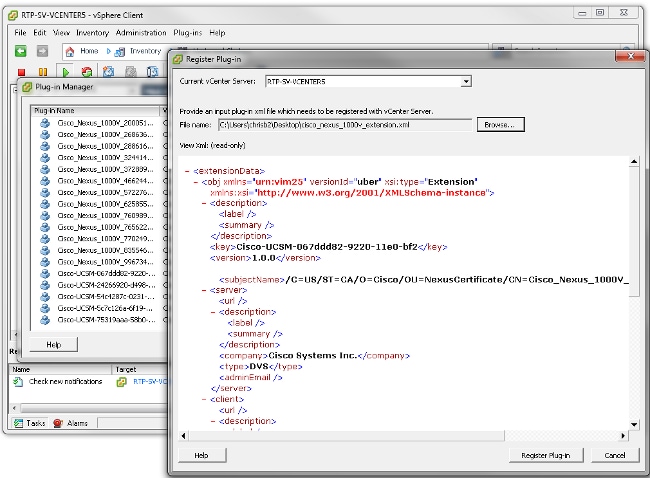
Once you have imported the key, continue with the vCenter integration wizard.
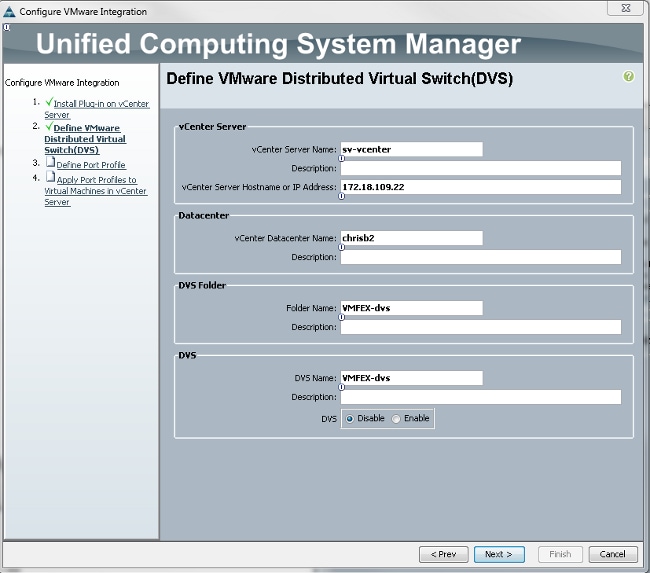
Complete the information as required. The vCenter and the IP address and vCenter Datacenter Name fields must match. The other fields can be named as desired.
Next, create a Port Profile for the VMs to connect.
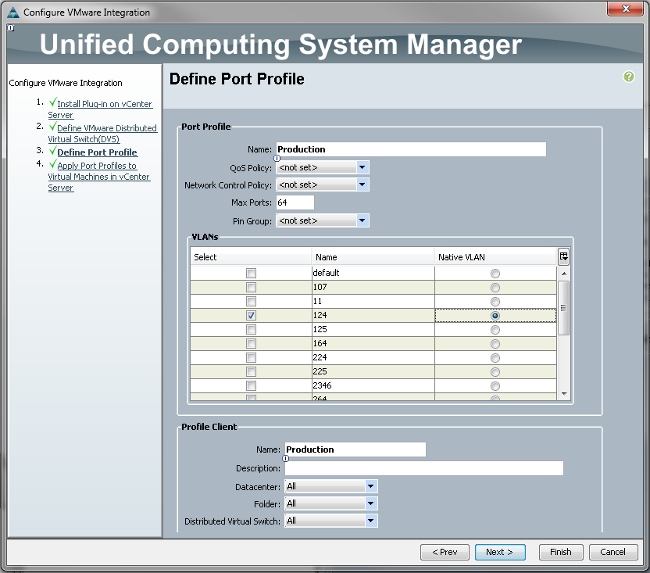
It is necessary to give a name to both the Port Profile and the Profile Client. Port Profiles contain all of the important switching information (VLANs and policies), but a Profile Client limits which dVSs have access to the Port Profile.
When finished, complete the wizard. It creates a dVS in vCenter.
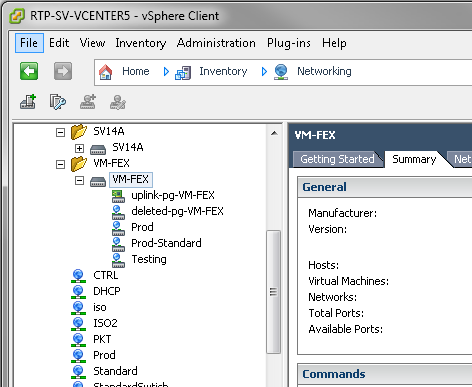
- Add a host to the dVS.
The host to be added to the dVS must have a Dynamic vNIC Connection Policy defined. This determines the amount of Network Interface Controllers (NICs) that the host can support on the dVS.
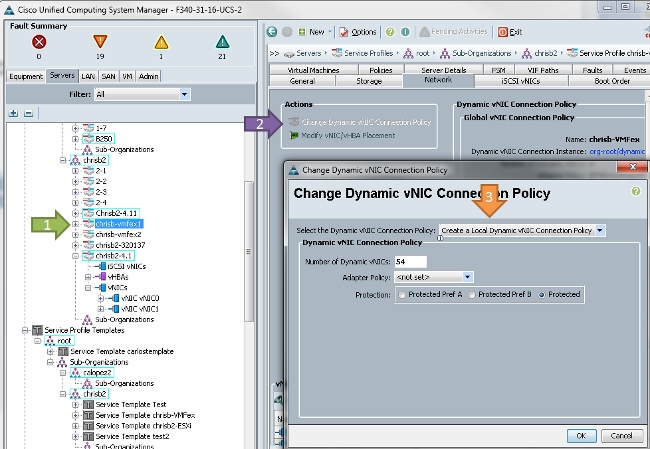
In order to change the policy, a reboot is required. Once you have configured this policy, you can install the Virtual Ethernet Module (VEM).
Similar to the Nexus 1000V, you must install a VEM onto the host where you wish to add to the VM-FEX dVS. You can either do this manually or with the VMware vCenter Update Manager (VUM). If you want to install it manually, you can find the software on the UCS homepage. The server must be in maintenance mode before the VEM is installed on the host.
The VIB is included in the UCS B-series Driver bundle for the version of code that you run. Download the proper VIB and enter one of these commands to install it:
Version 4.1 or earlier:
esxupdate -b path_to_vib_file update
Version 5.0:
esxcli software vib install -v path_to_vib_file
Before installation, ensure that the Hypervisor runs an enic driver version that is compatible with the same UCSM release. Refer to the compatibility matrix to find out the correct driver versions for a specific UCSM release. If the driver does not support VM-FEX, you receive this error message during installation of the VEM:
[InstallationError]
Error in running ['/etc/init.d/n1k-vem', 'stop', 'upgrade']:
Return code: 2
Output: /etc/init.d/n1k-vem: .: line 26: can't open
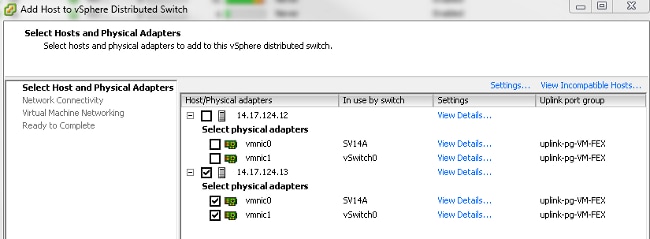
'/usr/lib/ext/cisco/nexus/vem-v132/shell/vssnet-functions'- Now, add the host to the dVS with the Add Host wizard in vCenter. Right-click the dVS and choose Add Host.
Add two NICs (one per fabric) to the dVS as uplinks and place them in the uplink port-group which was automatically created. This is for vSphere, as traffic does not actually pass over these uplinks.
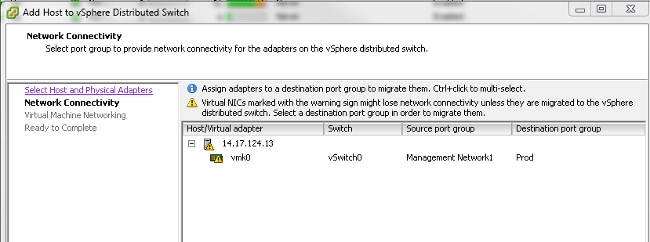
Ensure that you move over the VMkernel, or management access to the box is lost.
On the next screen, move over any VMs on that host, if desired.
Now you have finished the configuration for VM-FEX. You now see vEthernet interfaces in the nxos side of the FI for the VMs, and you can see the VMs in UCSM.

Verify
There is currently no verification procedure available for this configuration.
Troubleshoot
There is currently no specific troubleshooting information available for this configuration.
Related Information
Revision History
| Revision | Publish Date | Comments |
|---|---|---|
1.0 |
22-Nov-2013 |
Initial Release |
Contact Cisco
- Open a Support Case

- (Requires a Cisco Service Contract)


 Feedback